
There’s something so magical about a dessert that requires absolutely no oven time, isn’t there? Especially when that dessert tastes like a tropical getaway and looks like a million bucks—hence the name: Millionaire Pie. If you’ve never had this chilled, creamy, fruity dream before, you are in for a treat.
I’ve been making variations of this pie for years, and it always ends up being the star of the dessert table. It’s sweet, fluffy, a little tangy from the pineapple and lemon, and just loaded with texture from the coconut, pecans, and juicy cherries. It’s one of those retro-style recipes that reminds me of potlucks and summer family reunions. You know the ones—where there’s always that one dessert that disappears before dinner even hits the plate? Yep, this is that dessert.
One of my favorite things about this pie is just how simple it is to throw together. It uses everyday ingredients and comes together in minutes (besides the chilling part, of course). You can make it ahead, keep it in the fridge, and pull it out when you’re ready to impress. Whether it’s for a holiday, a birthday, or just because—it never fails.
Alright, let’s get started with the first steps of making this luscious Millionaire Pie. You’ll want to make sure your pineapple is really well-drained and your cherries are patted dry so that your filling stays nice and creamy without turning watery.

Ingredients You’ll Need:
-
20 ounces canned pineapple, drained very well
-
1 (14-ounce) can sweetened condensed milk
-
¾ cup sweetened coconut flakes
-
¾ cup chopped maraschino cherries, patted dry
-
½ cup chopped pecans
-
¼ cup fresh-squeezed lemon juice
-
2 tablespoons maraschino cherry juice
-
1 (8-ounce) tub whipped topping (like Cool Whip), divided
-
1 (9-inch) graham cracker crust
STEPS: Getting Started with the Filling
Step 1: Prep Your Fruit and Nuts
Start by draining the canned pineapple really well—this is crucial so your filling doesn’t get runny. I usually pour it into a mesh strainer and let it sit while I prep everything else, then press it gently with a spatula to remove any extra moisture.
Next, chop your maraschino cherries and pat them dry with paper towels. Again, moisture is the enemy here. You want all the color and flavor, just not the syrup.
Go ahead and give your pecans a rough chop, and if you have time, toast them in a dry skillet for a couple of minutes. This adds such a rich, nutty flavor that really complements the sweetness of the filling. It’s a small step that makes a big difference.
Step 2: Mix It All Together
Grab a large mixing bowl and add your drained pineapple, sweetened condensed milk, coconut flakes, chopped cherries, and pecans.
Pour in the lemon juice and cherry juice—this gives the filling that little zing that keeps it from being overly sweet.
Give everything a good stir until it’s evenly combined. You should see all that beautiful color and texture coming together—this is where you know it’s going to be good.
Step 3: Fold in the Whipped Topping
Now take half of your whipped topping and gently fold it into the mixture. This helps lighten the filling and gives it that fluffy, creamy texture we all love. Don’t stir too aggressively here—use a spatula and fold gently until the whipped topping is fully incorporated.
At this point, the filling should look airy, glossy, and almost mousse-like. And yes, it’s totally okay if you sneak a little taste. (I always do.)
Assembling & Chilling to Perfection
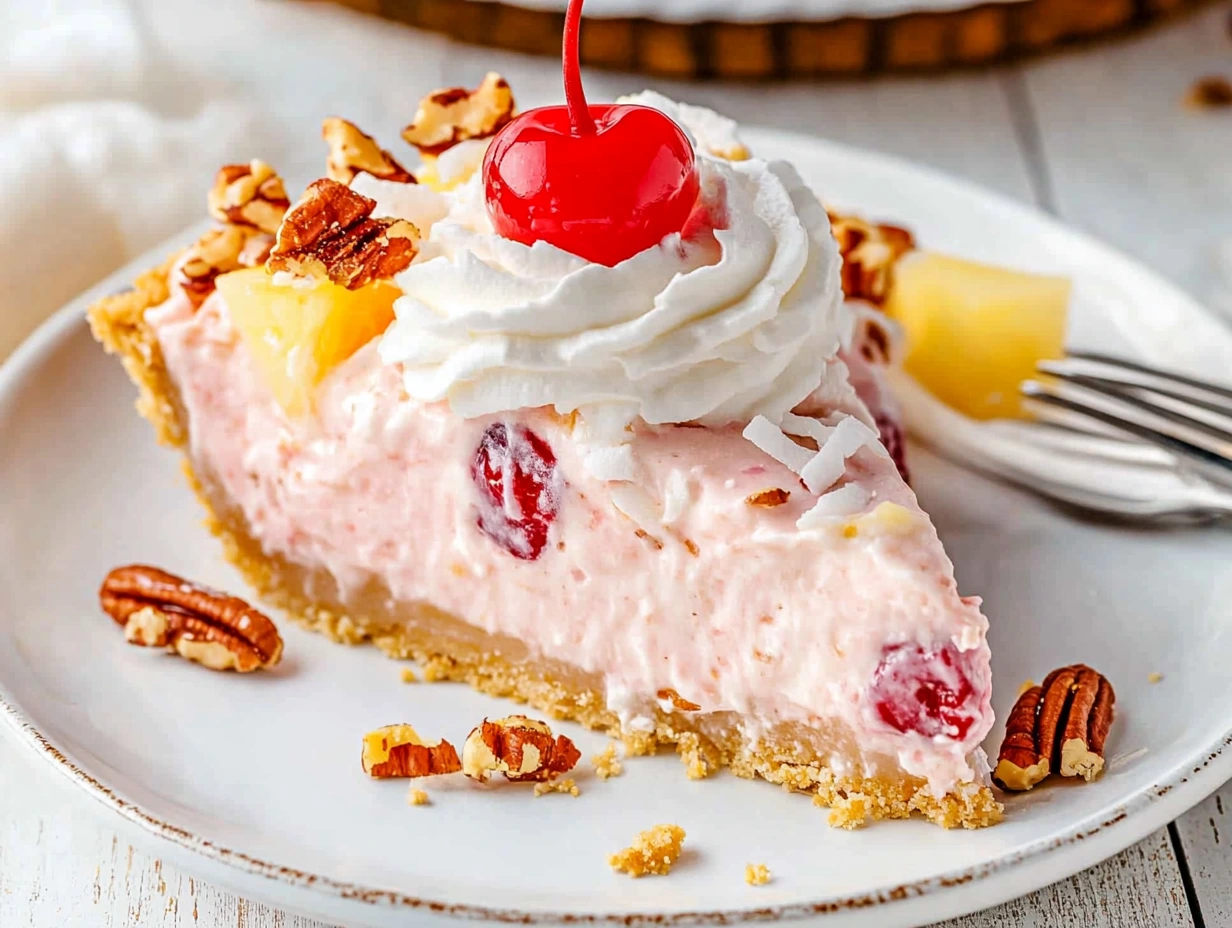
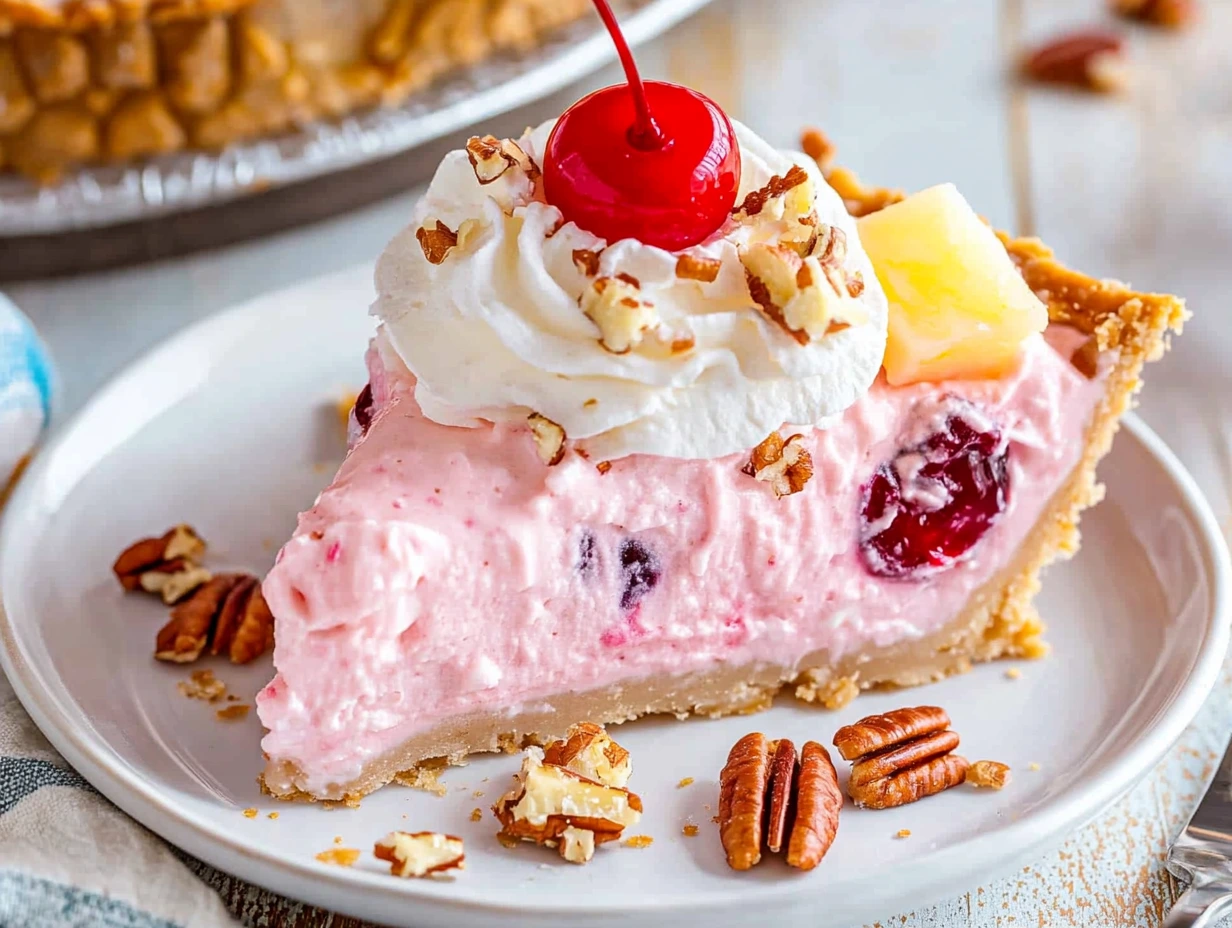
Now that we’ve got that creamy, fruit-packed filling all whipped up and ready to go, it’s time to bring it all together into one dreamy, no-bake masterpiece. This is the part where your Millionaire Pie really starts to look like, well, a million bucks. Whether you’re serving it at a party or just enjoying a slice for yourself on a warm evening, this pie is sure to make people smile with every bite.
There’s no need for baking, complicated layers, or fancy techniques here. Just a good graham cracker crust, some chill time in the fridge, and a little whipped topping flair before serving. And let’s be honest—anything that looks this gorgeous but takes so little effort is an absolute win in my book.
Let’s get this pie finished up and ready to chill!
STEPS: Assemble and Chill
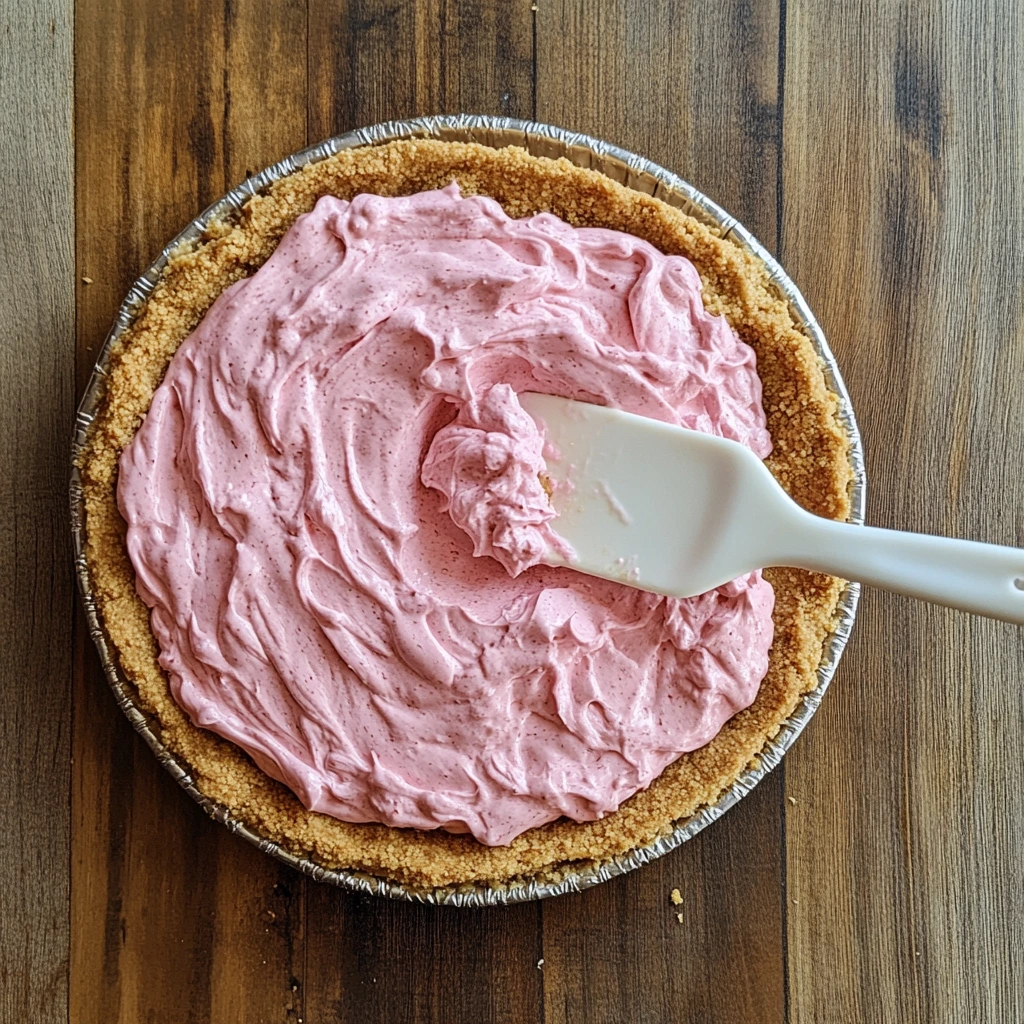
Step 4: Spoon the Filling Into the Crust
Grab your 9-inch graham cracker crust—store-bought works just fine, but if you love making your own from scratch, go for it! Just make sure it’s completely cooled if it’s homemade.
Spoon that luscious filling into the crust, piling it high and using a spatula to gently spread it out evenly all the way to the edges. You’ll want to smooth the top so it sets nicely and looks picture-perfect later when you slice into it.
It’s going to be full to the brim with all that creamy goodness, and that’s exactly what we want. Don’t press down too hard—keep the filling light and fluffy as you shape it.
Step 5: Chill Until Set
This pie needs to chill in the fridge for at least four hours, but honestly? Overnight is best. It gives all those flavors time to come together, and the texture firms up just right for clean slices.
Cover the pie loosely with plastic wrap or foil to keep it fresh, then pop it in the fridge. This is the hardest part—waiting!
Serving Tips and Variations
Once your pie is nice and chilled, it’s time for the finishing touches and maybe a few personal flourishes to make it your own.
Top It Off Just Before Serving
Right before serving, use the remaining whipped topping to add a dollop to each slice or pipe a decorative border around the edges. If you’re feeling fancy, a piping bag with a star tip works beautifully here.
To give it a little extra wow factor, sprinkle on some additional toasted pecans, chopped maraschino cherries, or a light dusting of coconut flakes. These toppings not only add flavor and texture—they also make the pie look irresistible.
Fun Twists to Try
Want to switch it up a bit? Here are a few easy variations you can try:
-
Tropical Vibes: Add a handful of chopped mango or banana for even more island-inspired flavor.
-
Nut-Free Version: Skip the pecans and add a little extra coconut or crushed graham cracker crumbs for texture.
-
Mini Pies: Spoon the filling into mini graham cracker crusts for single-serve treats—great for parties!
-
Chocolate Drizzle: A little chocolate syrup drizzled on top just before serving adds a decadent twist.
The beauty of Millionaire Pie is how adaptable it is. You can play with the flavors and textures to suit your taste or what you have on hand, and it always comes out tasting rich, creamy, and totally satisfying.
FAQs & Final Thoughts
You’ve made it to the final part of this dreamy no-bake Millionaire Pie recipe! At this point, your pie should be chilling in the fridge, and your kitchen probably smells like sweet pineapple and toasted coconut—basically like a summer vacation in dessert form.
Before we wrap things up, I wanted to take a few minutes to answer some of the most common questions people ask about this recipe. Whether you’re a first-timer or a longtime fan of this classic pie, these tips can help you avoid common pitfalls and even put your own spin on it.
FAQs About Millionaire Pie
1. Can I make this pie ahead of time?
Absolutely! In fact, it’s better if you do. Making Millionaire Pie a day ahead allows all the flavors to meld together and gives the filling enough time to firm up. Just keep it refrigerated until you’re ready to serve.
2. Can I freeze Millionaire Pie?
Yes, you can! Wrap it tightly in plastic wrap and foil and freeze for up to 1 month. When you’re ready to enjoy it, transfer it to the fridge and let it thaw overnight. Keep in mind the texture may soften slightly, but it still tastes fantastic.
3. What if I don’t have fresh lemon juice?
Bottled lemon juice will work in a pinch, though I do recommend fresh if you can get it. The fresh juice adds a nice brightness that balances the sweetness of the pie.
4. Can I use homemade whipped cream instead of Cool Whip?
Yes! If you prefer to use homemade whipped cream, just make sure it’s whipped to stiff peaks so it holds its shape. Keep in mind that homemade whipped cream may not be quite as stable over time, so it’s best to serve the pie within a day or two.
5. Is there a nut-free version of this pie?
Definitely. You can leave out the pecans entirely or swap them for something crunchy like crushed graham crackers or even sunflower seeds if you’re not allergic.
6. Why is my filling runny?
This usually happens if the pineapple wasn’t drained well or if the cherries were too wet. Make sure both are patted dry thoroughly. Also, be sure to chill the pie long enough so it sets properly.
7. Can I use a different type of crust?
Of course! A shortbread crust or even a vanilla wafer crust would work beautifully with this recipe. You could also use a chocolate cookie crust for a fun twist.
Final Thoughts: A Slice of Sweet Simplicity
Millionaire Pie is one of those classic, crowd-pleasing desserts that checks all the boxes: no-bake, easy to make, full of flavor, and totally stunning when served. Whether you’re making it for a summer barbecue, a potluck, or just a little treat for yourself, it always brings a bit of joy to the table.
Personally, I love how versatile it is. Some days I stick with the classic version, and other times I’ll get creative with toppings or swap out ingredients based on what I have in the pantry. No matter how you serve it, this pie never disappoints.
Print
Millionaire Pie
- Author: Sophia
Description
A luscious, no-bake dessert that brings together tropical pineapple, sweet coconut, bright cherries and crunchy pecans in a creamy whipped filling nestled in a buttery graham cracker crust. Perfectly chilled, it delivers layers of flavor and texture in every slice.
Ingredients
20 ounces canned pineapple, drained very well
14-ounce can sweetened condensed milk
¾ cup sweetened coconut flakes
¾ cup chopped maraschino cherries, patted dry
½ cup chopped pecans
¼ cup fresh-squeezed lemon juice
2 tablespoons maraschino cherry juice
8-ounce tub whipped topping (Cool Whip), divided
1 (9-inch) graham cracker crust
Instructions
In a large bowl combine the drained pineapple, sweetened condensed milk, coconut flakes, chopped maraschino cherries, pecans, fresh lemon juice and cherry juice, stirring until everything is evenly incorporated.
Gently fold half of the whipped topping into the mixture until the filling is light and creamy.
Spoon the filling into the graham cracker crust, spreading it to fill the edges and smoothing the surface with a spatula.
Cover the pie and refrigerate for at least four hours or overnight to allow the flavors to meld and the filling to set.
When ready to serve, top each slice with dollops of the remaining whipped topping or pipe decorative swirls around the edge.
Notes
Chilling the pie overnight enhances the creaminess and makes slicing cleaner.
For a festive presentation, sprinkle extra coconut flakes, chopped cherries or toasted pecans over the top just before serving.
Toasting the pecans in a dry skillet for two to three minutes brings out their nutty aroma and adds extra depth of flavor.


