
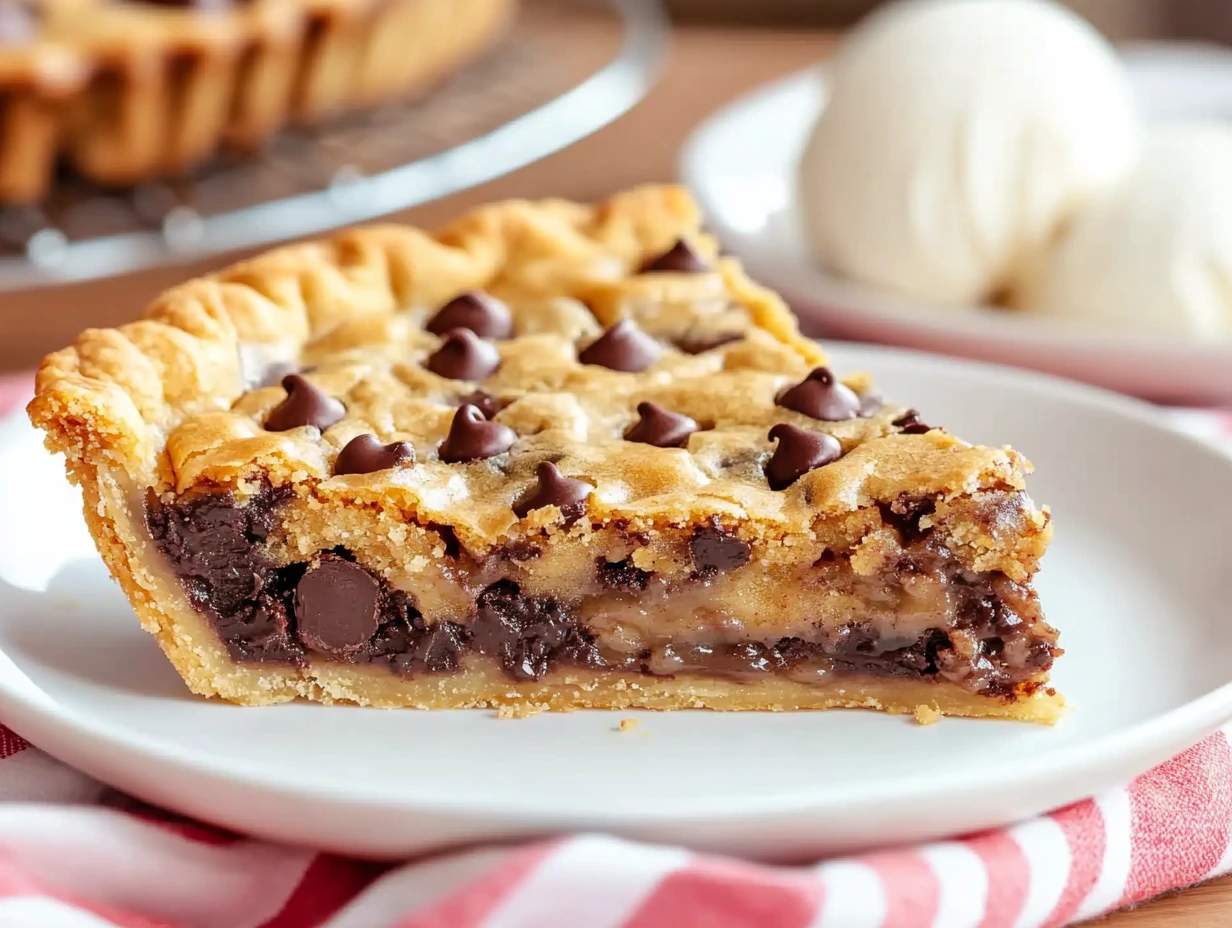
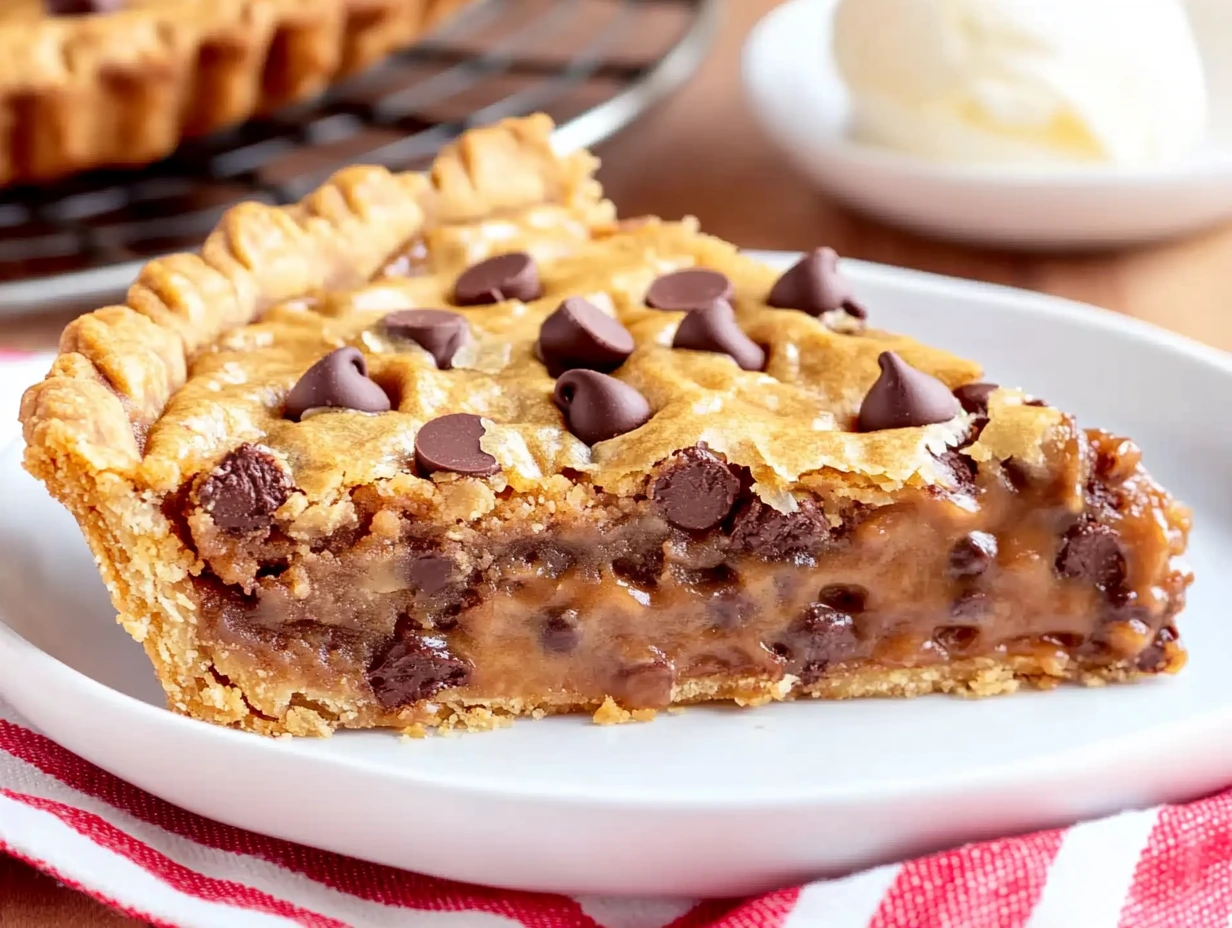
There’s something about the smell of chocolate chip cookies baking that instantly transports me back to childhood. But when you take that classic cookie flavor and tuck it into a buttery pie crust? Oh my—now that’s a next-level dessert experience. This Tollhouse Cookie Pie is everything you love about warm, gooey cookies with a flaky, buttery twist. And trust me, once you serve it warm with a scoop of vanilla ice cream on top, you’ll understand why it’s always a hit around here.
I first made this cookie pie for a last-minute family dinner when I didn’t have time to fuss with a batch of cookies. I had a refrigerated pie crust in the fridge, a bag of chocolate chips in the pantry, and just enough butter left to pull it all together. The result? A dessert that disappeared faster than any cookie tray I’ve ever served. It’s now my go-to for potlucks, holiday gatherings, or just whenever we need a little sweet comfort.
Why You’ll Love This Recipe
This Tollhouse Cookie Pie hits the sweet spot between rustic and indulgent. The inside is rich and gooey, the top bakes up golden and crisp, and that crust gives every bite a little extra buttery flake. It’s also super simple to pull together—no chilling dough or scooping individual cookies. Just one bowl, one crust, and one incredible dessert.
Alright, let’s jump in and get started with the recipe!

Ingredients You’ll Need
-
1 refrigerated pie crust, thawed
-
¾ cup (1½ sticks) salted butter, softened to room temperature
-
½ cup granulated sugar
-
½ cup light brown sugar, packed
-
2 large eggs
-
1 teaspoon vanilla extract
-
½ cup all-purpose flour
-
1½ cups Tollhouse semi-sweet chocolate chips
-
¾ cup chopped walnuts (optional)
STEP 1: PREHEAT AND PREP YOUR PIE CRUST
Start by preheating your oven to 325°F. You’ll want to let your pie crust come to room temperature so it’s easier to work with—no cracking or tearing as you shape it into the dish.
Once it’s pliable, unroll the pie crust and gently press it into a 9-inch pie plate. Crimp the edges for a finished look. This step doesn’t have to be perfect—rustic works just fine! Set it aside while you make the filling.
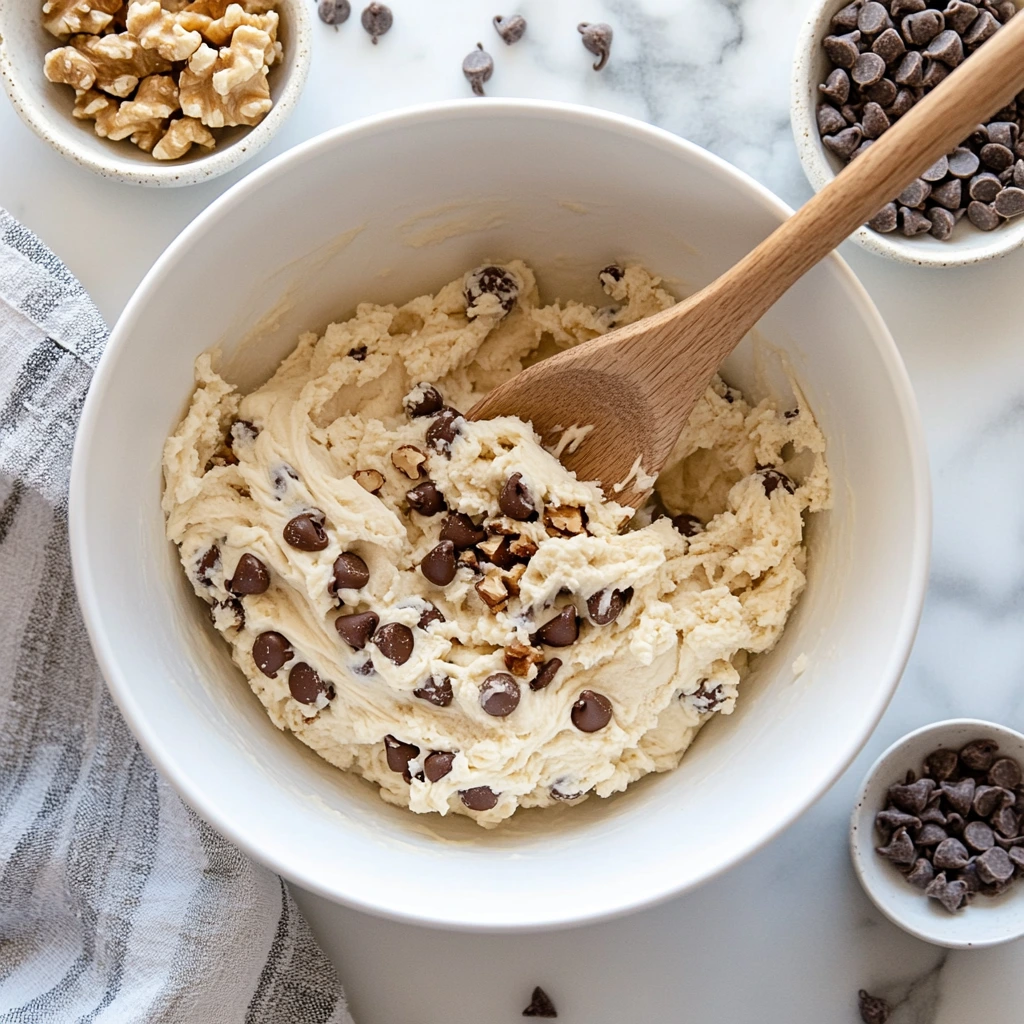
STEP 2: CREAM THE BUTTER AND SUGARS
In a large mixing bowl (or the bowl of your stand mixer with the paddle attachment), cream together ¾ cup softened salted butter, ½ cup granulated sugar, and ½ cup packed light brown sugar.
This should take about two minutes on medium speed. You’re looking for a light and fluffy texture—this step sets the foundation for that signature chewy middle.
STEP 3: ADD THE EGGS AND VANILLA
Crack in the two eggs and pour in 1 teaspoon of vanilla extract. Mix everything together until well combined. You’ll see the mixture smooth out and become slightly glossy. That’s exactly what you want—it means the eggs are fully incorporated and ready to help bind your filling.
STEP 4: MIX IN THE FLOUR
Sprinkle ½ cup of all-purpose flour into the bowl. Mix gently, just until there are no more visible streaks of flour. Be sure to scrape down the sides of the bowl as needed to make sure everything is evenly combined.
Over-mixing here can make the filling a bit tough, so just mix until combined and stop there.
STEP 5: FOLD IN THE GOOD STUFF
Now for the best part: chocolate chips and nuts. Stir in 1½ cups of Tollhouse semi-sweet chocolate chips, and if you’re using them, add ¾ cup of chopped walnuts. The chips will melt into gooey pockets while the nuts give a little crunch that pairs perfectly with the soft center.
If you’re baking for someone who doesn’t love nuts (or if allergies are a concern), feel free to leave them out. The pie is still incredibly decadent without them.
How to Bake the Perfect Tollhouse Cookie Pie (Plus Pro Tips!)
Now that your filling is all mixed up and your crust is waiting patiently in the pie dish, it’s time to bring this gooey masterpiece to life. This is where the magic happens—those chocolate chips melt into luscious pockets, the edges crisp up beautifully, and the center stays soft and rich.
This pie smells so incredible while it bakes that I almost always get someone wandering into the kitchen asking, “What’s that smell, and when is it ready?” Trust me, you’ll be counting down the minutes until you can dig in.
Let’s get back to it and finish this pie the right way!
STEP 6: SPOON THE FILLING INTO THE CRUST
Grab that prepared pie crust and scoop the cookie dough mixture into it. Use a spatula or the back of a spoon to spread the filling evenly across the crust. Don’t forget to press it gently into the edges so there are no empty spots—it’ll bake more evenly that way.
Try to smooth out the top just a bit. It doesn’t have to be perfectly flat, but this helps the pie bake up with a nice even surface and gives those top chocolate chips a chance to shine.
STEP 7: BAKE LOW AND SLOW
Place the pie on the center rack of your preheated oven (325°F). Bake it uncovered for the first 20 minutes—this allows the top to set and start to turn a lovely golden brown.
After 20 minutes, tent the pie loosely with aluminum foil. This is key to preventing over-browning on top while the middle continues to cook through. You don’t want to skip this step!
Let the pie bake for a total of 55 to 65 minutes. It’s done when the center is set and a toothpick inserted about 2 inches from the edge comes out mostly clean. You want a little gooeyness—it is a cookie pie after all.
STEP 8: COOL BEFORE SERVING
This is the hardest part, especially if your kitchen now smells like heaven: let the pie rest on a wire rack for at least 15 minutes before slicing. This helps the filling firm up just enough so that it doesn’t fall apart when you cut into it.
If you can wait even longer (I know, I know), the texture becomes even better after about 30 minutes. Still warm, still gooey, but easier to serve.
Bonus Step: Add Extra Chocolate Chips on Top
If you want that bakery-style finish, here’s a quick trick: as soon as the pie comes out of the oven, press a small handful of chocolate chips into the top. They’ll soften from the residual heat and look extra melty and irresistible. It’s a simple touch that makes a big visual impact.
Tips for the Best Tollhouse Cookie Pie
Here are a few of my go-to tips that make this recipe foolproof every single time:
-
Use room temperature butter. This helps the butter cream properly with the sugars and creates that soft, fluffy texture that makes the pie so satisfying.
-
Avoid over-mixing the flour. Once you add the flour, go easy. Mixing just until combined keeps the filling soft and tender.
-
Tent with foil at the right time. Don’t wait too long—after about 20 minutes is perfect. This keeps the top from turning too dark while the inside continues baking.
-
Try it with ice cream. Seriously, this pie was made to be served warm with a big scoop of vanilla ice cream. The contrast of warm and cold is just too good.
-
Refrigerate for cleaner slices. If you’re serving the pie the next day or want perfect slices for a party, pop it in the fridge overnight. It firms up beautifully and still tastes amazing.
Optional Variations to Make It Your Own
This Tollhouse Cookie Pie is pretty fabulous as is, but you can totally customize it depending on what you have in the pantry or who you’re serving. Here are a few fun ideas:
-
Swap the chocolate chips. Try dark chocolate chunks, mini chips, or even white chocolate chips for a twist.
-
Add a top crust. Want to turn it into a true pie-pie? Use a second refrigerated crust to make a lattice or full top. Brush with a simple egg wash and sprinkle with coarse sugar for a bakery finish.
-
Leave out the nuts. Not everyone loves walnuts, and that’s totally fine. The pie is rich and flavorful enough without them.
-
Go gluten-free. Use a gluten-free pie crust and swap the flour for a 1:1 gluten-free baking mix. It works really well in this recipe.
Tollhouse Cookie Pie FAQ + Final Thoughts
Before you slice into that perfectly baked pie, let’s talk through a few of the most common questions that pop up when making this dessert. Whether it’s your first time baking it or your fifth, these answers can help you troubleshoot, plan ahead, or just feel more confident heading into the kitchen.
Frequently Asked Questions
1. Can I make Tollhouse Cookie Pie ahead of time?
Absolutely! This pie actually gets better after a little rest. You can bake it a day ahead and store it covered at room temperature or in the fridge. If chilled, just warm individual slices in the microwave for about 10–15 seconds before serving.
2. How should I store leftovers?
Leftovers can be stored at room temperature for up to 2 days, or in the refrigerator for up to 4–5 days. Just cover the pie tightly with plastic wrap or store in an airtight container to keep it from drying out.
3. Can I freeze this pie?
Yes, this pie freezes beautifully. Wrap it tightly in plastic wrap and then in foil, and freeze for up to 2 months. Thaw overnight in the refrigerator and warm slices as needed.
4. Do I have to use a store-bought crust?
Not at all! If you have a favorite homemade pie crust recipe, feel free to use it. Just make sure it’s rolled to fit a standard 9-inch pie plate.
5. What can I use instead of walnuts?
You can skip the nuts entirely, or try chopped pecans for a different flavor. If you’re avoiding nuts altogether, you might consider tossing in some shredded coconut or toffee bits for a fun twist.
6. How do I know when the pie is fully baked?
Look for a golden brown top and gently set center. A toothpick inserted about 2 inches from the edge (not the center) should come out mostly clean, with just a few moist crumbs attached. The center will continue to firm up as it cools.
7. Can I make this pie without eggs?
Eggs help bind the filling and give it structure, so they’re pretty important here. However, if you’re experienced with egg substitutes, something like a flax egg or a commercial egg replacer might work in a pinch—though the texture will be slightly different.
Final Thoughts: This Pie Deserves a Spot in Your Dessert Rotation
There’s just something timeless about this Tollhouse Cookie Pie. It’s the kind of dessert that brings everyone to the table a little faster, encourages second helpings, and somehow manages to feel both nostalgic and new every time you make it.
Whether you’re baking it for a casual Sunday dinner, a holiday gathering, or just because you want something sweet and cozy, this pie is up to the task. And the best part? It’s easy. No chilling, no fuss—just a handful of pantry staples and a little baking magic.
If you give this recipe a try, I’d love to hear how it turns out! Let me know if you made any fun tweaks, if you added the optional top crust, or if you tried it with a scoop of something wild like caramel ice cream. Drop a comment, share your photos, and tell me all about your version of this sweet favorite.
Print
Tollhouse Cookie Pie
- Author: Sophia
Description
This rich and gooey cookie pie combines the buttery flakiness of a pie crust with the classic flavors of a chocolate chip cookie. Serve warm with a scoop of vanilla ice cream for an extra-decadent treat.
Ingredients
1 refrigerated pie crust, thawed
¾ cup (1½ sticks) salted butter, softened to room temperature
½ cup granulated sugar
½ cup light brown sugar, packed
2 large eggs
1 teaspoon vanilla extract
½ cup all-purpose flour
1½ cups Tollhouse semi-sweet chocolate chips
¾ cup chopped walnuts (optional)
Instructions
Preheat the oven to 325°F and fit the thawed pie crust into a 9-inch pie plate, crimping the edges evenly.
In a large bowl or the bowl of a stand mixer with the paddle attachment, cream the softened butter with both sugars until light and fluffy, about two minutes.
Add the eggs and vanilla extract to the bowl and mix until thoroughly combined.
Sprinkle in the flour, mixing gently until no streaks of flour remain; scrape down the sides of the bowl as needed to ensure uniform texture.
Fold in the chocolate chips and walnuts until they are evenly distributed throughout the dough.
Spoon the cookie dough into the prepared pie crust, spreading it out to reach the edges and smoothing the surface.
Place the pie on the middle rack of the preheated oven. After twenty minutes, tent loosely with aluminum foil to prevent over-browning. Continue baking until the center is set and a toothpick inserted two inches from the edge comes out mostly clean, about 55 to 65 minutes total.
Allow the pie to rest on a wire rack for at least 15 minutes before serving to let the filling set slightly.
Notes
For extra visual appeal and melty pockets of chocolate, press a handful of additional chocolate chips into the top of the pie immediately after it comes out of the oven.
Chill any leftovers overnight—this cookie pie is easier to slice cleanly when slightly cool, and flavors meld beautifully after resting.
If you prefer a deeper pie, use a second refrigerated crust as a decorative lattice or full top crust, brushing with an egg wash and sprinkling with coarse sugar before baking.


