
Chicken fritters are a popular dish made by combining finely chopped or ground chicken with various seasonings, then frying or baking them into golden, crispy patties. Traditionally, fritters can be made with seafood, vegetables, or even fruits, but chicken fritters stand out as a versatile and protein-packed option.
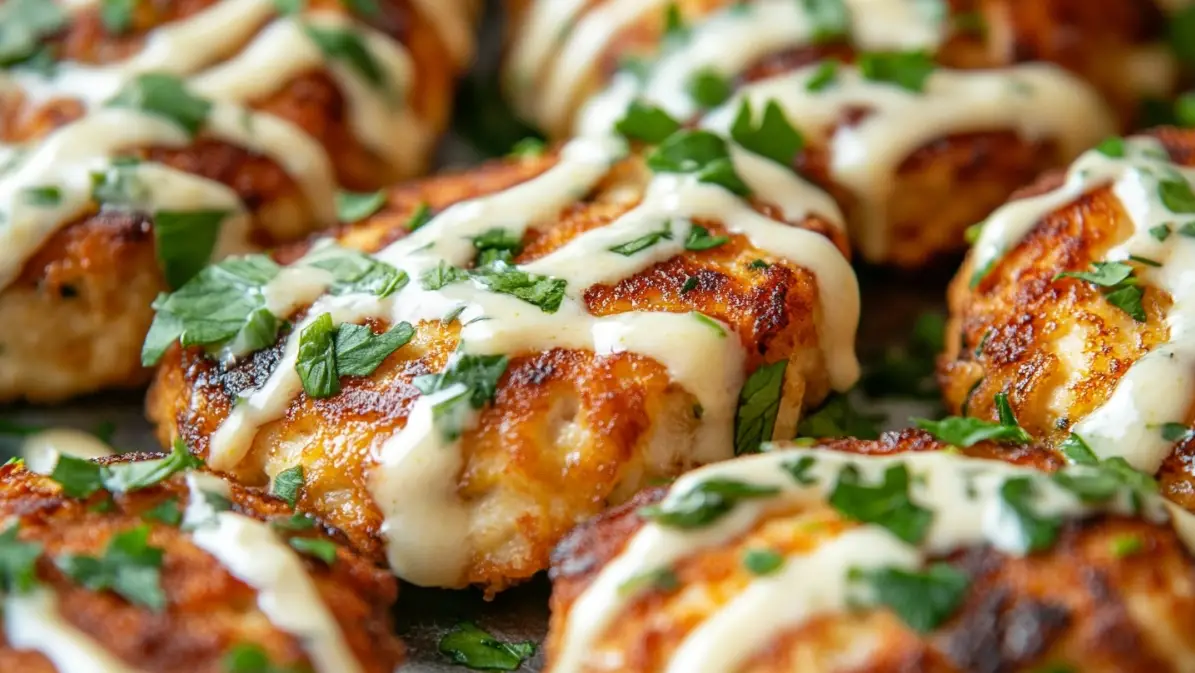
Cheesy chicken fritters take this concept a step further by incorporating melted cheese into the mixture, adding richness and flavor that makes them irresistible. The cheese not only enhances the taste but also contributes to the texture, making the fritters more moist and flavorful with every bite. This twist on the classic fritter elevates the dish, making it perfect for those who love savory, cheesy comfort food.
What makes cheesy chicken fritters a favorite is their versatility. They can be served as a quick family meal, a snack for kids, or even a delicious appetizer for parties. Whether you enjoy them with a dipping sauce, in a slider, or as a standalone snack, cheesy chicken fritters are sure to please everyone at the table. Plus, they’re easy to customize with different spices, cheeses, or vegetables to suit your taste preferences.
Ingredients Overview
To make cheesy chicken fritters, you’ll need a handful of simple yet flavorful ingredients that bring the dish to life:
- Chicken: You can use ground chicken for a smoother texture or shredded chicken for a chunkier consistency. Ground chicken mixes more uniformly with the other ingredients, while shredded chicken offers more bite and texture.
- Cheese: The type of cheese you use is key to both the flavor and the texture. Cheddar adds sharpness, while mozzarella provides a milder, stretchy melt. Other cheeses like Parmesan or gouda can also be used to experiment with flavor.
- Eggs: Eggs act as the binding agent, holding the mixture together and ensuring the fritters don’t fall apart while cooking.
- Herbs and Spices: Common seasonings include garlic powder, onion powder, salt, and pepper. Fresh herbs like parsley or cilantro can be added for extra freshness, while spices like smoked paprika or chili flakes can bring heat and complexity to the dish.
Tools You’ll Need
To prepare cheesy chicken fritters efficiently, you’ll need a few basic kitchen tools:
- Mixing Bowls: For combining the chicken, cheese, and other ingredients together.
- Frying Pan/Skillet: A good-quality non-stick frying pan is ideal for cooking fritters to achieve an even, golden-brown exterior.
- Spatula: To flip the fritters without breaking them during the frying process.
- Cheese Grater: If you’re using block cheese, grating it fresh will enhance the flavor and melting consistency.
Step-by-Step Cooking Instructions
Preparing the Chicken Mixture
To begin, gather your ingredients: ground or shredded chicken, cheese, eggs, and seasonings. Here’s a detailed guide on how to combine these ingredients for the perfect cheesy chicken fritters:
- Step 1: Combine the Ingredients
In a large mixing bowl, add the chicken (either ground or shredded), cheese (shredded or cubed), eggs, and your selected herbs and spices (such as garlic powder, onion powder, parsley, salt, and pepper). Use a spoon or your hands to mix everything thoroughly until well-combined. - Step 2: Adjust the Consistency
If the mixture seems too wet, you can add a tablespoon of flour or breadcrumbs to help absorb the moisture and bind the ingredients together. If it’s too dry, you can add an extra egg or a tablespoon of mayonnaise for added moisture. - Step 3: Season to Taste
Taste the mixture to check for seasoning balance. Make sure the mixture is flavorful enough as some of the flavor might dissipate during cooking. - Optional Variations:
You can add finely chopped vegetables like spinach, bell peppers, or grated zucchini for added texture and nutrients. These ingredients not only boost the flavor but also increase the fritters’ nutritional value.
Shaping the Fritters
Once your mixture is prepared, it’s time to shape the fritters:
- Step 1: Form the Fritters
Scoop a handful of the mixture and shape it into a small patty, about 2-3 inches in diameter. Ensure that the fritters are not too thick—around ½ inch—so they cook evenly inside. - Step 2: Keep Hands Wet
If the mixture is sticky, wet your hands slightly with water or oil before forming each fritter. This prevents the mixture from sticking to your hands, making the process smoother. - Step 3: Uniformity for Consistent Cooking
Ensure all fritters are roughly the same size and thickness. Uniform fritters will cook more evenly, so none are over- or undercooked. - Step 4: Prevent Breaking
Avoid handling the fritters too much during shaping, as overmixing or overshaping can cause them to break apart during cooking.
Cooking Methods: Pan-Frying vs. Baking
Now that your fritters are shaped, it’s time to cook them. Here are two popular cooking methods:
Pan-Frying
- Step-by-Step Guide:
- Heat a frying pan or skillet over medium heat. Add 2-3 tablespoons of oil, such as vegetable, canola, or olive oil.
- Once the oil is hot, carefully place the fritters into the pan. Do not overcrowd the pan, as this will lower the oil temperature and result in soggy fritters.
- Fry the fritters for about 4-5 minutes on each side or until they turn golden brown and crispy on the outside.
- Remove from the pan and place them on a paper towel-lined plate to drain excess oil.
- Ideal Oil and Temperatures:
Use oils with a high smoke point, such as canola or vegetable oil, for crispier results. Keep the heat at medium to prevent burning. - Achieving the Perfect Texture:
For crispy exteriors and moist interiors, avoid flipping the fritters too often. Let them cook undisturbed for a few minutes on each side.
Baking (Healthier Option)
- Step-by-Step Guide:
- Preheat your oven to 400°F (200°C).
- Line a baking sheet with parchment paper or lightly grease it.
- Arrange the fritters evenly on the sheet and brush them with a small amount of oil for a golden finish.
- Bake for 15-20 minutes, flipping halfway through, until they’re golden brown and cooked through.
- Pros & Cons of Baking:
- Pros: Healthier option, uses less oil, easier to make in larger batches.
- Cons: Might not achieve the same crispy texture as pan-frying.
How to Know When Your Fritters Are Done
To ensure your cheesy chicken fritters are fully cooked, look for these signs:
- Visual Cues: The outside should be golden brown and crispy, while the inside should be moist and tender.
- Temperature Check: The internal temperature of the fritters should reach 165°F (75°C), ensuring the chicken is safely cooked.
- Firmness: Gently press the fritters with a spatula; they should be firm, not mushy, when done.
Serving & Pairing Suggestions
Creative Serving Ideas
Cheesy chicken fritters are versatile and can be served in various ways:
- Standalone: Serve the fritters hot with a variety of dipping sauces.
- In Sliders: Use mini buns and serve the fritters as sliders with lettuce, tomatoes, and a creamy sauce.
- Over a Salad: Place fritters on top of a fresh salad with mixed greens, avocado, and a light vinaigrette.
- In Tacos or Wraps: Crumble the fritters into tacos or wraps with salsa, avocado, and sour cream.
- Family Meal: Serve alongside sides like mashed potatoes, roasted vegetables, or coleslaw for a complete meal.
Presentation is key for gatherings. Arrange fritters on a large serving plate with dipping sauces in the center to create an inviting spread.
Dipping Sauces and Toppings
Enhance your cheesy chicken fritters with delicious dipping sauces and toppings:
- Popular Dipping Sauces:
- Garlic Aioli
- Spicy Mayo
- Ranch Dressing
- Barbecue Sauce
- Sriracha or Sweet Chili Sauce
- Toppings:
Add sour cream, chives, or grated cheese on top for extra flavor. - Homemade Dip:
To make a simple homemade dip, mix Greek yogurt with lemon juice, garlic powder, salt, and herbs like dill or parsley. It’s a light and tangy complement to the rich fritters.
Variations of Cheesy Chicken Fritters
Cheesy chicken fritters are easily customizable to suit different tastes and dietary needs:
- Different Cheeses: Experiment with sharp cheddar, mozzarella, feta, or gouda to change the flavor profile.
- Protein Alternatives: Use ground turkey, beef, or even tofu for a vegetarian version.
- Add Vegetables: Incorporate finely chopped vegetables like zucchini, corn, or bell peppers to add more nutrients and texture.
- Gluten-Free Option: Use almond flour or gluten-free breadcrumbs instead of regular flour.
- Keto-Friendly: Use coconut flour or flaxseed meal to keep it low-carb.
- Flavor Enhancements: Add spices like smoked paprika, cayenne, or cumin to make the fritters more flavorful.
Cooking Tips for the Best Fritters
Achieving the perfect cheesy chicken fritters requires some key tips:
- Ensuring Fritters Hold Together:
Make sure to use enough binding agents such as eggs and a small amount of flour or breadcrumbs. Properly mixing the chicken with these ingredients ensures the fritters stay intact while cooking. - Preventing Greasiness:
Avoid over-oiling your pan. Use just enough oil to coat the bottom of the skillet and fry the fritters over medium heat to ensure they cook evenly without soaking up too much oil. - Keeping Chicken Juicy:
Don’t overcook the fritters. Cook them on medium heat, flipping only once, to avoid drying out the chicken. Also, mixing some mayonnaise or a small amount of cream cheese into the mixture can help retain moisture.
How to Store & Reheat Cheesy Chicken Fritters
- Storing in the Fridge:
Place cooked fritters in an airtight container and store them in the fridge for up to 3 days. Make sure to cool them completely before sealing the container to prevent condensation. - Freezing for Later:
For longer storage, place the cooled fritters in a single layer on a baking sheet and freeze until solid. Once frozen, transfer them to a freezer-safe bag. Fritters can be stored in the freezer for up to 3 months. - Reheating Methods:
- Microwave: For a quick option, microwave the fritters, but note they may lose their crispiness.
- Oven: Reheat at 375°F (190°C) for about 10-12 minutes, flipping halfway through to restore the crispy texture.
Using Leftovers in Creative Ways
Leftover cheesy chicken fritters can be repurposed into new meals:
- In Wraps:
Slice the fritters and add them to a tortilla wrap with fresh veggies, hummus, or a tangy sauce. - In Salads:
Crumble or slice the leftover fritters over a green salad, adding texture and protein. - In Sandwiches:
Use the fritters as a filling in a sandwich with lettuce, tomatoes, and your favorite condiments for a quick lunch. - Avoiding Waste:
If you have extra ingredients from the fritters, consider freezing those separately or using them in other recipes to minimize food waste.
Nutritional Breakdown
On average, each cheesy chicken fritter (depending on ingredients and portion size) contains the following:
- Calories: Approximately 150-200 per fritter
- Protein: 15-20 grams per serving (from chicken and cheese)
- Fats: 10-12 grams, largely from cheese and cooking oil
- Carbohydrates: Minimal, especially if made with almond flour or low-carb substitutes
Health Benefits:
- Chicken is a lean source of protein, essential for muscle building.
- Cheese provides calcium, aiding bone health.
- Using herbs and spices instead of heavy sauces reduces unnecessary sodium and added calories.
Dietary Adjustments
- Gluten-Free Option:
Replace regular flour with almond flour or gluten-free breadcrumbs. This keeps the fritters gluten-free without compromising texture. - Low-Carb or Keto-Friendly Modifications:
Use coconut flour or almond flour, and opt for full-fat cheese to make the fritters suitable for keto or low-carb diets. - Reducing Calories or Fat:
Use lean ground chicken and opt for low-fat cheese to cut down on fats. Baking the fritters instead of frying can further reduce calories while maintaining flavor.
These adjustments make the dish suitable for various dietary preferences without losing its appeal.
Frequently Asked Questions (FAQs)
- Can I use pre-cooked chicken for this recipe?
Yes, you can use pre-cooked chicken, but it will result in a slightly different texture. Shredded pre-cooked chicken won’t bind as well as raw ground chicken, so you might need to add more binding agents like eggs or flour. The fritters will also cook faster since the chicken is already cooked. - What kind of cheese works best for chicken fritters?
Cheddar and mozzarella are popular choices due to their meltability and flavor. Cheddar adds sharpness, while mozzarella melts into a gooey, stretchy texture. For a unique twist, you can also try feta for a tangier taste or Parmesan for an extra savory kick. - Can I bake these fritters instead of frying?
Yes! Preheat your oven to 400°F (200°C), place the fritters on a parchment-lined baking sheet, and bake for 15-20 minutes, flipping halfway through. Baking provides a healthier option with less oil, though the fritters may not be as crispy as when pan-fried. - How do I prevent the fritters from falling apart?
Make sure to include enough binding agents like eggs and breadcrumbs or flour. Mixing the ingredients well and not making the fritters too large can help prevent them from falling apart during cooking.
Cheesy Chicken Fritters
Description
Cheesy Chicken Fritters are a delicious, savory dish made with a combination of chicken, cheese, eggs, and flavorful seasonings, then fried to golden perfection. These fritters are crispy on the outside with a rich, cheesy center, making them perfect for a quick family dinner, an appetizer for gatherings, or a protein-packed snack. Versatile and easy to prepare, this dish can be customized with different cheeses, herbs, and even vegetables, making it adaptable to various tastes and dietary preferences. Whether pan-fried for a crispy texture or baked for a healthier version, Cheesy Chicken Fritters are a guaranteed crowd-pleaser.
Ingredients
- 1 1/2 lbs chicken breasts diced into 1/3-inch pieces
- 2 large eggs
- 1/3 cup mayonnaise
- 1/3 cup all-purpose flour or cornstarch/potato starch for gluten-free
- 4 oz mozzarella cheese shredded (about 1 1/3 cups)
- 1 1/2 tablespoons fresh dill chopped
- 1/2 teaspoon salt or to taste
- 1/8 teaspoon black pepper
- 2 tablespoons olive oil for frying
- Garlic Aioli Optional
- 1/3 cup mayonnaise
- 1 garlic clove pressed
- 1/2 tablespoon lemon juice
- 1/4 teaspoon salt
- 1/8 teaspoon black pepper
Instructions
-
Prepare the Chicken: Dice the chicken breasts into small, 1/3-inch pieces. For easier slicing, partially freeze the chicken beforehand.
-
Mix Ingredients: In a large mixing bowl, combine chicken, eggs, mayonnaise, flour, mozzarella, dill, salt, and pepper. Mix well until fully incorporated.
-
Refrigerate: Cover the mixture with plastic wrap and refrigerate for at least 2 hours, or overnight for best results.
-
Cook the Fritters: Heat olive oil in a large non-stick pan over medium heat. Scoop heaping tablespoons of the chicken mixture into the pan, flattening each slightly. Sauté for 3-4 minutes per side until golden brown and fully cooked through.
-
Prepare the Aioli: In a small bowl, combine all aioli ingredients and stir until smooth.
-
Serve: Serve the fritters hot, with garlic aioli on the side if desired.
Notes
- Cheese Choices:
Cheddar and mozzarella are the most common choices, but feel free to experiment with gouda, Parmesan, or feta for different flavors. - Binding Tips:
The combination of eggs and breadcrumbs or flour helps bind the mixture together, ensuring the fritters hold their shape during cooking. If the mixture seems too wet, add a little more flour or breadcrumbs. - Cooking Methods:
- Pan-Frying: Gives the fritters a crispy, golden-brown crust and is ideal for quick cooking.
- Baking: A healthier option, though the fritters may not be as crispy. To achieve crispiness when baking, lightly brush the fritters with oil before placing them in the oven.
- Seasoning Variations:
Add different spices or herbs like smoked paprika, cumin, or fresh cilantro for an added depth of flavor. Adjust seasoning to your taste before shaping the fritters. - Make-Ahead Option:
Prepare the fritter mixture ahead of time and store it in the fridge for up to a day before cooking. The shaped fritters can also be frozen uncooked and then fried or baked when needed. - Serving Suggestions:
Pair these fritters with dipping sauces like garlic aioli, spicy mayo, or ranch dressing. Serve them as sliders, in wraps, or on a salad for a well-rounded meal. - Leftovers:
Leftover fritters can be stored in the fridge or freezer, then reheated in the oven to restore crispiness. They’re perfect for quick lunches or snacks the next day.


