
There’s just something magical about casseroles—they’re warm, comforting, and always seem to bring people together around the table. And let me tell you, this Cheesy Taco Cornbread Casserole is one of those dishes you’ll find yourself coming back to again and again. Whether you’re feeding a hungry family on a weeknight or hosting a casual weekend get-together, this layered bake hits all the right notes: savory, creamy, cheesy, and just the right amount of spice.
I first stumbled onto the idea of combining cornbread and taco flavors when I needed a way to stretch a pound of ground beef for dinner one night. The pantry had a packet of cornbread mix and a couple of cans of veggies staring me down, and before I knew it, this casserole was born. The best part? It all comes together in just one dish—less cleanup and more time to actually enjoy your meal.
This recipe starts with a tender, golden layer of baked cornbread, followed by a savory taco-seasoned beef layer that’s been jazzed up with Mexicorn and Rotel. Then we finish things off with a dreamy sour cream and cheese topping that bakes into pure bubbly perfection. Trust me—this one’s a keeper.

STEPS: STARTING WITH THE BASE
Let’s kick things off by building that comforting cornbread base. It’s simple, quick, and sets the stage for all the delicious layers to come.
Step 1: Preheat and Prep
Start by preheating your oven to 350°F. Lightly coat a 9×9-inch baking dish (or a 2½-quart baking dish if that’s what you’ve got on hand) with nonstick cooking spray. You want to make sure nothing sticks later on, especially when it’s time to dig in.
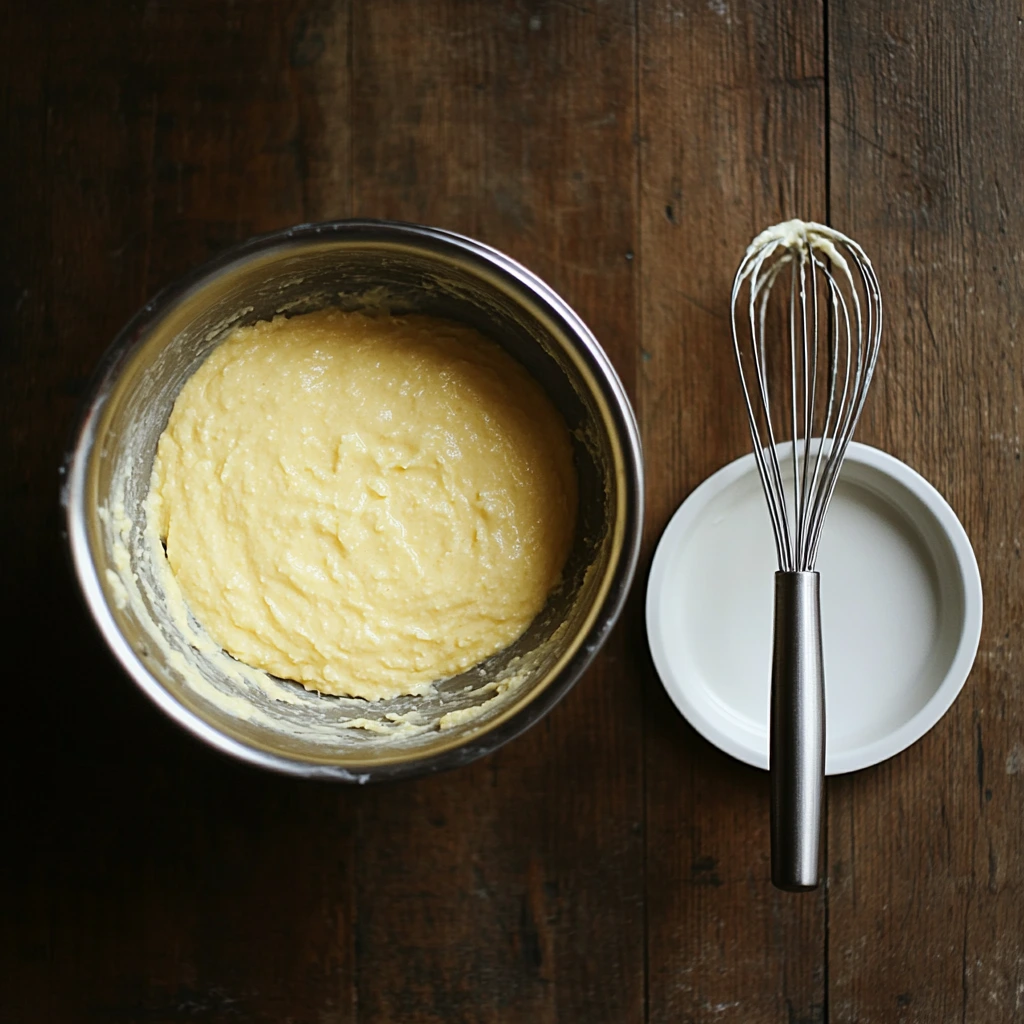
Step 2: Mix the Cornbread Batter
In a medium-sized mixing bowl, stir together the following:
-
7-ounce packet of cornbread mix
-
½ cup milk
-
1 large egg
Just stir until everything is combined—no need to overmix. Then, spread the batter evenly into your prepared baking dish. Pop it into the oven and bake for about 15 minutes, or until the top is set and lightly golden. You’ll want the cornbread to be mostly cooked through, but not overdone—it’s going back into the oven later!
Step 3: Make the Taco Beef Layer
While that cornbread is baking away, grab a large skillet and get your beef going. You’ll need:
-
1 pound ground beef
Cook it over medium heat, breaking it into crumbles with your spatula. Cook until there’s no more pink showing—then go ahead and drain off any excess grease. This helps keep your casserole from getting soggy on the bottom.
Once drained, add the following to the skillet:
-
3 tablespoons taco seasoning (or one standard packet)
-
⅓ cup water
-
11-ounce can Mexicorn, drained
-
10-ounce can Rotel, drained
Stir everything together and let it simmer for 2–3 minutes. This quick simmer helps the flavors meld and thickens the mixture just a bit. Don’t skip this part—it really makes a difference in the final texture of your casserole.
Step 4: Layer the Beef Over Cornbread
Once your cornbread layer is out of the oven and slightly cooled, carefully spoon the beef and veggie mixture right on top. Spread it out evenly with the back of your spoon so every bite gets a little bit of everything.
Cheesy Taco Cornbread Casserole: A Crowd-Pleasing Comfort Bake
Alright, now that we’ve laid down the foundation—our golden cornbread base and that seasoned beef and veggie layer—it’s time to take this casserole to the next level. The creamy, cheesy topping not only adds richness, but also ties the whole dish together. It’s the part that makes people go back for seconds… and maybe even thirds.
I’ve found that the best casseroles aren’t complicated—they’re just built on smart layers and the right balance of flavor and texture. And this one absolutely nails it. What really makes it special is that sour cream and cheese mixture—it melts beautifully in the oven and creates that irresistible bubbly topping everyone loves.
Let’s get back into the kitchen and keep things going.
STEPS: ADDING THE CREAMY TOP LAYER
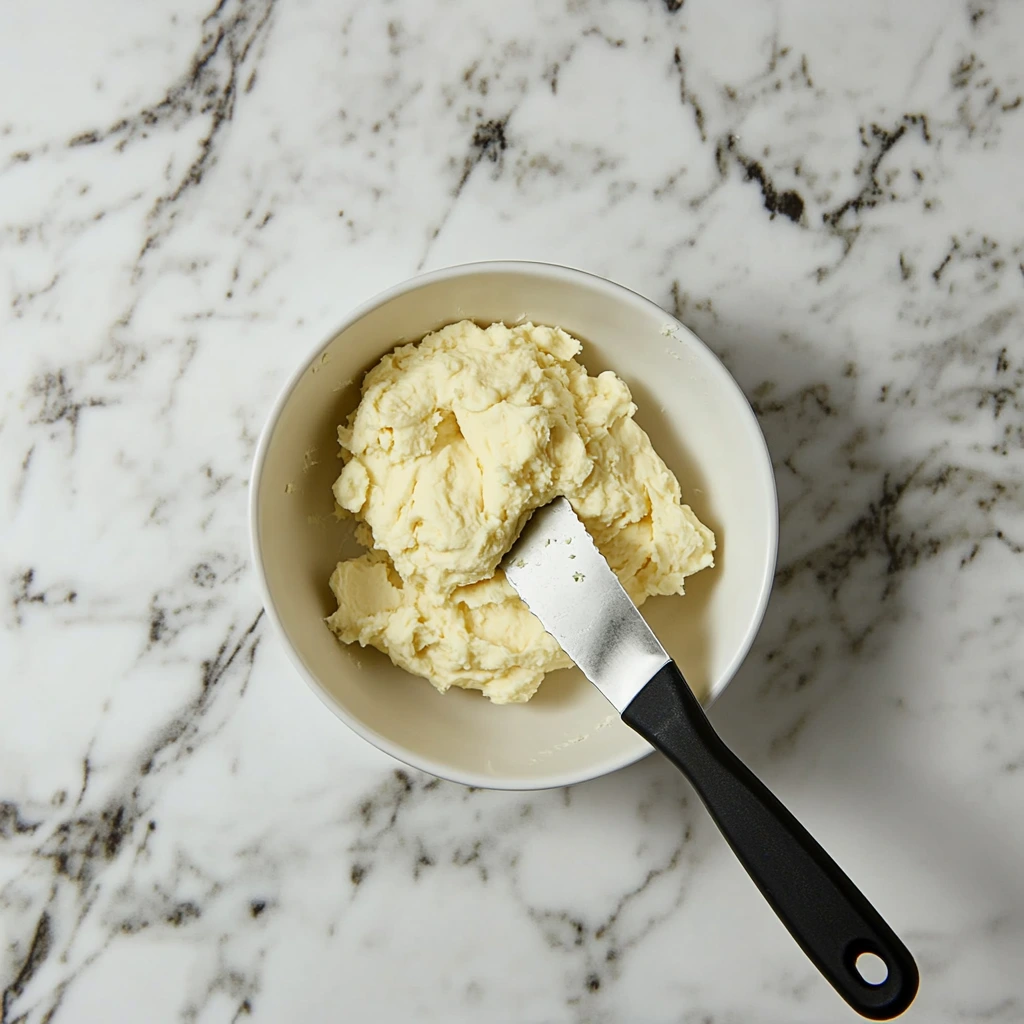
Step 5: Make the Sour Cream Topping
In a clean mixing bowl, stir together the following ingredients:
-
2 cups sour cream
-
1 cup shredded Mexican cheese blend (save the other cup for the topping)
-
½ cup chopped green onions
Stir until everything is well combined. This mixture should be thick, creamy, and packed with flavor thanks to those green onions. If you prefer a little tang or want to lighten things up, you can substitute half of the sour cream with Greek yogurt. It won’t change the flavor much, but it does make the topping a touch lighter.
Step 6: Layer It On
Now, gently spoon the sour cream mixture over the beef layer in your baking dish. Use a spatula or the back of your spoon to carefully spread it out. Try not to mix it into the beef layer—you want to keep those layers separate so you get that nice stacked effect when you serve it up.
Step 7: Add the Final Cheese Layer
Sprinkle the remaining 1 cup of shredded Mexican cheese blend evenly over the sour cream mixture. This is what’s going to create that golden, melty, slightly crispy cheese top that seals in all the flavor below.
Step 8: Bake Until Bubbly and Golden
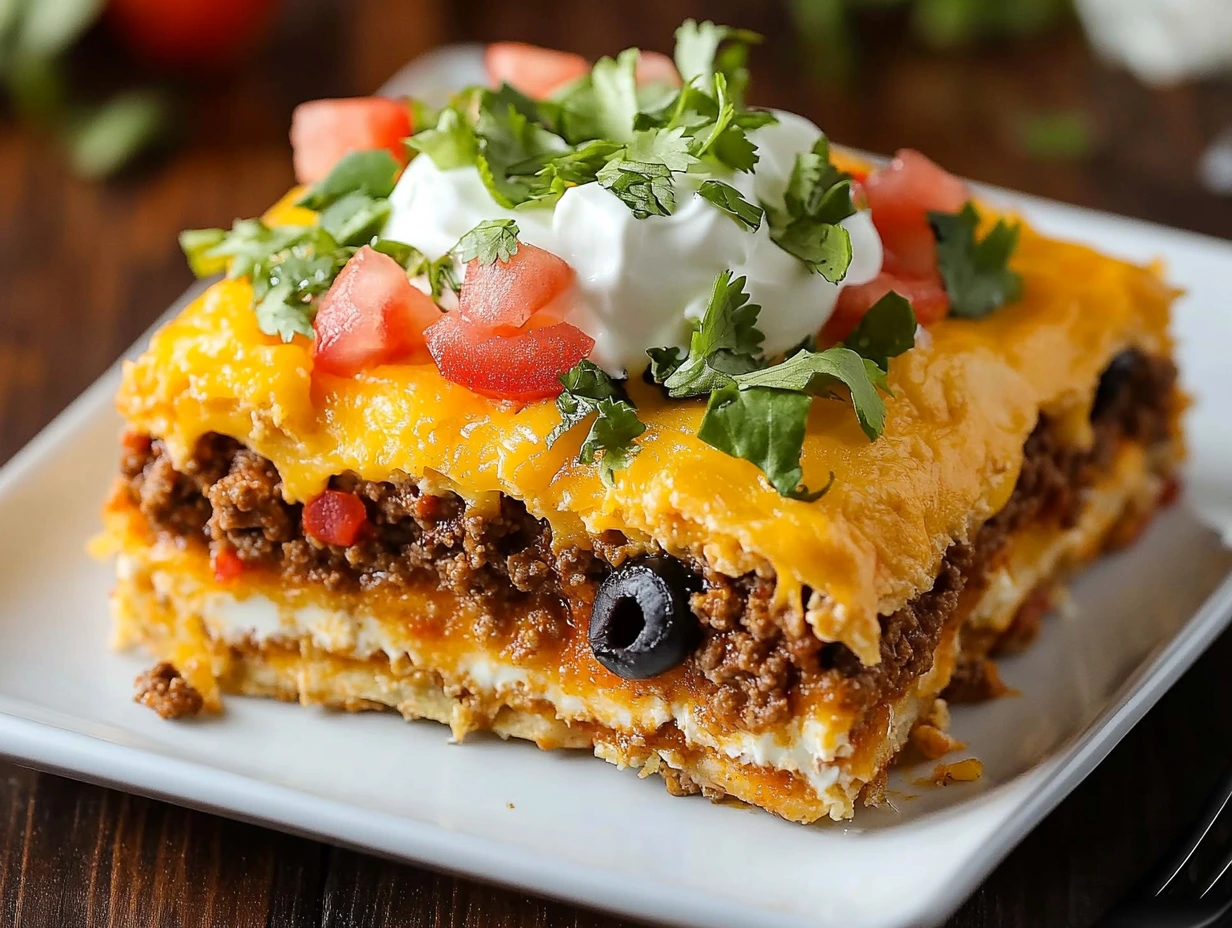
Slide the whole dish back into your preheated 350°F oven and bake uncovered for about 25 minutes. You’ll know it’s ready when the cheese on top is melted and just starting to bubble. Let it rest for at least 5 minutes once it comes out of the oven. This little break helps everything set up so you can cut nice, clean squares when serving.
TIPS & VARIATIONS TO TRY
This casserole is super flexible, which makes it a perfect go-to when you’re looking to clean out your fridge or pantry. Here are a few ways you can tweak it:
-
Spice It Up or Tone It Down: Using mild Rotel will keep the heat level low, while a hot version will give it a spicy kick. You can also sprinkle in some crushed red pepper flakes or diced jalapeños if you like it hotter.
-
Make It a Little Lighter: As mentioned earlier, replacing half the sour cream with Greek yogurt is a great way to lighten the dish without losing that creamy texture.
-
Switch Up the Protein: Don’t have ground beef? Ground turkey, chicken, or even a meatless crumble can work just as well here.
-
Add More Veggies: Want to sneak in a little more nutrition? Diced bell peppers, zucchini, or even spinach can be mixed into the beef layer without changing the flavor too much.
-
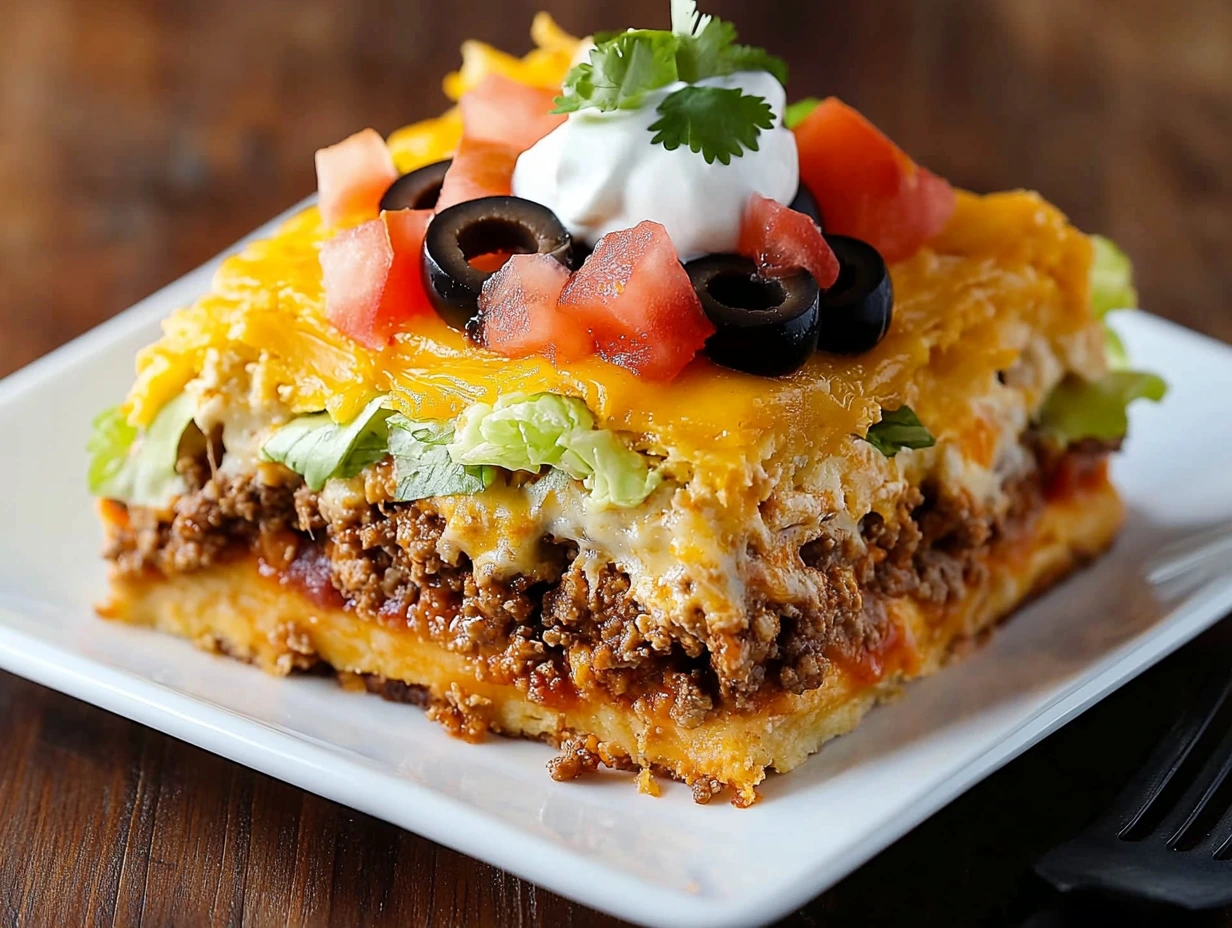
Serve With Toppings: This casserole is a meal in itself, but a few fresh toppings can take it even further. Try shredded lettuce, chopped tomatoes, sliced olives, or a drizzle of taco sauce for a little added flair.

Cheesy Taco Cornbread Casserole: A Crowd-Pleasing Comfort Bake
At this point, your kitchen probably smells like a Tex-Mex dream—warm cornbread, savory taco beef, and gooey melted cheese. This Cheesy Taco Cornbread Casserole isn’t just a dinner recipe, it’s the kind of comfort food that makes people pause mid-bite and say, “You have to make this again.” Whether you’re serving it for a weeknight dinner, a potluck, or a casual Sunday supper, it’s a hit every single time.
And if you’re someone who loves a make-ahead option or needs leftovers to stretch through the week, you’ll be happy to know this dish keeps and reheats beautifully. Before we wrap things up, let’s take a quick dive into some of the most common questions that come up when making this casserole.
FREQUENTLY ASKED QUESTIONS
Can I make this casserole ahead of time?
Absolutely! You can assemble the casserole up to the point where you add the final cheese layer. Cover it and refrigerate for up to 24 hours. When you’re ready to bake, let it sit at room temperature for 15–20 minutes before placing it in the oven.
How spicy is this dish?
It really depends on the Rotel and taco seasoning you use. Opt for “mild” versions if you’re feeding kids or spice-sensitive eaters. Want more heat? Use hot Rotel or add diced jalapeños or red pepper flakes to the beef layer.
Can I freeze it?
Yes, though the texture of the sour cream layer may change slightly upon thawing. If you plan to freeze it, assemble the casserole without baking, wrap tightly, and freeze for up to 2 months. Thaw overnight in the fridge and bake as directed.
What’s the best way to reheat leftovers?
Reheat individual portions in the microwave for about 1–2 minutes, or warm larger amounts in the oven at 350°F until heated through (usually 15–20 minutes). Cover with foil to prevent the top from drying out.
Can I use homemade cornbread instead of a mix?
Definitely! If you have a favorite cornbread recipe, you can bake it in the dish first, then continue with the rest of the layering. Just make sure it’s not too sweet—a savory cornbread works best with the taco flavors.
What’s the best dish size for this recipe?
A 9×9-inch square baking dish works great, but a 2½-quart casserole dish is also perfect if that’s what you have. Just make sure it’s deep enough to hold all the layers comfortably.
Is this gluten-free?
That depends on your cornbread mix and taco seasoning. If you need this dish to be gluten-free, make sure to use certified gluten-free versions of both, and double-check labels on all canned goods.
WRAPPING IT ALL UP
This Cheesy Taco Cornbread Casserole is one of those reliable, down-home meals that brings people together and makes dinner feel easy and satisfying. It’s layered, flavorful, and cozy in all the best ways—and you can customize it to fit whatever you have on hand. I love how versatile it is, and how even the pickiest eaters at the table go back for seconds without hesitation.
Print
Cheesy Taco Cornbread Casserole
- Author: Sophia
Description
A hearty, layered casserole that starts with a golden cornbread base and builds with seasoned beef, Mexicorn and Rotel. Topped with a creamy cheese-and-sour-cream mixture and finished with melted Mexican cheese, this one-dish bake is perfect for busy weeknights or casual gatherings.
Ingredients
7-ounce packet cornbread mix
½ cup milk
1 large egg
1 pound ground beef
3 tablespoons taco seasoning (or one packet)
⅓ cup water
11-ounce can Mexicorn, drained
10-ounce can Rotel, drained
2 cups sour cream
2 cups shredded Mexican cheese blend, divided
½ cup chopped green onions
Optional toppings: shredded lettuce, sliced olives, diced tomatoes, taco sauce
Instructions
Preheat the oven to 350°F and coat a 9×9-inch (or 2½-quart) baking dish with nonstick spray. In a medium bowl stir together the cornbread mix, milk and egg until just combined, then spread the batter evenly in the prepared dish. Bake until the top looks set and lightly golden, about fifteen minutes, then remove from the oven.
While the cornbread bakes, brown the ground beef in a skillet over medium heat, breaking it into crumbles and cooking until no pink remains. Drain off any excess grease, then stir in the taco seasoning, water, drained Mexicorn and drained Rotel. Simmer for two to three minutes until the flavors meld and the mixture is slightly thickened.
Spoon the beef and vegetable layer over the baked cornbread, spreading it into an even layer. In a clean bowl combine the sour cream with one cup of the shredded cheese blend and the chopped green onions, stirring until smooth. Gently dollop and spread this creamy mixture over the beef layer, taking care not to mix the layers.
Sprinkle the remaining cup of shredded cheese evenly over the top. Return the dish to the oven and bake uncovered until hot and the cheese is melted, about twenty-five minutes. Let the bake rest for five minutes before slicing.
Serve warm with optional toppings such as shredded lettuce, sliced olives, diced tomatoes or a drizzle of taco sauce.
Notes
For a lighter topping, substitute half the sour cream with Greek yogurt without altering the flavor profile.
Adjust the level of spice by choosing mild or hot Rotel, or by adding a pinch of crushed red pepper flakes.
Leftovers keep well in an airtight container for up to three days and can be reheated in the oven or microwave until warmed through.


