
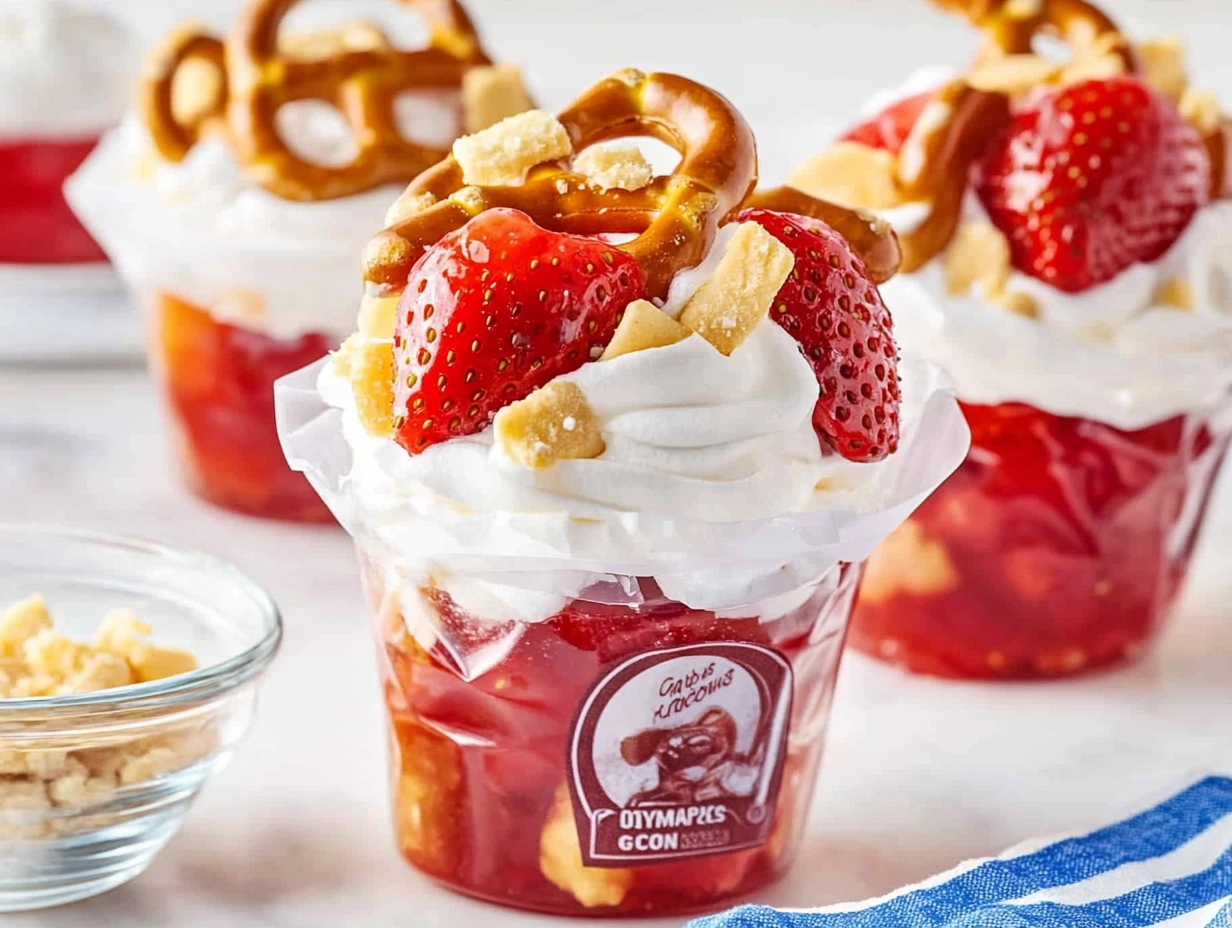
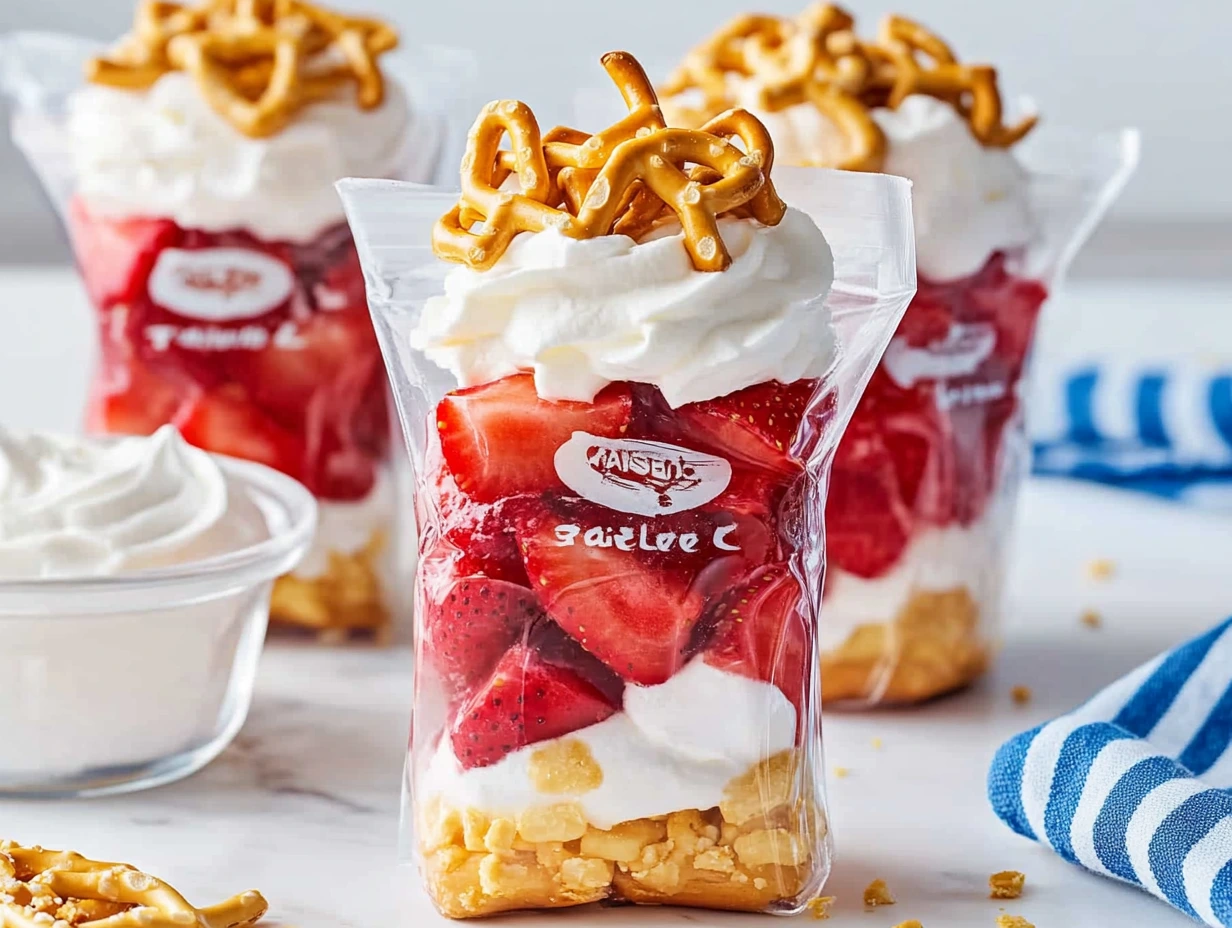
If there’s one dessert that screams summer, it’s the classic strawberry pretzel salad. But this Walking Strawberry Pretzel Salad? Oh, it takes the cake—or salad, in this case—for the most fun, no-fuss, grab-and-go version of the original. Sweet, salty, creamy, crunchy—it checks every box. And the best part? No need to fuss with fancy layers in a pan or worry about slicing it just right. This version is served in individual snack-size pretzel bags (or clear cups), making it perfect for parties, picnics, potlucks, or just a Tuesday when you’re craving something sweet and salty.
I remember the first time I brought this to a family barbecue. It was one of those scorching July afternoons when no one wants to turn on the oven. I needed something that felt festive but wouldn’t melt into a puddle before we even got to dessert. Enter the Walking Strawberry Pretzel Salad. I had seen walking tacos before (who hasn’t?), and thought—why not do the same with dessert? Let’s just say it disappeared faster than the grilled hot dogs, and people were literally asking me for the recipe before we’d even sat down. That’s when I knew I had a keeper.
This recipe combines three simple components: strawberry gelatin with real fruit, a creamy no-bake cheesecake layer, and crispy toasted pretzel bits. Every bite hits that perfect combo of creamy, fruity, and crunchy with just the right amount of sweet and salt. Plus, you can prep everything ahead of time and just assemble right before serving. Easy breezy!
Alright, let’s walk through how to make this fun summer treat.

INGREDIENTS YOU’LL NEED
For the Strawberry Gelatin Layer:
-
1 box (3 oz) strawberry gelatin
-
1 cup boiling water
-
1 cup cold water
-
1 cup chopped strawberries (fresh or thawed frozen)
For the Pretzel Crumble:
-
1 cup crushed pretzels
-
2 tablespoons sugar
-
2 tablespoons butter, melted
For the Creamy Cheesecake Layer:
-
1 package (8 oz) cream cheese, softened
-
1/2 cup powdered sugar
-
1 container (8 oz) whipped topping, thawed
For Serving:
-
6–8 individual snack-size pretzel bags (or clear plastic cups, if preferred)
STEP 1: PREPARE THE STRAWBERRY GELATIN MIXTURE
Start with the strawberry gelatin. In a medium bowl, dissolve the strawberry gelatin in 1 cup of boiling water. Stir until completely dissolved. Then add 1 cup of cold water and stir in the chopped strawberries. If you’re using frozen strawberries, just make sure they’re thawed and drained so they don’t water down the mix.
Pop the bowl into the refrigerator and chill it until it’s slightly thickened—kind of like the consistency of loose jam. This usually takes around 30 to 45 minutes. Don’t let it fully set just yet, or it’ll be harder to layer later on.

STEP 2: MAKE THE PRETZEL CRUMBLE
While the gelatin is chilling, go ahead and make your pretzel crumble. This part adds the salty crunch that makes the dessert so irresistible.
In a small mixing bowl, combine 1 cup of crushed pretzels (just pulse them in a food processor or crush with a rolling pin in a zip-top bag), 2 tablespoons of sugar, and 2 tablespoons of melted butter. Stir until the pretzels are evenly coated.
Spread the mixture out on a baking sheet and bake at 350°F (175°C) for 8 to 10 minutes. Keep an eye on it—you want them golden brown and crispy, not burnt. Let the pretzels cool completely before using, otherwise the heat can melt your cream layer later.
STEP 3: WHIP UP THE CREAM CHEESE FILLING
Now for the creamy goodness. In a separate bowl, beat the softened cream cheese with the powdered sugar until smooth and creamy. No lumps allowed here! Once it’s nice and fluffy, gently fold in the whipped topping. You’ll end up with a light and airy cheesecake-style filling that brings all the layers together.
How to Assemble Walking Strawberry Pretzel Salad Like a Pro
Now that you’ve got all your components ready—your strawberry gelatin mixture is chilled and jiggly (but not set solid), your pretzel crumble is golden and crisp, and your cream cheese layer is dreamy and smooth—it’s time for the fun part: putting it all together.
Whether you’re serving this at a backyard BBQ, packing them up for a picnic, or letting the kids help with a DIY dessert bar, this part is quick, easy, and a little bit addictive. I usually set up a small assembly station and let everyone build their own. But if you’re prepping ahead of time, you can easily layer everything into cups and keep the pretzels in a separate container to sprinkle on just before serving.
Let’s get into how to bring it all together.
STEP 4: LAYER THE CREAM CHEESE MIXTURE
Gently open your snack-size bags of pretzels—don’t tear them too far down the sides or you’ll lose that nice “container” shape. If you’re going with clear plastic cups instead, spoon about 2 to 3 tablespoons of the cream cheese mixture into the bottom of each cup.
This layer acts like the creamy base of your dessert. You want enough to get that sweet and tangy flavor in every bite, but not so much that it overwhelms the other layers. Smooth it out just a bit with the back of a spoon if needed.
STEP 5: ADD THE STRAWBERRY GELATIN LAYER
Next comes that chilled strawberry gelatin. It should be thickened but still spoonable. Add a generous spoonful right on top of the cream cheese mixture in each bag or cup. You’ll see it nestle down slightly, creating that signature strawberry layer that’s sweet, fruity, and oh-so-refreshing.
Don’t worry about making it look perfect. The charm of this dessert is that it’s rustic and layered, and every spoonful gets a little of everything.
STEP 6: SPRINKLE THE PRETZEL CRUNCH (JUST BEFORE SERVING)
Here’s the key step that makes all the difference: wait until just before serving to add the toasted pretzel topping.
If you add it too early, it’ll soak up moisture from the gelatin and cream layer and turn soft. Still tasty, but not nearly as satisfying. Right before serving, sprinkle a spoonful of the pretzel crumble right on top. The buttery crunch paired with the creamy and fruity layers? It’s perfection.
TIPS FOR THE BEST WALKING STRAWBERRY PRETZEL SALAD
Let’s make sure your dessert comes out absolutely foolproof. Here are a few helpful pointers I’ve learned along the way:
-
Keep Pretzels Separate Until the Last Minute: This can’t be stressed enough. Moisture is the enemy of crunch, so only add the pretzel crumble when you’re ready to eat.
-
Use Cold Ingredients: Make sure your whipped topping and cream cheese are properly chilled before mixing. It helps the layers stay firm and hold up better, especially on hot days.
-
Crush Pretzels Fine But Not Powdery: You want small pieces, not crumbs. That way you get crunch without it feeling like sand.
-
Customize Your Cups: Add a dollop of extra whipped topping on top if you’re feeling indulgent. Or drizzle a little white chocolate for an elegant touch.
-
Make It Ahead (Sort Of): You can assemble the cream cheese and gelatin layers a few hours in advance and store them in the fridge. Just keep the pretzel topping in a sealed container and sprinkle when ready to serve.
SERVING IDEAS FOR DIFFERENT OCCASIONS
This recipe is a total crowd-pleaser and super versatile. Here are a few ideas to match your vibe:
-
For Kids’ Parties: Let kids build their own! Set out bowls of each layer and let them scoop away. It’s interactive and fun.
-
For Elegant Events: Use small dessert cups or mini mason jars, layer everything neatly, and add a little mint leaf on top for a cute touch.
-
For Picnics or Tailgates: Stick with the pretzel bags—just add a plastic spoon and napkin, and you’ve got a totally portable dessert.
Walking Strawberry Pretzel Salad FAQs and Final Thoughts
By now, you’ve got the full scoop on how to make this fun, portable twist on a classic dessert. Whether you’re prepping it for a crowd or just treating yourself to something a little extra, Walking Strawberry Pretzel Salad is the kind of recipe that feels both nostalgic and fresh. And if you’re still wondering about a few details, I’ve got you covered. Below are some of the most common questions I get whenever I serve this dessert.
FAQ: Your Questions Answered
Can I make this recipe ahead of time?
Yes—but with a note! You can prep the cream cheese and gelatin layers up to a day ahead and store them in cups or containers in the fridge. Just be sure to keep the toasted pretzels separate in an airtight container and add them only right before serving so they stay crunchy.
Can I use frozen strawberries?
Absolutely. Just make sure they’re fully thawed and drained. Frozen strawberries tend to release more liquid, so letting them sit in a colander for a few minutes will help prevent the gelatin mixture from getting watery.
Can I substitute the whipped topping with homemade whipped cream?
You can, but keep in mind that homemade whipped cream is less stable and may not hold up as long in the fridge. If you’re serving right away, it’s a delicious option. For make-ahead prep, I recommend sticking with store-bought whipped topping.
What type of pretzels work best?
Traditional mini twist or stick pretzels work great—just crush them into small pieces. You can even use pretzel crisps if that’s what you have on hand. Just avoid flavored or coated varieties, since they’ll affect the taste of the final dessert.
How do I keep the pretzel layer crunchy?
Only add the toasted pretzel mixture right before serving. Store it in an airtight container at room temperature until you’re ready to sprinkle it on. You can even pack it in little snack bags if you’re taking the dessert on the go.
Can I make this into a full-size dish instead of individual servings?
Yes! You can totally go traditional and layer everything in a 9×13-inch baking dish. Layer the cream cheese mixture first, then the gelatin layer, and chill until set. Sprinkle the pretzels just before serving. It’s just as delicious—just less portable.
How long will leftovers last in the fridge?
If already assembled (with pretzels on top), it’s best to eat them within a few hours, as the pretzels will soften quickly. If stored without the pretzel topping, the cups will keep in the fridge for up to 2 days.
Final Thoughts: A Fun Twist on a Classic Favorite
There’s just something so satisfying about a dessert that checks all the boxes: sweet and salty, creamy and crunchy, nostalgic yet totally fresh. This Walking Strawberry Pretzel Salad is one of those recipes that brings people together, whether it’s kids grabbing bags off a picnic table or friends catching up around a backyard bonfire.
And while I’ll always have a soft spot for the original layered version, I love how this one makes it so easy to serve, share, and enjoy—without a fork or a fridge in sight. You can prep everything ahead, pack it up, and still get all the flavor and texture you’d expect from a more formal dessert.
Print
Walking Strawberry Pretzel Salad
- Author: Sophia
Description
Walking Strawberry Pretzel Salad is a fun and portable take on the classic layered dessert. Served in single-serve bags, this version combines sweet strawberries, creamy cheesecake filling, and crunchy pretzel pieces for a perfect blend of salty and sweet in every bite. Great for parties, picnics, or an easy no-bake treat on the go.
Ingredients
1 box (3 oz) strawberry gelatin
1 cup boiling water
1 cup cold water
1 cup chopped strawberries (fresh or thawed frozen)
1 cup crushed pretzels
2 tablespoons sugar
2 tablespoons butter, melted
1 package (8 oz) cream cheese, softened
1/2 cup powdered sugar
1 container (8 oz) whipped topping, thawed
6–8 small individual snack-size bags of pretzels (or clear cups if preferred)
Instructions
In a mixing bowl, dissolve the strawberry gelatin in boiling water. Stir in the cold water and chopped strawberries. Refrigerate until slightly thickened but not fully set, about 30–45 minutes.
In a small bowl, mix crushed pretzels, sugar, and melted butter until evenly coated. Spread onto a baking sheet and bake at 350°F (175°C) for 8–10 minutes until golden. Let cool completely.
In a separate bowl, beat cream cheese and powdered sugar until smooth. Fold in the whipped topping until well combined and fluffy.
To assemble, gently open the pretzel snack bags or prepare clear cups. Spoon a layer of the cream cheese mixture into each bag or cup.
Add a spoonful of the chilled strawberry gelatin mixture on top of the cream layer.
Sprinkle with toasted crushed pretzels just before serving to maintain their crunch.
Notes
To avoid soggy pretzels, add the crushed pretzels right before eating. This dessert is ideal for parties and can be prepped in advance by assembling the cream and strawberry layers and storing the pretzels separately. You can also add extra whipped topping on top for a more indulgent finish.


