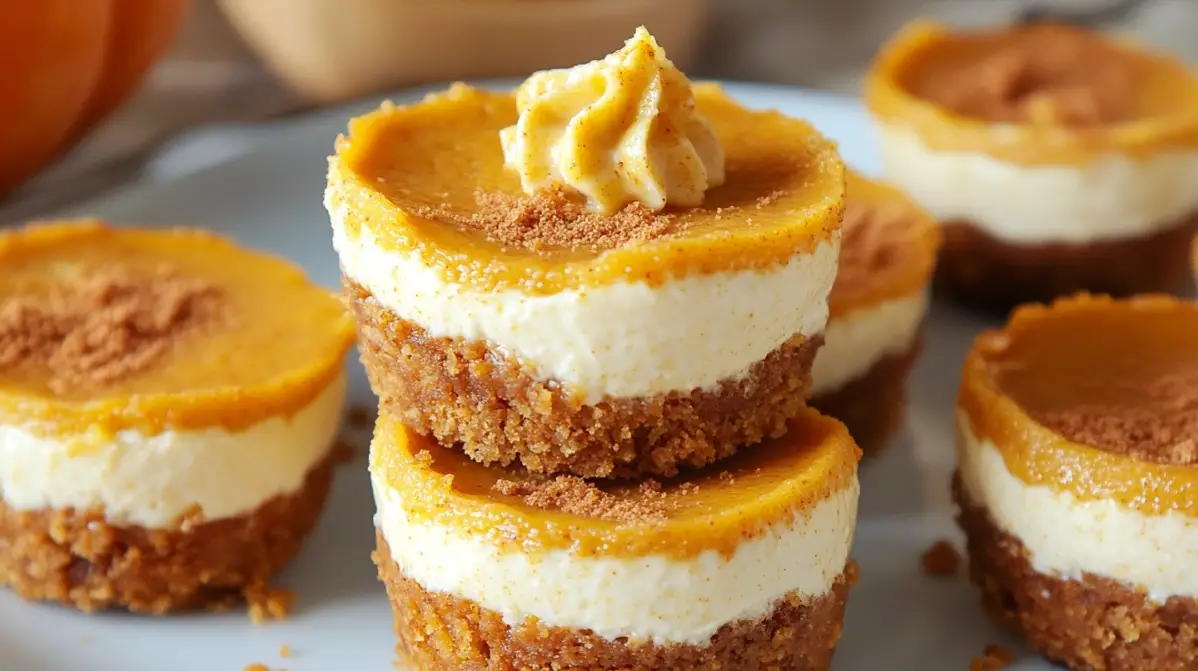
Mini Pumpkin Cheesecake Bites are a perfect dessert for the fall season, combining two beloved flavors—rich, creamy cheesecake and spiced pumpkin. These delightful bite-sized treats are ideal for gatherings, offering a more casual, easy-to-serve alternative to full-sized cheesecakes or pies. Their miniature size makes them particularly appealing for holiday events like Thanksgiving or Halloween parties, where guests often prefer smaller, portable desserts.
The charm of these cheesecake bites lies in their balance of flavors and textures. The smooth, creamy filling infused with pumpkin spice brings out the warmth of fall, while the buttery graham cracker crust adds a crunchy contrast. These cheesecakes also allow for a variety of toppings, making them versatile and customizable to suit individual tastes or presentation preferences.
Key Ingredients Breakdown
- Graham Cracker Crust: The foundation of these mini cheesecakes is a classic graham cracker crust made with crushed graham crackers, melted butter, and a touch of sugar. This base provides a satisfying crunch that pairs beautifully with the smooth filling.
- Creamy Pumpkin Filling: The star of the dessert is the luscious cheesecake filling made with softened cream cheese, pumpkin puree, sugar, eggs, vanilla, and pumpkin pie spice. The pumpkin puree gives the filling its signature fall flavor, while the cream cheese offers a rich, velvety texture.
- Topping Options: To finish the cheesecake bites, you can top them with whipped cream for an airy touch, dust them with cinnamon for added spice, or sprinkle crushed pecans for a nutty flavor and decorative flair. These toppings enhance the presentation and elevate the flavor profile of the dessert.
Step-by-Step Recipe Process
Step 1: Preparing the Crust
The base of the Mini Pumpkin Cheesecake Bites is a graham cracker crust, which adds a satisfying crunch that complements the smoothness of the cheesecake filling. To start, crush graham crackers into fine crumbs. You can use a food processor for efficiency or place the crackers in a zip-top bag and crush them with a rolling pin. Once the crackers are finely crushed, transfer them to a mixing bowl.
Next, mix the crumbs with melted butter and a small amount of sugar to bind the crust and enhance its sweetness. Stir until the crumbs are evenly coated, resembling wet sand. This mixture should then be spooned into lined muffin tins, creating an even layer in each cup. Use the back of a spoon, a small jar, or a spice bottle to firmly press the crumb mixture down, ensuring a solid, compact base for the cheesecake.
Tips for an even crust layer:
- Press the crumbs down evenly and firmly to prevent them from crumbling when the cheesecake is removed from the muffin liner.
- For uniformity, divide the crust mixture equally among the muffin liners before pressing down.
Step 2: Making the Cheesecake Filling
The filling is where the magic happens—creamy, spiced, and infused with pumpkin. Begin by beating softened cream cheese in a large mixing bowl until smooth. Add brown sugar, granulated sugar, and vanilla extract to enhance the sweetness and richness of the filling. Beat until everything is well incorporated.
Next, add the eggs one at a time, mixing just until the yolk disappears. Overbeating at this stage can cause too much air to be incorporated into the batter, leading to cracks during baking. Afterward, stir in the pumpkin puree and pumpkin pie spice. The combination of these ingredients gives the filling its distinct autumn flavor, filled with warmth from spices like cinnamon, nutmeg, and cloves.
Key technique:
- Avoid overmixing: Overmixing the filling can incorporate too much air, which may lead to cracks on the surface of the cheesecakes. Mix just until all the ingredients are combined and the batter is smooth.
Step 3: Baking the Cheesecake Bites
Preheat your oven to 350°F (175°C). Using a spoon or small ice cream scoop, divide the cheesecake filling evenly over the prepared graham cracker crusts in the muffin tin. Each cup should be filled nearly to the top.
Bake the cheesecakes for 15-18 minutes, or until the centers are set but still slightly jiggly when gently shaken. Overbaking can result in a dry texture, so keep a close eye on the cheesecakes during the final minutes. The edges should be firm, and the tops should not appear wet or glossy.
Why not overbake?
- Cheesecakes continue to cook as they cool, so removing them from the oven while the center still jiggles ensures a creamy texture. Overbaking results in a denser, drier filling.
Step 4: Cooling and Setting
Once the cheesecakes are done baking, remove them from the oven and allow them to cool in the muffin tin for about 10 minutes. This helps them firm up before transferring them to a wire rack to cool completely. It’s essential to cool the cheesecakes gradually to avoid cracking, which can happen due to rapid temperature changes.
After they’ve cooled, refrigerate the cheesecakes for at least 3 hours, or overnight if possible. This refrigeration period allows the flavors to meld and the texture to set properly, resulting in a firmer, richer cheesecake bite.
Expert Tips for Perfect Cheesecake Bites
- Use room temperature ingredients: Ensure that the cream cheese, eggs, and other ingredients are at room temperature. This makes the batter easier to mix, resulting in a smoother texture.
- Avoid common cheesecake problems: Overmixing can cause air bubbles, leading to cracks. Overbaking will dry out the cheesecakes, so it’s essential to remove them while they still have a slight jiggle in the center.
- Enhance flavor: Feel free to add extra spices like cinnamon, nutmeg, or ginger to the filling to intensify the fall flavors.
Recipe Variations
- Gluten-Free Option: Replace the graham crackers with gluten-free alternatives or use a crushed almond or pecan base for a gluten-free, nutty twist.
- Sweet Potato or Squash Version: If pumpkin puree is unavailable, substitute it with sweet potato or butternut squash puree. These alternatives offer a similar texture and flavor, making for a delicious variation.
- Vegan Cheesecake Bites: For a plant-based option, use dairy-free cream cheese and replace eggs with flax eggs or another egg substitute.
Decorating and Serving Suggestions
- Toppings: Whipped cream is a classic choice, but you can also add a sprinkle of cinnamon or crushed nuts (such as pecans or walnuts) for texture and visual appeal.
- Creative serving ideas: Present these bites on a dessert platter alongside other fall-themed treats like pumpkin cookies, apple tarts, or spiced muffins. They’re perfect for a Thanksgiving dessert table.
Storing, Freezing, and Reheating
Storage Tips
To keep your mini pumpkin cheesecake bites fresh, store them in an airtight container in the refrigerator for up to 5 days. If you’re adding whipped cream or other toppings, it’s best to do so just before serving to maintain the texture and freshness.
Freezing Instructions
Mini cheesecakes freeze beautifully. To freeze, wrap each cheesecake individually in plastic wrap or freeze them in a single layer on a baking sheet. Once frozen, transfer them to an airtight container or freezer bag. They can be stored for up to 2 months. When ready to serve, thaw in the refrigerator overnight.
Reheating Options
Although these bites are best enjoyed chilled, you can reheat them slightly in the microwave for about 10-15 seconds if you prefer a warmer dessert. However, this might alter the texture slightly.
Repurposing Leftovers
Leftover cheesecake bites can be crumbled over pancakes, waffles, or even a bowl of oatmeal for a delicious breakfast twist. You could also add them as a decadent topping to ice cream or blend them into a milkshake for an indulgent treat.
FAQs
- Can I make these ahead of time? Yes, these bites can be prepared a day or two in advance. Store them in the refrigerator without the whipped cream topping, and add the topping just before serving.
- Can I freeze Mini Pumpkin Cheesecake Bites? Absolutely! Freeze them without the whipped cream in a single layer, then transfer them to an airtight container. They’ll keep for up to 2 months in the freezer. Thaw in the fridge before serving.
- What can I substitute for pumpkin puree? Sweet potato puree or butternut squash puree are excellent alternatives, offering a similar texture and flavor.
- How do I prevent the cheesecakes from cracking? Avoid overmixing the filling, bake at a steady temperature, and allow the cheesecakes to cool gradually. Cooling too quickly can cause cracks.
- Can I make these in a regular muffin tin? Yes, but be mindful of the baking time. The larger size of regular muffin tins can lead to overcooking if not watched closely.

Mini Pumpkin Cheesecake Bites
Description
These Mini Pumpkin Cheesecake Bites are the perfect fall dessert, combining the creaminess of classic cheesecake with the warm flavors of pumpkin and spice. With a buttery graham cracker crust and a smooth, spiced pumpkin filling, they offer a delightful balance of textures and flavors. These bite-sized treats are ideal for gatherings, allowing guests to enjoy an indulgent dessert without the mess or commitment of a full slice of pie or cake. Whether you’re hosting a Thanksgiving dinner or a cozy fall get-together, these mini cheesecakes will surely be a hit.
Ingredients
Crust:
- 1 ½ cups graham cracker crumbs
- ½ cup unsalted butter, melted
- 2 tablespoons sugar
Cream Cheese Layer:
- 1 ½ cups cream cheese, softened
- ½ cup granulated sugar
- 1 teaspoon vanilla extract
- 1 large egg
Pumpkin Layer:
- 1 cup pumpkin puree
- ½ cup granulated sugar
- 1 teaspoon ground cinnamon
- ½ teaspoon ground nutmeg
- ½ teaspoon ground ginger
- ¼ teaspoon ground cloves
- 1 large egg
Topping:
- Whipped cream, for topping
- Ground cinnamon, for dusting
Optional substitutions:
- For a gluten-free version, replace graham cracker crumbs with gluten-free crumbs.
- To make it dairy-free, use dairy-free cream cheese and butter alternatives.
Instructions
-
- Preheat the oven to 325°F (165°C). Line a muffin tin with paper liners to make it easier to remove the cheesecakes after baking.
-
- Prepare the Crust: In a medium bowl, combine the graham cracker crumbs, melted butter, and sugar. Mix until the crumbs are evenly coated. Press about 2 tablespoons of the crumb mixture into the bottom of each muffin liner, pressing down firmly to form a crust.
- Make the Cream Cheese Layer: In a large bowl, beat the softened cream cheese and sugar until smooth and creamy. Add the vanilla extract and egg, mixing until fully combined. Spoon the cream cheese mixture over the crusts, filling each about one-third of the way.
- Create the Pumpkin Layer: In another bowl, whisk together the pumpkin puree, sugar, cinnamon, nutmeg, ginger, cloves, and egg until smooth. Gently spoon the pumpkin mixture over the cream cheese layer in each muffin liner, filling to the top.
- Bake: Place the muffin tin in the preheated oven and bake for 20-25 minutes, or until the centers are set. Once done, allow the cheesecakes to cool in the tin for 10 minutes, then remove them to a wire rack to cool completely.
- Add the Finishing Touches: Once cooled, top each mini cheesecake with a dollop of whipped cream and a dusting of ground cinnamon for an extra touch of flavor and presentation.
Notes
- Room Temperature Ingredients: For the best results, make sure your cream cheese and eggs are at room temperature before mixing. This ensures a smoother filling and prevents lumps.
- Pumpkin Puree, Not Pumpkin Pie Filling: Be sure to use pure pumpkin puree, not the pre-sweetened pumpkin pie filling, which could throw off the flavor and texture of the cheesecake.
- Avoid Overmixing: When preparing the cheesecake filling, mix just until combined. Overmixing can incorporate air into the batter, which may cause the cheesecakes to crack while baking.
- Chilling Time: Although you may be tempted to dig in right after baking, these cheesecakes taste best when they’ve had time to chill for at least 3 hours in the refrigerator. This helps the flavors meld and ensures the filling sets properly.
- Make Ahead: These mini cheesecakes can be made a day or two in advance, making them a great option for stress-free entertaining.
- Topping Ideas: Add a dollop of whipped cream just before serving, and for an extra touch, sprinkle some cinnamon, or top with crushed pecans for added crunch.


