
If you’re anything like me, there are days when turning on the oven just isn’t an option. Whether it’s a hot summer afternoon or you just want something quick, chilled, and stress-free, this No-Bake Biscoff Cheesecake is your go-to solution. And let’s be honest—any excuse to use Biscoff cookies and cookie butter is a good one, right?
This recipe is one of those magical creations that feels fancy and indulgent, yet comes together with minimal effort. It’s rich, creamy, and packed with that deep, spiced caramel flavor that makes Biscoff so irresistible. The best part? It requires zero baking. Yes, really.
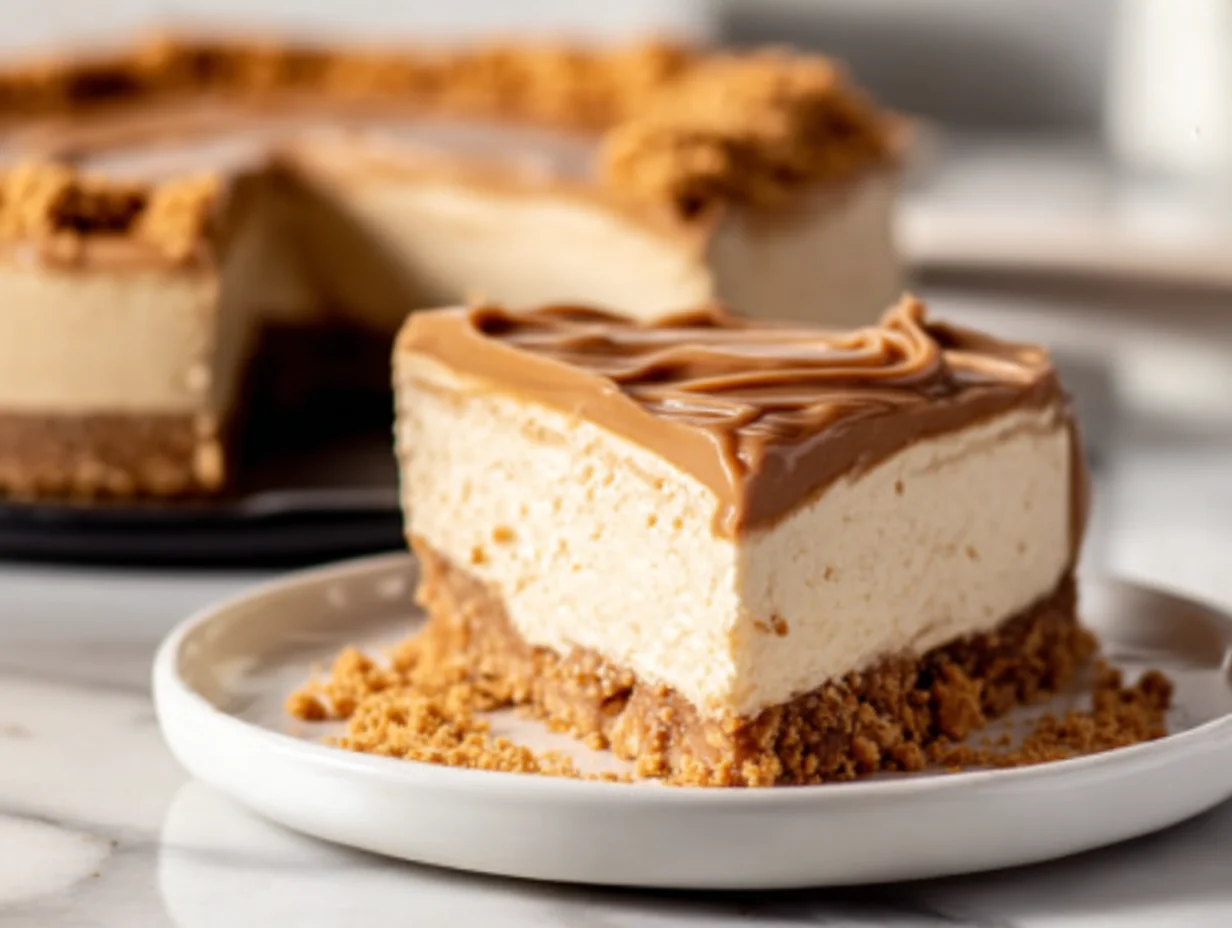
There’s something so satisfying about a dessert that doesn’t demand precise oven temperatures or perfect timing. It’s just simple ingredients, a few mixing bowls, and a little bit of chill time. Plus, the layered contrast of the buttery cookie crust and velvety Biscoff filling makes every bite feel like it came straight from a high-end bakery.
I made this for a weekend get-together not long ago, and let’s just say—there were no leftovers. One of my friends actually asked if I had bought it from a gourmet dessert shop! That’s how good it is. So if you’re looking to impress with minimal effort, or just want something decadent for your next sweet fix, keep reading. You’ll want to bookmark this one.
Ingredients You’ll Need
For the crust:
-
2 cups Biscoff cookies, finely crushed
-
6 tablespoons unsalted butter, melted
For the filling:
-
1 cup Biscoff spread (cookie butter)
-
16 ounces cream cheese, softened
-
1 cup powdered sugar
-
1 teaspoon vanilla extract
-
1 ¼ cups heavy cream, cold
For the topping:
-
¼ cup Biscoff spread, melted
-
Crushed Biscoff cookies for garnish (optional)
STEPS: Making the Crust and Creamy Filling
Let’s start with the base of this beauty—that buttery Biscoff cookie crust. It’s crunchy, sweet, and just the right amount of rich to balance the smooth filling on top.

1. Make the Crust
In a medium bowl, mix together the crushed Biscoff cookies and melted butter until the mixture looks like wet sand. You want every crumb to be evenly coated in butter so it holds together when pressed.
Then, pour this mixture into the bottom of a 9-inch springform pan. Use the bottom of a flat glass or measuring cup to press the crumbs firmly and evenly across the base. This step is key—it creates that delicious, sturdy foundation for your cheesecake.
Pop the pan into the fridge while you prep the filling. Chilling the crust gives it time to set, which helps everything hold together when you slice it later.
2. Whip the Filling
Grab a large mixing bowl and beat the softened cream cheese until it’s completely smooth. No lumps allowed! Then add in the powdered sugar, Biscoff spread, and vanilla extract. Keep mixing until it’s all creamy and fully combined.
In a separate bowl, whip the cold heavy cream until you get stiff peaks. This means the whipped cream will hold its shape when you lift the beaters—super important for giving your cheesecake that light, airy texture.
Now, gently fold the whipped cream into the Biscoff-cream cheese mixture. Take your time here. You want everything to be smooth and well-mixed without deflating the whipped cream.
3. Assemble the Cheesecake
Once the filling is ready, take your crust out of the fridge and spoon the filling over the top. Use a spatula to smooth out the surface, making sure it’s even from edge to edge.
Then—it’s chill time. Cover the pan and let the cheesecake sit in the fridge for at least 6 hours, but overnight is even better. The longer it sets, the firmer and easier it will be to slice.
![]()
Finishing Touches, Easy Tips, and Irresistible Variations for Your No-Bake Biscoff Cheesecake
So your cheesecake is chilling and the anticipation is real. If you’re anything like me, you’re probably checking the fridge every hour just to sneak a peek. But trust me—giving this dessert the full chill time it needs will make all the difference in how well it sets and slices.
Now it’s time for the part that makes this cheesecake look just as impressive as it tastes: the topping. This final step takes just a few minutes but transforms the entire dessert into something that looks totally bakery-worthy.
Let’s finish strong.
STEPS: Top, Chill, and Serve
4. Add the Biscoff Topping
Once your cheesecake is fully set (after at least 6 hours or overnight), it’s time to dress it up.
Start by melting ¼ cup of Biscoff spread. You can do this in the microwave for about 20–30 seconds—just until it’s smooth and pourable. Give it a quick stir, then drizzle it right over the top of the cheesecake. You can go rustic and let it drip down the sides, or spread it gently over the surface for a clean, glossy finish.
For a little added crunch and visual appeal, sprinkle some crushed Biscoff cookies on top. Totally optional—but highly recommended. It adds a lovely contrast to the creamy filling and just looks beautiful.

5. Slice and Serve
Once your cheesecake is topped, it’s officially ready to serve. To get those picture-perfect slices, run a sharp knife under hot water, wipe it dry, then make your first cut. Repeat between slices for that clean, smooth edge every time.
This cheesecake is best served chilled, and honestly—it holds up so well. It’s firm, yet creamy, rich without being too heavy, and has just the right amount of sweetness thanks to that Biscoff cookie butter magic.
Tips to Make It Even Better
Over the years, I’ve played with this recipe a few different ways, and here are some go-to tips that always help:
-
Use full-fat cream cheese. It’s the difference between a creamy, luscious texture and one that feels a little too soft. The fat helps the cheesecake set beautifully.
-
Whip your cream properly. Make sure your heavy cream is cold, and beat it until it forms stiff peaks. This step gives the cheesecake structure and that airy, mousse-like feel.
-
Don’t skip chilling. I know it’s tempting, but giving this dessert time to set is what takes it from soft to sliceable. Overnight is ideal, especially if you’re making it for a special event.
-
Make the crust ahead of time. You can press the crust into your pan and let it chill overnight, then add the filling the next day. It’s a great time-saver if you’re prepping for a dinner party.
-
Store leftovers in the freezer. Yes, you can freeze this cheesecake! Just wrap individual slices or the whole cheesecake tightly in plastic wrap and foil. Thaw in the fridge before serving. It’s just as creamy and dreamy even days later.
Simple Variations to Try
The classic version is honestly perfect on its own, but if you’re feeling creative, here are a few fun twists:
-
Add chocolate. Drizzle some melted dark chocolate over the Biscoff topping or add mini chocolate chips into the filling for a little extra indulgence.
-
Make it mini. Use a muffin tin with cupcake liners to create adorable mini cheesecakes. Great for parties or gifting.
-
Layer it in jars. Skip the springform pan and layer the crust, filling, and toppings into mason jars for a cute, portable dessert. Ideal for picnics or showers.
-
Swap the crust. If you want to change things up, try using graham crackers or Oreos instead of Biscoff for the base. It’ll give you a different flavor profile while keeping that creamy filling front and center.
-
Top with fruit. A few fresh raspberries or sliced strawberries on top can balance out the richness and add a pop of color.
No-Bake Biscoff Cheesecake: Your Questions Answered + Final Thoughts
Now that you’ve seen just how simple (and downright irresistible) this No-Bake Biscoff Cheesecake is, you might have a few lingering questions before you dive into making it. Don’t worry—I’ve got you covered.
Whether you’re prepping this dessert ahead for a dinner party or just want to know how long it’ll last in the fridge (hint: not long, because everyone will devour it), these FAQs will help you feel totally confident from start to finish.

Frequently Asked Questions
1. Can I make this cheesecake ahead of time?
Yes, absolutely! In fact, I recommend making it the day before you plan to serve it. The longer chill time helps it set perfectly, and the flavors really come together overnight. You can even prep the crust a day in advance, then finish the filling and topping the next morning.
2. How do I store leftovers?
Leftovers can be stored in the refrigerator for up to 4–5 days. Just cover the cheesecake tightly with plastic wrap or place slices in an airtight container. You can also freeze individual slices—wrap them in plastic wrap and aluminum foil, and thaw in the fridge before serving.
3. Can I use a different type of cookie for the crust?
Sure! While Biscoff cookies are the star here, you can definitely substitute graham crackers, Oreos, or digestive biscuits if needed. Just aim for the same quantity (about 2 cups of crumbs) and adjust the butter slightly if the texture feels too dry or too wet.
4. Do I need a springform pan?
A springform pan makes serving super easy, but if you don’t have one, you can use a deep-dish pie pan or even an 8×8 square baking dish. Just know that the slices might not come out as cleanly, but the flavor will still be spot-on.
5. Can I make this dairy-free or vegan?
You can make some substitutions to make it dairy-free or vegan. Use a plant-based cream cheese and a dairy-free whipped topping (like coconut whipped cream) instead of heavy cream. Make sure your Biscoff spread is vegan—most are, but always double-check the label.
6. What’s the best way to get a smooth, lump-free filling?
Make sure your cream cheese is fully softened before mixing, and beat it well before adding the other ingredients. Using room-temperature ingredients (except the whipped cream) will help everything blend smoothly without any lumps.
7. Can I add a gelatin or stabilizer to help it set?
This recipe sets beautifully on its own thanks to the cream cheese and whipped cream combo, but if you want a firmer texture (especially if you’re serving it at a warm event), you can dissolve a little gelatin in water and fold it into the filling. Not necessary, but it’s an option!
Final Thoughts: Time to Treat Yourself
I hope this No-Bake Biscoff Cheesecake becomes your new favorite go-to dessert, just like it has for me. It’s the kind of recipe that checks all the boxes—easy, impressive, and wildly delicious. Plus, it’s a total crowd-pleaser. Every time I bring this out for guests, it’s met with “wow, did you really make this?” and then quickly followed by requests for the recipe.
Whether you’re making it for a special occasion or just because you deserve something sweet and indulgent, this cheesecake never disappoints. It’s rich without being heavy, sweet but perfectly balanced, and every bite delivers that warm, spiced caramel flavor we all love in Biscoff cookies.
If you give this recipe a try, I’d love to hear how it turned out! Did you stick with the classic, or try a twist of your own? Drop your thoughts in the comments, share it with your dessert-loving friends, and don’t forget to save this one—you’ll definitely want to make it again.
Print
No Bake Biscoff Cheesecake
- Author: Sophia
Description
This No Bake Biscoff Cheesecake is a rich and indulgent dessert that combines the creamy texture of cheesecake with the spiced caramel flavor of Biscoff cookies. Made with a buttery Biscoff crust and a velvety filling infused with cookie butter, this chilled dessert is both elegant and easy to make. Perfect for entertaining or satisfying a sweet tooth without turning on the oven.
Ingredients
For the crust
2 cups Biscoff cookies, finely crushed
6 tablespoons unsalted butter, melted
For the filling
1 cup Biscoff spread (cookie butter)
16 ounces cream cheese, softened
1 cup powdered sugar
1 teaspoon vanilla extract
1 ¼ cups heavy cream, cold
For the topping
¼ cup Biscoff spread, melted
Crushed Biscoff cookies for garnish (optional)
Instructions
Mix the crushed Biscoff cookies and melted butter in a bowl until evenly combined. Press the mixture firmly into the bottom of a springform pan. Use the bottom of a glass or measuring cup to compact the crust. Place in the refrigerator to chill while preparing the filling.
In a large mixing bowl, beat the cream cheese until smooth and creamy. Add the powdered sugar, Biscoff spread, and vanilla extract. Continue beating until fully combined and no lumps remain.
In a separate bowl, whip the cold heavy cream until stiff peaks form. Gently fold the whipped cream into the Biscoff cream cheese mixture until fully incorporated and smooth.
Spoon the filling over the chilled crust and smooth the top with a spatula. Refrigerate the cheesecake for at least 6 hours, or overnight, until fully set.
Once set, drizzle the melted Biscoff spread over the top and garnish with crushed cookies if desired. Slice and serve chilled.
Notes
For a firmer set, allow the cheesecake to chill overnight. Use full-fat cream cheese for the creamiest texture. The crust can be made a day ahead and stored covered in the refrigerator. This cheesecake is best served cold and can be frozen for longer storage. To slice cleanly, use a sharp knife dipped in hot water and wiped dry between each cut.


