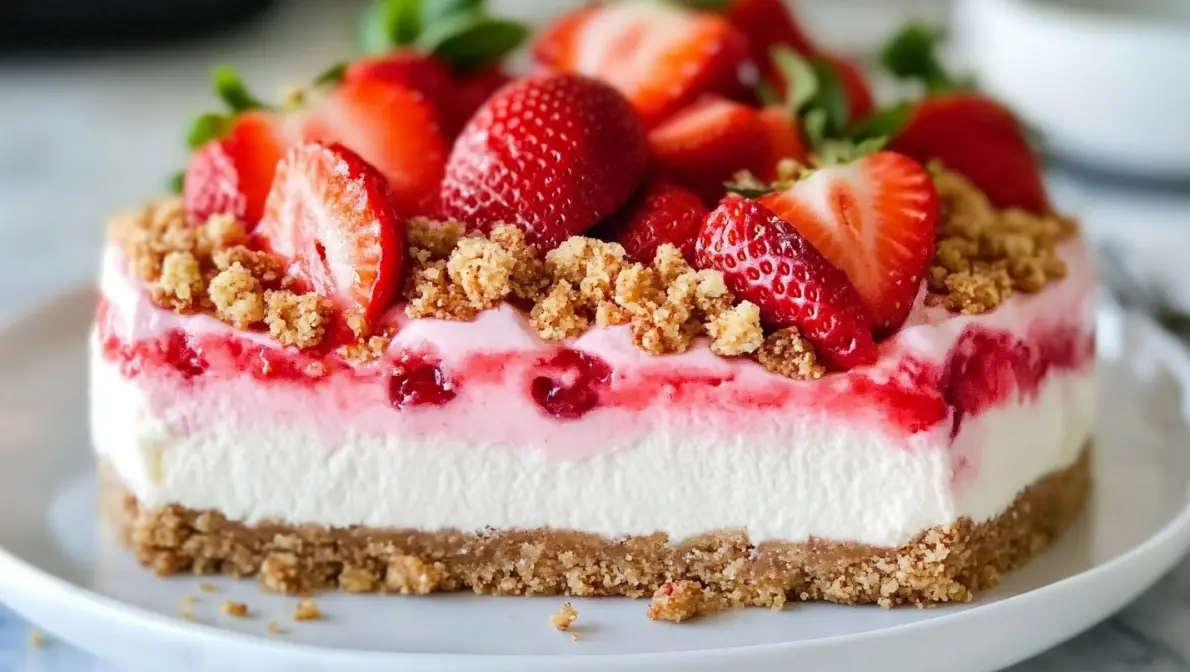
A No-Bake Strawberry Crunch Cheesecake is a delightful, no-fuss dessert that combines the tangy richness of cheesecake with the sweet, fruity flavor of fresh strawberries and a crunchy topping. Unlike traditional cheesecakes that require baking, this version is made entirely without the oven, making it an excellent choice for warm weather or when you’re short on time. With its creamy filling, vibrant strawberry layer, and crispy cookie crunch, it’s the perfect dessert for summer picnics, potlucks, or family gatherings. The ease of preparation and stunning presentation make it a crowd favorite, while the no-bake aspect ensures convenience.
Why You’ll Love This Recipe
This No-Bake Strawberry Crunch Cheesecake is a recipe you’ll come back to time and again because of its simplicity and versatility.
- Time-saving and easy to make: Without needing to bake, it’s perfect for busy days or hot kitchens.
- Perfect for all seasons: Fresh strawberries bring a bright, summery taste, but it can be made year-round with either fresh or frozen fruit.
- Ideal for gatherings: Its vibrant colors and layered textures make it a showstopper for any occasion, whether it’s a family dinner, birthday party, or holiday dessert.
- Customizable: You can switch up the base with graham crackers, Golden Oreos, or other cookies, and experiment with different fruits like raspberries or blueberries for variety. The crunchy topping can also be adapted with your favorite cookies or nuts.
Ingredients Breakdown
To make this No-Bake Strawberry Crunch Cheesecake, you’ll need simple, easy-to-find ingredients that come together to create a deliciously rich dessert:
- Crust: Crushed cookies form the base of the cheesecake. You can use Golden Oreos for extra sweetness or graham crackers for a more classic cheesecake flavor. Melted butter helps bind the crust together.
- Creamy Filling: The smooth, rich filling consists of softened cream cheese, whipped cream (for lightness), sugar (for sweetness), and a hint of vanilla extract. These ingredients create the fluffy and tangy center of the cheesecake.
- Strawberry Layer: Fresh strawberries provide a vibrant and juicy fruit layer. You can enhance the strawberry flavor by adding strawberry preserves or strawberry puree. Optional strawberry jello adds another layer of texture and flavor.
- Crunch Topping: The crunchy top layer is made with crushed cookies like Nilla Wafers, mixed with freeze-dried strawberries and a little butter to keep it crispy and flavorful.
Tools Needed
Having the right tools will make assembling your cheesecake easier:
- Springform pan: Essential for easy removal of the cheesecake.
- Food processor: To finely crush cookies for both the crust and the topping.
- Mixing bowls: For combining the ingredients.
- Hand mixer or stand mixer: For whipping the cream cheese and other filling ingredients until smooth.
- Spatula: To spread layers evenly.
- Measuring cups and spoons: For accurate measurements of ingredients.
These tools will help you achieve the best results with minimal effort!
Step-by-Step Instructions
Step 1: Prepare the Crust
- Crushing the cookies: Use a food processor to finely crush the Golden Oreos or graham crackers. If you don’t have a food processor, place the cookies in a ziplock bag and crush them with a rolling pin until they form fine crumbs.
- Mix with melted butter: Transfer the crushed cookies to a bowl and mix them with melted butter. Stir until the crumbs are evenly coated and the mixture has the consistency of wet sand.
- Press into the pan: Pour the cookie-butter mixture into the bottom of a springform pan. Use the back of a spoon or a flat-bottomed glass to press the crumbs into an even layer, ensuring it covers the entire base. Set it in the fridge to firm up while you prepare the filling.
Step 2: Make the Filling
- Whip the cream cheese: In a large mixing bowl, whip the softened cream cheese using a hand mixer or stand mixer until it’s smooth and creamy. Be sure to scrape down the sides of the bowl to avoid any lumps.
- Add sugar and vanilla: Gradually add in the sugar and vanilla extract. Beat the mixture until fully combined and smooth. The sugar should dissolve, leaving the mixture light and slightly sweet.
- Fold in whipped cream: In a separate bowl, whip heavy cream until soft peaks form. Gently fold the whipped cream into the cream cheese mixture using a spatula, being careful not to deflate the whipped cream. This step gives the filling a light, airy texture.
- Spread the filling: Pour the creamy mixture over the chilled crust and use the spatula to smooth it out into an even layer. Make sure the top is flat and uniform.
Step 3: Strawberry Layer
- Prepare the strawberries: Wash and hull fresh strawberries. If using frozen strawberries, make sure they are thawed and well-drained to avoid adding excess moisture to the cheesecake.
- Layer with strawberry preserves or puree: Spread a layer of strawberry preserves or strawberry puree over the cream cheese layer. The preserves add extra flavor, while the fresh strawberries create a juicy, fruit-forward bite.
- Optional jello topping: For additional texture, you can prepare strawberry-flavored jello according to the package instructions and pour a thin layer over the strawberry preserves. This optional step enhances the strawberry flavor and creates a beautiful, glossy finish.
Step 4: Crunch Topping
- Crushing the freeze-dried strawberries and cookies: In a food processor or by hand, crush freeze-dried strawberries and cookies (like Nilla Wafers) until they form coarse crumbs. You want a balance of texture, so avoid over-crushing into fine dust.
- Combine with butter: Melt a small amount of butter and stir it into the crumb mixture. This will bind the topping together and help it stay crunchy once applied.
- Sprinkle over the cheesecake: Evenly distribute the crunchy mixture over the top of the cheesecake. The colorful, crispy topping adds both texture and visual appeal to your dessert.
Step 5: Chill and Serve
- Refrigerate: Cover the cheesecake with plastic wrap or foil and refrigerate for at least 4 hours, or overnight for best results. This allows the filling to set properly and enhances the flavors.
- Serving tips: Once the cheesecake has fully set, carefully release the springform pan and transfer the cheesecake to a serving plate. Use a sharp knife to cut clean slices, wiping the knife between cuts for neat edges. Serve chilled and garnish with additional fresh strawberries if desired.
Expert Tips for the Best No-Bake Cheesecake
To ensure your No-Bake Strawberry Crunch Cheesecake turns out perfectly every time, here are some expert tips:
- Room temperature ingredients: Make sure your cream cheese is at room temperature before mixing. Cold cream cheese can cause lumps in the filling, making it difficult to achieve a smooth consistency. Similarly, room-temperature whipped cream blends more easily into the cream cheese mixture, giving you a fluffy, creamy texture.
- Chill time: Patience is key! Refrigerate your cheesecake for at least 4 hours, but ideally overnight. This allows the filling to set properly and gives the flavors time to meld. Skipping this step can result in a cheesecake that’s too soft to slice neatly.
- Avoiding a runny filling: Ensure you whip the cream cheese until smooth before adding sugar and whipped cream. If your filling seems runny, it could be due to overmixing or not enough time chilling. To avoid this, fold the whipped cream into the cream cheese mixture gently, ensuring you don’t deflate the air in the whipped cream.
Variations and Add-ins
There are plenty of ways to customize this cheesecake to suit your preferences:
- Flavor twists: Try swapping strawberries for raspberries, blueberries, or a mixed berry combination for a delicious twist. Each fruit brings its own flavor and color, giving your cheesecake a new dimension.
- Crust alternatives: Use graham crackers for a more traditional cheesecake base, or switch to chocolate cookies for a richer, decadent flavor.
- Topping ideas: Add extra flair with whipped cream, a drizzle of chocolate or caramel sauce, or a sprinkle of chopped nuts to enhance the texture and flavor.
Storage and Make-Ahead Tips
- Refrigerating leftovers: Store any leftover cheesecake in an airtight container in the fridge. It will stay fresh for 3 to 5 days.
- Freezing the cheesecake: If you want to make this dessert ahead of time or store leftovers for later, you can freeze it. Wrap the cheesecake tightly in plastic wrap and then in aluminum foil. It will keep in the freezer for up to 2 months. To thaw, transfer the cheesecake to the refrigerator overnight.
- Make-ahead instructions: Prepare the cheesecake up to 2 days in advance. Keep it in the fridge, and wait to add the crunch topping until just before serving to keep it crispy.
FAQs Section
1. Can I use frozen strawberries instead of fresh?
Yes, you can substitute frozen strawberries for fresh ones. However, make sure to thaw and drain them well before layering them onto the cheesecake to avoid adding excess moisture, which can make the filling too runny.
2. How long does no-bake cheesecake last in the fridge?
No-bake cheesecake can be stored in the refrigerator for about 3 to 5 days when kept in an airtight container. After that, the texture may start to degrade, and the flavor might diminish.
3. Can I freeze this cheesecake?
Yes, this cheesecake freezes beautifully. To freeze, wrap the entire cheesecake or individual slices tightly in plastic wrap, followed by aluminum foil to prevent freezer burn. It can be frozen for up to 2 months. Thaw the cheesecake in the fridge overnight before serving.
4. What if my cheesecake filling is too runny?
A runny filling can result from overmixing or not giving the cheesecake enough time to chill. To avoid this, make sure you don’t overwhip the filling, especially when folding in the whipped cream. Ensure you chill the cheesecake for at least 4 hours (preferably overnight) to allow it to set properly.
5. Can I make this dessert gluten-free?
Yes, you can make this dessert gluten-free by using gluten-free cookies for the crust. Be sure to check that all your other ingredients, such as whipped cream and jello, are certified gluten-free.
Print
No-Bake Strawberry Crunch Cheesecake
Description
This No-Bake Strawberry Crunch Cheesecake is a delicious and easy-to-make dessert that requires no oven time. It features a buttery cookie crust, a smooth and creamy cheesecake filling, and a vibrant strawberry layer, all topped with a crunchy cookie and freeze-dried strawberry crumble. Perfect for any occasion, this refreshing dessert combines sweet, fruity, and tangy flavors with a delightful contrast of textures. It’s an impressive showstopper that will wow your guests while being simple enough for even novice bakers to master.
Ingredients
- 1 lb Vanilla Cream Cookies about 34 cookies, with some reserved for topping
- 6 tbsp Butter melted
- 1 small box Strawberry Jello 3.3 oz
- 1 cup Boiling Water
- 16 oz Cream Cheese softened
- 3/4 cup Granulated Sugar
- 2 cups Heavy Whipping Cream
- 1/2 cup Powdered Sugar
- 10 Strawberry Wafer Cookies about 4 oz, for extra crunch
- 1/2 small tub Whipped Topping thawed, in a pastry bag with a star tip
Instructions
-
Crush 26 vanilla cream cookies into fine crumbs. Reserve remaining cookies for topping. Mix crumbs with melted butter until well-coated. Press into a greased 10-inch springform pan. Freeze crust for 15 minutes to set.
-
Dissolve strawberry jello in boiling water; set aside to cool.
-
Beat softened cream cheese with granulated sugar until smooth.
-
Whip heavy cream with powdered sugar until stiff peaks form.
-
Fold whipped cream into the cream cheese mixture. Gradually add cooled jello and fold until combined. Crush strawberry wafer cookies and fold into the filling.
-
Spread half of the filling over the crust; freeze for 15 minutes. Add remaining filling and smooth evenly.
-
Crush remaining cookies and wafers; optionally, add food coloring. Sprinkle over cheesecake and press lightly. Refrigerate for at least 4 hours.
-
Pipe decorative swirls with whipped topping just before serving.
Notes
- Use Room Temperature Ingredients: Ensure that the cream cheese and whipped cream are at room temperature to achieve a smooth, lump-free filling.
- Chill for Best Results: For the cheesecake to set properly, it must be refrigerated for at least 4 hours. For optimal flavor and texture, it’s best to refrigerate overnight.
- Customize the Crust: If you prefer a different flavor, you can swap out the Golden Oreos for graham crackers or chocolate cookies. Each will bring its own twist to the dessert.
- Add a Jello Layer: For extra texture and a glossy finish, you can add a thin layer of strawberry jello on top of the strawberry preserve layer.
- Make It Gluten-Free: Use gluten-free cookies for the crust to create a gluten-free version of this cheesecake.
- Prep Ahead: This dessert is great for making ahead of time. You can store it in the fridge for a couple of days, but wait to add the crunchy topping until just before serving to keep it crisp.