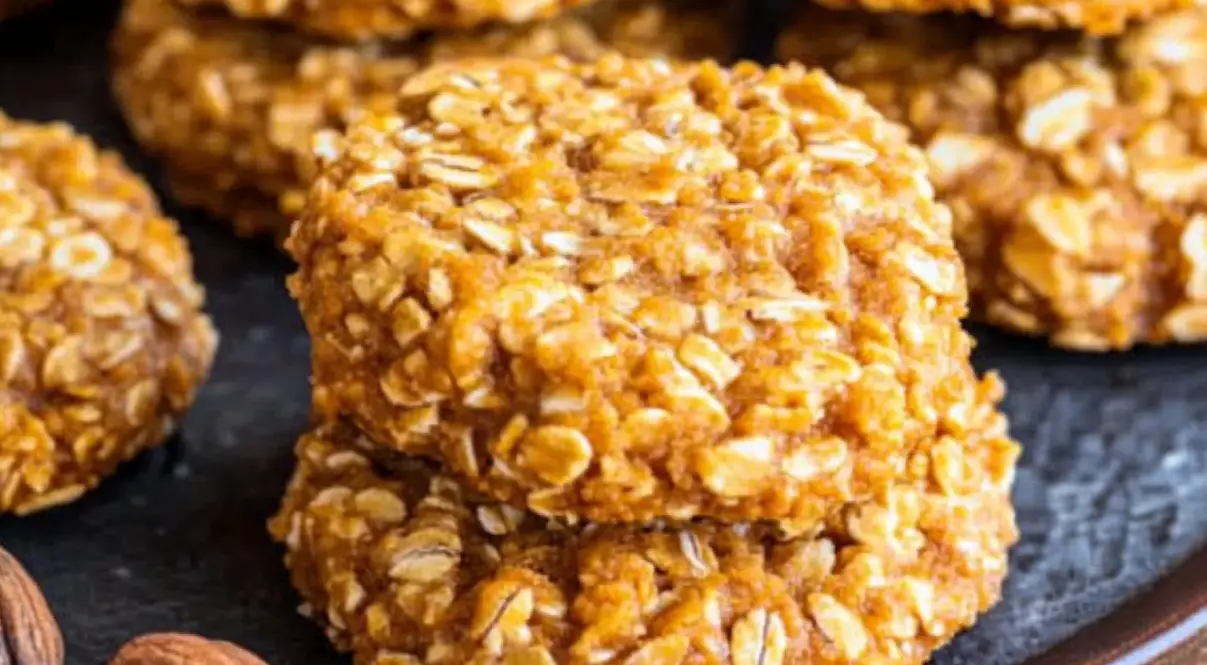
No-bake cookies have gained popularity for being quick, easy, and requiring no oven time—making them perfect for anyone who wants a simple dessert with minimal fuss. These cookies are particularly appealing because they can be prepared in a matter of minutes and don’t involve the hassle of traditional baking techniques.
Popularity of Pumpkin-Flavored Treats During the Fall Season:
Pumpkin-flavored treats, especially those featuring warm spices like cinnamon, nutmeg, and cloves, are beloved in the fall. From pumpkin spice lattes to pies, this versatile ingredient has become a staple during the cooler months, evoking the cozy spirit of autumn. Pumpkin no-bake cookies combine the flavor of the season with the simplicity of a no-bake dessert, making them an instant favorite.
Why Pumpkin No-Bake Cookies Are a Perfect Autumn Dessert:
Pumpkin no-bake cookies provide all the rich, spiced flavors of fall without the need to turn on the oven. Whether you’re short on time or just looking for a fun, kid-friendly treat to whip up in minutes, these cookies are the perfect solution. They’re great for satisfying sweet cravings while also incorporating nutritious ingredients like oats and pumpkin puree.
Brief History and Popularity of No-Bake Cookies
Origins of No-Bake Cookies and Their Place in American Culture:
No-bake cookies first gained popularity in the mid-20th century as an easy, homemade treat that families could prepare without fancy equipment. They became particularly common in American households where quick, inexpensive desserts were in demand.
Evolution of Seasonal Varieties (e.g., Pumpkin Spice):
Over the years, no-bake cookies have evolved, with new flavors emerging to match seasonal preferences. The rise of pumpkin spice in the 2000s spurred interest in pumpkin-infused recipes, leading to the creation of autumnal treats like pumpkin no-bake cookies.
Why Choose No-Bake?
- Time-Saving:
No-bake cookies are ideal for busy schedules because they don’t require baking time, allowing you to prepare them in under 30 minutes. - Energy-Efficient:
Since no oven is required, you save energy—perfect for warmer fall days when you want to avoid heating up the kitchen. - Kid-Friendly and Easy to Make:
With simple, safe steps, no-bake cookies are perfect for involving kids in the kitchen. They’re fun to make and customize with add-ins, making them a delightful family activity.
Ingredients Breakdown
Main Ingredients for Pumpkin No Bake Cookies
- Pumpkin Puree (Health Benefits and Flavor Profile):
Pumpkin puree is the star ingredient in these cookies, adding a subtle sweetness and smooth texture. It’s also packed with vitamins A, C, and fiber, making it a nutritious choice for dessert. The earthy, rich flavor of pumpkin pairs beautifully with autumn spices. - Rolled Oats (Nutritional Value and Texture):
Rolled oats provide the perfect chewy texture to these no-bake cookies while also delivering fiber and a range of essential nutrients. They act as a great binder and add heartiness, making the cookies more filling. - Sweeteners: Maple Syrup, Honey, or Brown Sugar (Flavor and Natural Sweetness):
To sweeten the cookies, options like maple syrup or honey add natural sweetness, while brown sugar offers a deeper, caramel-like flavor. Each sweetener brings its own unique profile, allowing for flexibility based on taste preferences. - Peanut Butter or Almond Butter (Added Protein and Creamy Texture):
Nut butters, such as peanut or almond, provide a creamy, rich consistency and boost the protein content of the cookies. This ingredient also helps to bind the other components together. - Spices: Pumpkin Pie Spice, Cinnamon, Nutmeg (Autumnal Flavors):
A blend of pumpkin pie spice, cinnamon, and nutmeg infuses the cookies with the warmth and fragrance of fall. These spices elevate the flavor of the pumpkin puree and complement the sweetness. - Optional Add-Ins: Chocolate Chips, Nuts, Coconut Flakes (Customizable Options):
For a personal touch, add-ins like chocolate chips, chopped nuts, or coconut flakes can be mixed into the dough. These elements offer texture and extra flavor, allowing you to tailor the recipe to your liking.
Substitutions and Alternatives
- Gluten-Free Options (Gluten-Free Oats):
For those with gluten sensitivities, swapping regular oats for certified gluten-free oats ensures the recipe remains safe to consume without compromising taste or texture. - Vegan Substitutes (Agave, Vegan Chocolate Chips, Dairy-Free Butter):
To make this recipe vegan, simply use agave syrup instead of honey, and choose vegan chocolate chips and dairy-free butter substitutes. These changes retain the same delicious flavor and texture while making the cookies suitable for all diets. - Sugar-Free or Lower-Calorie Options (Using Stevia or Monk Fruit Sweeteners):
If you’re looking to cut down on sugar, sugar alternatives like stevia or monk fruit sweeteners can be used in place of traditional sweeteners. This keeps the cookies sweet but reduces the overall calorie count, making them a healthier option.
Step-by-Step Recipe Instructions
Step 1: Preparing the Ingredients
- How to Measure the Dry and Wet Ingredients:
To ensure consistency in your cookies, it’s important to accurately measure both the dry and wet ingredients. Use a kitchen scale or measuring cups for precise measurements. Rolled oats, peanut butter, and pumpkin puree are the core ingredients. Make sure to pack the peanut butter into the measuring cup and level it off for accuracy. For pumpkin puree, smooth out the top of the measurement to avoid too much moisture. - Mixing the Spices with the Pumpkin Puree for Maximum Flavor Infusion:
Before you combine all the ingredients, mix your spices (pumpkin pie spice, cinnamon, nutmeg) into the pumpkin puree. This allows the flavors to meld and evenly distribute throughout the cookies. Let the mixture sit for a few minutes to fully absorb the spices before adding it to the rest of the ingredients.
Step 2: Mixing the Base
- Combining the Oats, Peanut Butter, and Sweeteners for the Right Texture:
In a large mixing bowl, combine the rolled oats with the peanut or almond butter, along with your chosen sweeteners (maple syrup, honey, or brown sugar). Stir until the mixture is evenly combined and starts to come together as a dough. The oats will act as the base, while the peanut butter binds everything together. - Tips on Consistency (What to Do if It’s Too Dry or Too Wet):
If your cookie mixture appears too dry and isn’t sticking together, add a little more peanut butter or an extra tablespoon of maple syrup or honey to increase moisture. If the mixture is too wet and runny, gradually add more oats until you reach the desired consistency. The dough should hold its shape but not be overly sticky.
Step 3: Forming the Cookies
- How to Properly Shape the No-Bake Cookies (Using a Spoon or Hands):
Once the dough has reached the correct texture, use a tablespoon or a small ice cream scoop to portion out the cookies. Roll each portion into a ball using your hands, or gently flatten them if you prefer a more traditional cookie shape. For uniformity, try to make each cookie the same size. - Refrigeration Tips for Firming Up the Cookies:
After shaping the cookies, place them on a baking sheet lined with parchment paper. Refrigerate the cookies for at least 30 minutes to help them firm up. If you’re in a hurry, you can pop them in the freezer for 10-15 minutes for faster results. Once they’re firm, the cookies will hold their shape when served.
Step 4: Storing and Serving
- Proper Storage: Refrigerator or Freezer for Long-Term Freshness:
To keep your pumpkin no-bake cookies fresh, store them in an airtight container in the refrigerator for up to 7-10 days. For longer storage, place them in the freezer, where they can last for up to 2 months. Be sure to separate layers with parchment paper to prevent the cookies from sticking together. - Serving Suggestions: Pairing with a Fall-Themed Drink (Like Spiced Lattes or Apple Cider):
These cookies are perfect when served with a warm drink, especially during the fall. Try pairing them with a spiced latte, chai tea, or apple cider for a cozy seasonal treat. You can also serve them as part of a dessert platter at holiday gatherings.
Nutritional Information and Health Benefits
Health Benefits of Pumpkin No Bake Cookies
- Nutritional Benefits of Pumpkin: Rich in Vitamins A, C, and Fiber:
Pumpkin is a nutrient-dense ingredient, loaded with vitamins A and C, which support eye health and immune function. It’s also high in fiber, promoting digestive health and providing a sense of fullness with fewer calories. - Rolled Oats: A Source of Fiber and Heart-Healthy Grains:
Rolled oats are a great source of soluble fiber, which can help lower cholesterol and maintain steady blood sugar levels. They also provide complex carbohydrates for lasting energy. - Protein Boost from Peanut or Almond Butter:
Both peanut butter and almond butter are excellent sources of protein and healthy fats. Including them in these cookies adds not only flavor but also nutrition, making them more satisfying and energizing.
Calorie Breakdown and Nutritional Facts
- Estimated Calories per Serving (With and Without Add-Ins Like Chocolate):
On average, each cookie contains about 120-150 calories, depending on the ingredients and optional add-ins like chocolate chips or nuts. Without add-ins, the calorie count is on the lower side, around 120 calories. - Macros: Protein, Carbs, Fats per Cookie:
Each cookie typically provides around 4-5 grams of protein (from oats and nut butter), 15-18 grams of carbs (mostly from oats and sweeteners), and 6-8 grams of fat (from peanut or almond butter).
Tips and Tricks for Perfect Pumpkin No Bake Cookies
How to Achieve the Perfect Texture
- Balancing Wet and Dry Ingredients for Chewy Versus Soft Cookies:
For chewy cookies, use a bit more oats or decrease the pumpkin puree. If you prefer softer cookies, add a little extra pumpkin or reduce the oats. Achieving the right balance ensures that your cookies aren’t too dry or too mushy. - The Role of Refrigeration and How Long to Chill the Cookies:
Chilling is essential for setting the no-bake cookies. Be patient and let them firm up in the fridge for at least 30 minutes. This step allows the ingredients to bind together and enhances the texture. For firmer cookies, leave them in the fridge longer.
Flavor Enhancements and Variations
- Adding Extra Spices for More Flavor (e.g., Cloves, Cardamom):
If you want to intensify the autumnal flavors, try adding a pinch of ground cloves or cardamom to the spice mix. These spices will give your cookies a more complex, aromatic profile. - Different Nut Butters for Unique Taste Profiles (e.g., Cashew Butter):
Experiment with different nut butters like cashew or sunflower seed butter. Each nut butter has a distinct flavor that can change the overall taste of the cookies. Cashew butter, for example, offers a milder, creamier flavor.
Mistakes to Avoid
- Common Errors (e.g., Using Too Much Liquid or Not Refrigerating Long Enough):
Using too much liquid (from pumpkin or sweeteners) can make the cookies too soft, while not refrigerating them long enough may result in a cookie that falls apart. Be mindful of the ingredient ratios and always give the cookies enough time to set. - Solutions to Fix Runny or Crumbly Cookies:
If the cookies are too runny, add more oats or nut butter to absorb the moisture. If they’re too crumbly, mix in a little more pumpkin puree or peanut butter to help bind the ingredients.
Seasonal and Holiday Variations
Adapting the Recipe for Different Seasons
- Spring/Summer: Adding Citrus Zest or Dried Fruits
To give these no-bake cookies a refreshing spring or summer twist, try adding a bit of citrus zest—such as lemon or orange—for a burst of bright flavor. Dried fruits like cranberries, apricots, or raisins also provide natural sweetness and chewiness, making these cookies adaptable for warmer seasons when pumpkin spice might feel a little heavy. - Winter: Incorporating Peppermint or Gingerbread Flavors
For a festive winter touch, consider adding peppermint extract or crushed peppermint candies to the mix. Alternatively, incorporate gingerbread spices like cloves, ginger, and molasses to create a cozy, holiday-ready cookie.
Holiday-Themed Cookie Ideas
- Thanksgiving: Adding Pecans or Cranberries
For a Thanksgiving variation, add chopped pecans or dried cranberries to the dough. The pecans give a crunchy texture, while the cranberries add a tart contrast to the pumpkin flavor, making the cookies a perfect post-Thanksgiving dinner treat. - Halloween: Using Orange and Black Sprinkles or Candy Decorations
To make the cookies more festive for Halloween, decorate them with orange and black sprinkles, or add candy corn for a fun twist. You could also shape the cookies into pumpkins or other spooky designs, making them a hit at Halloween parties.
Kid-Friendly and Family Involvement
How to Make the Recipe with Kids
- Safe Steps for Children to Help With (Mixing, Shaping the Cookies):
This recipe is ideal for kids to join in! Children can safely mix ingredients, roll or shape the dough into cookies, and even decorate them with sprinkles or other toppings. No hot oven means no risk of burns, making it a safe and fun activity for all ages. - Customizing the Cookies with Different Toppings (Sprinkles, M&M’s):
Let kids add their favorite toppings, like colorful sprinkles, mini M&M’s, or even mini marshmallows. This allows them to personalize their cookies while getting creative.
Making the Recipe for Parties and Events
- How to Easily Double or Triple the Batch:
Pumpkin no-bake cookies are a crowd-pleaser at parties, and it’s easy to double or triple the recipe. Just multiply the ingredients and be sure to prepare enough fridge space to chill larger quantities. - Presentation Ideas for Fall-Themed Gatherings:
Serve the cookies on a festive platter decorated with autumn leaves or pumpkins, and pair them with fall-themed beverages like apple cider or hot chocolate to enhance the seasonal vibe.
Frequently Asked Questions (FAQs)
- How long do pumpkin no-bake cookies last?
Pumpkin no-bake cookies can last for up to 1-2 weeks when stored properly. Keep them in an airtight container in the refrigerator to maintain freshness. For longer storage, freeze the cookies and they’ll last up to 3 months. Thaw in the fridge before serving. - Can I make this recipe without oats?
Yes! If you’re looking for an alternative to oats, you can substitute quinoa flakes or puffed rice cereal. Both options provide a different texture, with quinoa flakes being slightly crunchier and puffed rice giving a light, airy texture. - What can I substitute for peanut butter?
If you need a peanut butter alternative, almond butter, sunflower seed butter, or tahini work well. Sunflower seed butter is great for those with nut allergies, while almond butter adds a slightly sweeter, nuttier flavor. - Can I make these cookies vegan or gluten-free?
Absolutely! To make the recipe vegan, use agave syrup or maple syrup instead of honey and choose dairy-free chocolate chips. For gluten-free cookies, ensure you’re using certified gluten-free oats. This makes the recipe accessible to everyone, regardless of dietary preferences. - Why didn’t my cookies firm up?
If your cookies didn’t firm up, it’s likely due to too much moisture in the mix. You may need to add more oats or allow extra chilling time in the refrigerator. Another potential issue is not refrigerating long enough—be sure to chill for at least 30 minutes to an hour for the cookies to properly set.

Pumpkin No Bake Cookies
Description
Pumpkin No-Bake Cookies are a quick, easy, and delicious treat perfect for fall. These cookies combine the warm flavors of pumpkin, cinnamon, and nutmeg with the chewy texture of oats and the creaminess of nut butter. Best of all, there’s no need to turn on the oven! These cookies are mixed together, shaped, and then chilled in the fridge to set, making them a perfect snack or dessert to whip up in under 30 minutes. Customize them with your favorite add-ins like chocolate chips, chopped nuts, or shredded coconut for a unique twist.
Ingredients
- 1/3 cup Pumpkin Puree
- 1/2 cup Unsalted Butter
- 1/2 cup Granulated Sugar
- 2 cups Quick Oats
- 1/4 cup Milk
- 1/4 teaspoon Pumpkin Pie Spice
- 1 pinch Salt
- 1/4 teaspoon Vanilla Extract
Instructions
-
Line a baking sheet with parchment paper.
-
In a medium saucepan, melt together the butter, sugar and milk on high heat until all the ingredients are melted and combined.
-
Boil the mixture for 1-2 minutes.
-
Remove from heat.
-
Stir in the vanilla extract, pumpkin pie spice, pumpkin puree and quick oats until well combined.
-
Using a medium (2 Tbsp) cookie scoop or two spoons, drop mixture onto the lined baking sheet.
-
Allow to rest at room temperature until set, about 20 – 30 minutes (to speed up setting refrigerate).
-
Then the cookies are ready to serve and enjoy!
Notes
- Pumpkin Puree:
Be sure to use pure pumpkin puree and not pumpkin pie filling, which is already sweetened and spiced. Canned pumpkin is convenient, but you can also use homemade pumpkin puree if desired. - Oats:
Rolled oats work best for texture, giving the cookies a nice chew. If you prefer a finer texture, you can pulse the oats briefly in a food processor. For a gluten-free version, ensure you use certified gluten-free oats. - Sweeteners:
You can adjust the sweetness based on preference. For a more natural sweetness, use maple syrup or honey. For a deeper flavor, you can use brown sugar. If you want a lower-calorie option, consider using a natural sugar substitute like monk fruit. - Nut Butter:
Peanut butter provides a great balance of creaminess and flavor, but feel free to substitute with almond butter, cashew butter, or sunflower seed butter for different tastes or to accommodate allergies. Make sure the nut butter is smooth and not too runny, as it helps bind the cookies together. - Spices:
Use a blend of pumpkin pie spice or a combination of cinnamon, nutmeg, and cloves. For an extra spice kick, you can add a pinch of ground ginger or cardamom. - Consistency Tips:
If the mixture feels too wet, add more oats or chill the dough for a few minutes to firm it up. If it feels too dry, add a little more pumpkin puree or nut butter to help bind the ingredients. - Chilling:
Allow the cookies to chill in the fridge for at least 30 minutes so they can set properly. If you’re in a rush, you can pop them into the freezer for 10-15 minutes to speed up the process. - Add-Ins:
Get creative with add-ins like chocolate chips, dried cranberries, chopped nuts, or shredded coconut. This allows you to tailor the cookies to your own taste and make them unique for different occasions. - Storage:
Store the cookies in an airtight container in the refrigerator for up to 1-2 weeks. You can also freeze them for up to 3 months—just thaw them in the fridge before serving.


