If you’re anything like me, there are certain flavor combos that just never get old—and peanut butter and chocolate are right at the top of that list. There’s something about that sweet-salty nuttiness paired with rich, melty chocolate that makes every bite feel like a warm hug. That’s exactly what you get with these Reese’s Peanut Butter No-Bake Bars—all the nostalgic flavors of your favorite candy, with a whole lot less effort.
You won’t need an oven, a long prep time, or any fancy kitchen gadgets. Just a mixing bowl, a baking dish, and a craving for something truly delicious. Whether you’re whipping up a treat for a party, stashing some away for midnight snacks, or looking for a foolproof dessert your kids can help with, this recipe checks every box.
I first made these bars on a particularly busy weekend when I needed something sweet in a pinch. No time to bake, no patience for complicated instructions—but the craving for chocolate and peanut butter? Strong. And let me tell you, these bars delivered. Since then, they’ve become a family favorite and a potluck staple. People go nuts for them (pun totally intended).
Let’s dive into how easy these bars are to make. Trust me—you’ll be coming back to this recipe again and again.

Ingredients You’ll Need
-
1 cup unsalted butter, melted
-
2 cups graham cracker crumbs
-
2 cups powdered sugar
-
1 ½ cups creamy peanut butter
-
1 ½ cups semi-sweet chocolate chips
-
¼ cup creamy peanut butter (for the topping layer)
You probably have most of these in your pantry already, and that’s the beauty of this recipe. No need to run out to the store or hunt for hard-to-find items. And if you want to get a little creative with substitutions, don’t worry—we’ll talk about that in Part 2.
STEP 1: Mix the Peanut Butter Base
Start by grabbing a large mixing bowl. Combine the melted butter, graham cracker crumbs, powdered sugar, and 1 ½ cups of peanut butter. Mix everything together until it’s completely smooth and well blended. The texture should be soft and easy to press but not too runny.
Here’s a quick tip: Make sure your butter is fully melted but not scorching hot. If it’s too hot, it can separate the peanut butter and make the mixture greasy. A quick zap in the microwave or a gentle melt on the stovetop will do the trick.

STEP 2: Press Into the Pan
Take out a 9×13-inch baking dish (no need to grease it—there’s plenty of butter in the mix already). Pour the peanut butter mixture into the dish and use a spatula, the back of a spoon, or even your hands (I won’t tell!) to press it down evenly. Make sure to get into those corners and pack it firmly.
This layer is the heart of the bar—it’s rich, sweet, and slightly crumbly with just enough structure to hold everything together. You want it nice and compact so it doesn’t fall apart when you cut it later.
STEP 3: Melt the Chocolate Topping
In a microwave-safe bowl, combine the semi-sweet chocolate chips and the remaining ¼ cup of peanut butter. Microwave the mixture in 30-second intervals, stirring well between each round, until everything is melted and silky smooth.
This step usually takes about 1 to 1½ minutes total, depending on your microwave. Stirring is important—it prevents the chocolate from scorching and ensures a glossy, even melt. If you’d rather do this on the stovetop, a double boiler works beautifully.
Once the chocolate and peanut butter are completely melted and smooth, get ready to pour on the magic.
![]()
STEP 4: Spread the Chocolate Over the Base
Carefully pour the melted chocolate mixture over your peanut butter base. Use a spatula to spread it evenly across the top, making sure every inch is covered. That top layer will harden into a rich, candy-like shell that’s pure perfection.
And here’s a little trick I love: If you want a super-smooth finish, give the pan a gentle shake or tap it on the counter a few times. It helps settle the chocolate and smooth out any spatula marks.
Reese’s Peanut Butter No-Bake Bars: Easy Steps & Pro Tips
Now that we’ve layered our dreamy peanut butter base and rich chocolate topping, we’re almost there! The hardest part—if you can even call it that—is waiting for these bars to chill and set. But trust me, the payoff is so worth it.
This next section will walk you through the final steps, plus a few helpful tips to make your no-bake bars look and taste like a pro made them. I’ll also throw in some of my favorite variations and time-saving hacks, especially if you’re planning to make these ahead for a party, bake sale, or just a busy weeknight dessert.
STEP 5: Chill to Set
Once your chocolate layer is evenly spread across the peanut butter base, transfer the entire baking dish to the refrigerator. Let the bars chill for at least 2 hours, or until the chocolate has completely set.
You’ll know they’re ready when the chocolate is firm to the touch and doesn’t smudge. It’s tempting to rush this step, especially when your kitchen smells like heaven, but giving the bars enough time to chill ensures clean cuts and that perfect layered look.
Pro Tip: If you’re in a hurry, you can pop the pan in the freezer for about 45 minutes. Just don’t forget about them—chocolate can get brittle when over-frozen, which makes slicing a little more difficult.
STEP 6: Slice and Serve
Once the bars are chilled and firm, take them out of the fridge and let them sit at room temperature for 5-10 minutes. This quick step helps soften the chocolate slightly, making slicing easier and preventing cracks in the top layer.
Using a sharp knife, cut the bars into squares. You can go small if you’re serving a crowd, or cut them into larger portions for a more indulgent treat. I’ve found that wiping the knife clean between cuts helps keep the edges neat and presentable—especially if you’re aiming for that Pinterest-worthy finish.
These bars are rich, so a little goes a long way. But don’t be surprised if people come back for seconds (or thirds).

Tips and Tricks for the Best No-Bake Bars
1. Use Good-Quality Chocolate:
Since chocolate is a major flavor in these bars, using high-quality semi-sweet chocolate chips really makes a difference. Brands like Ghirardelli or Guittard melt beautifully and taste amazing.
2. Make It Crunchy:
Want a bit more texture? Try using crunchy peanut butter in the base or even stirring in some crushed pretzels or chopped peanuts for a salty-sweet twist.
3. Sweeten It Up or Down:
If you prefer your desserts a little less sweet, reduce the powdered sugar by ¼ cup. On the flip side, swapping semi-sweet chocolate for milk chocolate gives a more candy bar-like sweetness.
4. Add a Drizzle or Sprinkle:
Before the chocolate sets, sprinkle the top with a little flaky sea salt, crushed peanuts, or even mini Reese’s Pieces for a fun and festive touch. A simple peanut butter drizzle using a piping bag (or a zip-top bag with the corner snipped) also looks beautiful.
5. Line Your Pan:
If you want to lift the bars out of the pan easily for slicing, line your baking dish with parchment paper before pressing in the base layer. Once the bars are set, you can lift the whole slab out and slice it on a cutting board.
Make-Ahead and Freezer Friendly
One of my favorite things about these no-bake bars is how well they hold up in the fridge and freezer. You can absolutely make them a day (or even two) ahead of time and keep them in the refrigerator, tightly covered.
Freezing Tips:
-
After the bars have fully set, slice them and place in an airtight container.
-
Put parchment or wax paper between layers to keep them from sticking.
-
Freeze for up to 2 months.
-
Thaw in the fridge overnight, or let them sit at room temperature for about 30 minutes before serving.
They taste just as good (some say even better!) after being frozen—perfect for those moments when you need an emergency dessert.
Reese’s Peanut Butter No-Bake Bars: FAQs and Final Thoughts
We’ve mixed, pressed, melted, chilled, and sliced our way through one of the easiest (and most delicious) desserts out there. Whether this is your first batch or your fiftieth, these bars are the kind of recipe you’ll come back to whenever you need a reliable, crowd-pleasing treat.
Before we wrap up, let’s go over a few common questions that pop up when making these no-bake bars. These tips will help you avoid mishaps and customize the recipe to fit your taste or dietary needs.
Frequently Asked Questions
1. Can I use natural peanut butter instead of regular creamy peanut butter?
You can, but with caution. Natural peanut butter tends to separate and has a runnier consistency, which might make the base layer too soft. If you’re using it, try to stir it well and consider adding a little extra graham cracker crumbs to firm things up.
2. What can I use instead of graham cracker crumbs?
If graham crackers aren’t available, try digestive biscuits, vanilla wafers, or even crushed pretzels for a saltier twist. Just be sure the crumbs are finely crushed for best results.
3. How do I keep the chocolate layer from cracking when I slice it?
Let the bars sit at room temperature for 5–10 minutes before cutting. Using a sharp knife and wiping it clean between cuts will also help keep edges neat and minimize cracking.
4. Can I make these bars gluten-free?
Yes! Just swap the graham cracker crumbs with a gluten-free alternative—many grocery stores carry gluten-free graham crackers or similar cookies that work just as well.
5. What’s the best way to store leftovers?
Store the bars in an airtight container in the refrigerator for up to 1 week. If stacking them, place parchment paper between layers to prevent sticking.
6. Can these bars be made dairy-free?
You can try using dairy-free butter and dairy-free chocolate chips. Just make sure to double-check that your peanut butter and other ingredients are also dairy-free.
7. Are these bars freezer-friendly?
Absolutely. They freeze beautifully. Just cut them into squares, separate layers with parchment, and store them in a freezer-safe container for up to 2 months.
Final Thoughts
Reese’s Peanut Butter No-Bake Bars are one of those recipes that deliver maximum payoff with minimal effort. No oven, no complicated techniques—just a few pantry staples and a craving for something sweet.
They’re perfect for busy weekdays, last-minute gatherings, bake sales, or anytime you want a little chocolate-peanut butter pick-me-up. Plus, they’re super easy to customize, whether you want to dial up the texture, adjust the sweetness, or turn them into freezer-ready treats.
If you give these a try, I’d love to hear how they turned out. Did you stick with the classic version or add your own spin? Maybe a drizzle of white chocolate, a sprinkle of sea salt, or a surprise layer of crushed pretzels? Let me know in the comments—I always enjoy seeing how you make these recipes your own.
Print
Reese’s Peanut Butter No-Bake Bars
- Author: Sophia
Description
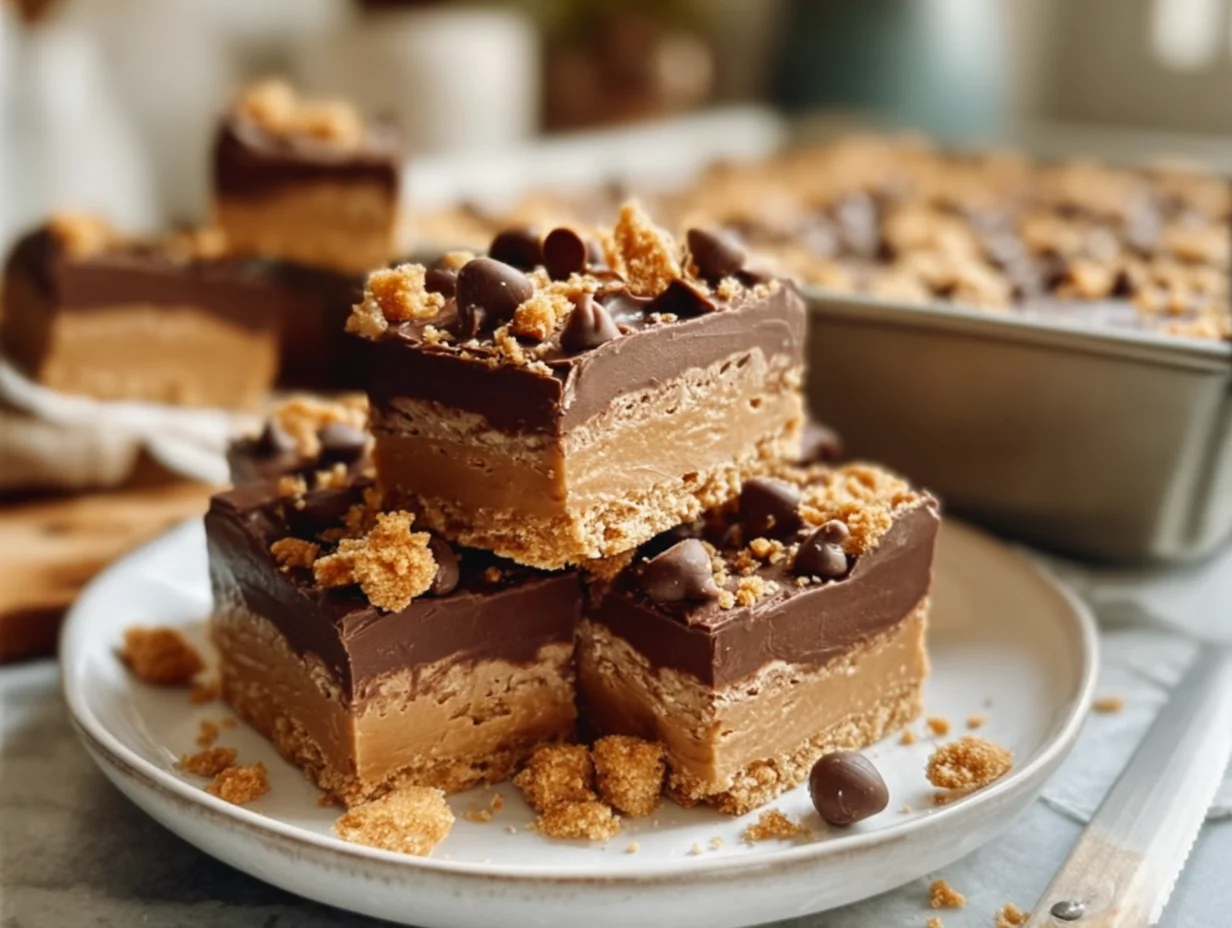
These Reese’s Peanut Butter No-Bake Bars are the ultimate treat for peanut butter and chocolate lovers. With a soft, sweet peanut butter base and a thick layer of rich chocolate on top, they taste just like the classic candy—only easier to make and perfect for sharing. No oven required, and they come together in just minutes with simple pantry ingredients.
Ingredients
1 cup unsalted butter, melted
2 cups graham cracker crumbs
2 cups powdered sugar
1 ½ cups creamy peanut butter
1 ½ cups semi-sweet chocolate chips
¼ cup creamy peanut butter (for topping layer)
Instructions
In a large mixing bowl, combine the melted butter, graham cracker crumbs, powdered sugar, and 1 ½ cups of peanut butter. Stir until the mixture is well combined and smooth.
Press the peanut butter mixture evenly into the bottom of a 9×13-inch baking dish. Use a spatula or the back of a spoon to pack it down firmly.
In a microwave-safe bowl, melt the chocolate chips and the remaining ¼ cup of peanut butter together in 30-second intervals, stirring in between, until smooth and fully melted.
Pour the melted chocolate mixture over the peanut butter base and spread it evenly with a spatula.
Refrigerate the bars for at least 2 hours, or until the chocolate is set and firm.
Once chilled, slice into squares and serve. Store leftovers in the refrigerator.
Notes
For a cleaner cut, let the bars sit at room temperature for a few minutes before slicing. You can use crunchy peanut butter for added texture or swap semi-sweet chocolate with milk chocolate if you prefer a sweeter topping. These bars freeze well, making them an ideal make-ahead dessert for parties, holidays, or late-night cravings.