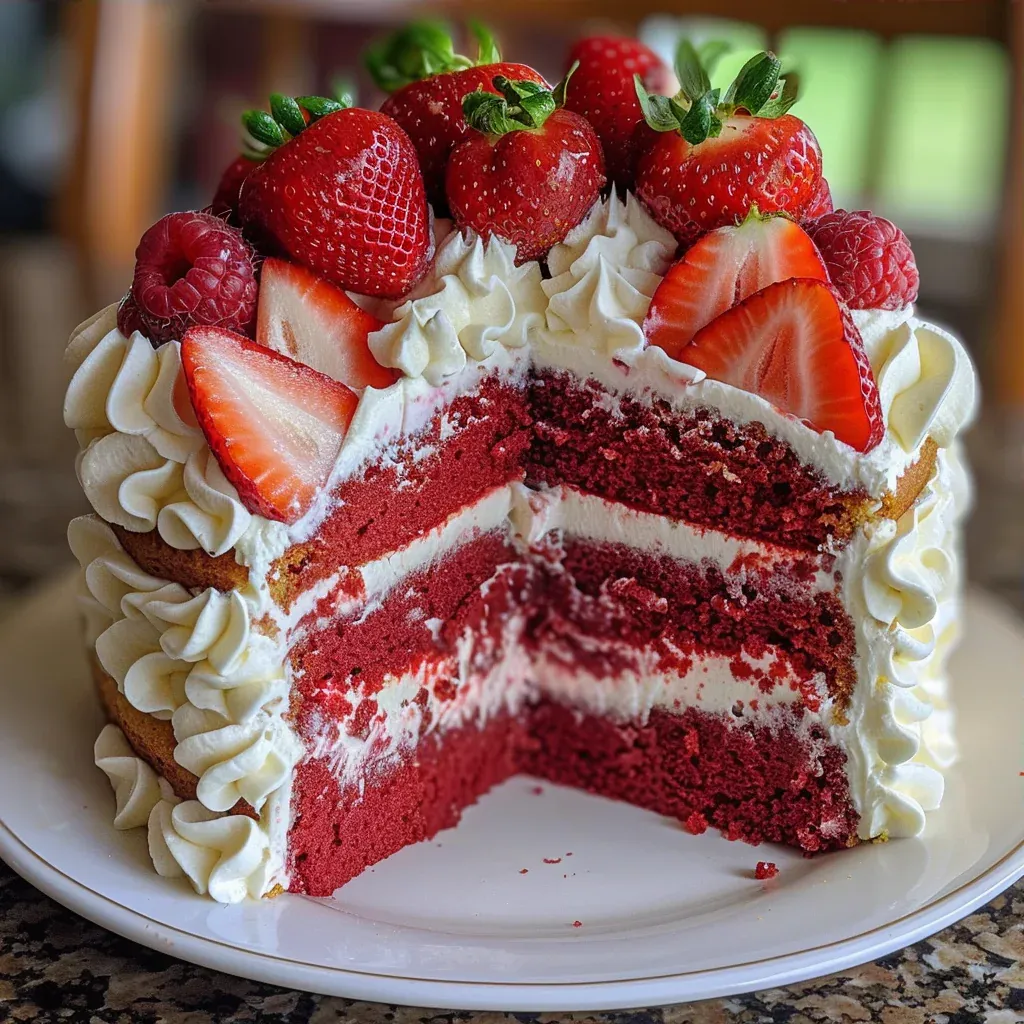
Strawberries and Cream Dream Layer is the epitome of summer indulgence, a dessert that beckons with its vibrant hues and luscious layers. Imagine a soft, moist red velvet cake cradling a rich, creamy filling, punctuated by the sweet and tangy burst of fresh strawberries. The aroma wafts through the kitchen, inviting everyone to gather around the table, eager to share in this delightful creation. Whether it’s a family gathering or a casual afternoon treat, this dessert transforms any occasion into a celebration. The balance of flavors and textures in this Strawberries and Cream Dream Layer is truly artisan-quality, making it a joy to both make and share.
- Why This Strawberries and Cream Dream Layer Is Worth Your Time
- Main Ingredients for Strawberries and Cream Dream Layer
- Tools Needed for Strawberries and Cream Dream Layer
- Step-by-Step Instructions for Strawberries and Cream Dream Layer
- Pro Tips for Perfect Strawberries and Cream Dream Layer
- Serving Ideas and Pairings
- Variations and Swaps for Strawberries and Cream Dream Layer
- Leftovers and Storage Tips
- Nutrition Notes
- Frequently Asked Questions About Strawberries and Cream Dream Layer
Why This Strawberries and Cream Dream Layer Is Worth Your Time
The Strawberries and Cream Dream Layer stands out not just for its stunning appearance but for the symphony of flavors and textures that come together beautifully. The richness of the cream cheese filling contrasts perfectly with the lightness of the whipped cream, while the red velvet cake provides a plush base that complements the refreshing strawberries. This dessert is a masterclass in balance; it’s sweet but not cloying, creamy yet light, and visually striking with its vibrant layers. Crafting this dish requires patience and attention to detail, qualities that elevate it from a simple dessert to an artisan masterpiece. Each step, from macerating the strawberries to folding the whipped cream, showcases traditional techniques that bring out the best in quality ingredients, making every bite a celebration of craftsmanship.
Main Ingredients for Strawberries and Cream Dream Layer
Quality ingredients are key to making this Strawberries and Cream Dream Layer truly special. Here’s a breakdown of what you’ll need:
- 1 box red velvet cake mix: The foundation of the dessert, providing a rich flavor and beautiful color.
- Eggs, oil, and water: As specified on the cake mix box, these ingredients help create a moist and tender cake.
- 1 teaspoon vanilla extract: Optional, but it adds a warm depth of flavor to the cake.
- 24 ounces cream cheese, softened: Essential for the creamy filling, providing a rich texture and tangy taste.
- 1 cup granulated sugar: Sweetens the cream cheese filling, balancing the tanginess.
- 1 tablespoon lemon juice: Brightens the flavors of the cream cheese filling.
- 2 cups heavy cream, cold: For whipping into light peaks, adding airiness to the filling.
- 2 cups fresh strawberries, hulled and sliced: For the macerated layer, providing a fresh and juicy contrast.
- 2 tablespoons granulated sugar: Used to macerate the fresh strawberries, drawing out their juices.
- 2 cups strawberries, diced: For the strawberry compote, adding a concentrated flavor.
- 1/3 cup granulated sugar: Sweetens the compote, enhancing the natural sweetness of the strawberries.
- 1 tablespoon lemon juice: Again used in the compote to elevate the flavor profile.
- 1 tablespoon cornstarch mixed with 2 tablespoons water: Thickens the compote for a glossy finish.
- Fresh sliced strawberries: For garnish, adding a vibrant touch to the finished dessert.
- Whipped cream for piping: Optional, for decorative purposes.
- Cream cheese frosting: Optional, for an extra layer of flavor and decoration.
Tools Needed for Strawberries and Cream Dream Layer
| Tool | Purpose / what it helps with |
| Cake pans | To bake the red velvet cake layers evenly. |
| Parchment paper | To prevent the cake from sticking and ensure easy removal. |
| Stand mixer or hand mixer | For whipping cream and beating the cream cheese filling until smooth. |
| Offset spatula | To spread the cream cheese filling evenly over the cake layers. |
| Sharp knife | For leveling the cake layers and slicing the assembled dessert. |
| Springform pan (optional) | To easily assemble and serve the layered dessert. |
| Small saucepan | For cooking the strawberry compote. |
Step-by-Step Instructions for Strawberries and Cream Dream Layer
Creating the Strawberries and Cream Dream Layer involves several key steps that build flavor and texture. Here’s how to do it:
- Preheat the oven as indicated on the cake mix package. Grease and line two cake pans with parchment paper. Prepare the cake batter using the ingredients listed on the cake mix box, incorporating the vanilla extract if desired. Divide the batter equally between the prepared pans and bake according to the package directions. Once baked, allow the cakes to cool in the pans for 10 minutes before turning them onto a wire rack to cool completely. After cooling, level the tops with a serrated knife to ensure even stacking.
- In a bowl, place the sliced strawberries and sprinkle with 2 tablespoons of sugar. Toss lightly and let them sit at room temperature for 10 to 15 minutes to allow the juices to release.
- In a small saucepan, combine the diced strawberries, 1/3 cup of sugar, and 1 tablespoon of lemon juice. Cook the mixture over medium heat until the berries soften and release their juices, which should take about 5 minutes. Stir in the cornstarch slurry and continue to simmer until the mixture thickens and turns glossy, approximately 2 to 3 minutes more. Remove from heat and allow to cool completely.
- Using a stand mixer or hand mixer, beat the softened cream cheese until smooth. Add 1 cup of sugar, lemon juice, and vanilla extract, mixing until combined and creamy. In a separate bowl, beat the cold heavy cream until stiff peaks form. Gently fold the whipped cream into the cream cheese mixture, preserving volume for a mousse-like texture. Keep the mixture chilled until ready to use.
- Arrange the cooled cake layers, cheesecake filling, macerated strawberries, and strawberry compote at your station. Use a springform pan or place the first cake layer on a flat serving board.
- Set one cake layer on the serving board or inside the springform pan. Brush away any loose crumbs.
- Spread a thick, even layer of cheesecake filling, about 1/3 to 1/2 inch thick, over the top of the cake layer using an offset spatula.
- Evenly distribute the macerated strawberry slices on top of the cheesecake layer to create a balanced texture across the cake.
- Spoon and spread a thin, glossy layer of strawberry compote over the strawberries to enhance moisture and flavor.
- Add another thick layer of cheesecake filling on top of the compote and smooth the surface gently.
- Place the remaining cake layer on top and press very gently to set the layers.
- Cover the top cake layer with a final layer of cheesecake filling. Garnish with fresh sliced strawberries and additional strawberry compote if desired. Optionally, pipe whipped cream around the border or add decorative cream cheese frosting.
- Cover the assembled cake and refrigerate for at least 4 hours, preferably overnight, so that the cheesecake filling firms up and the layers meld together. When ready to serve, slice with a sharp knife for clean layers.
Pro Tips for Perfect Strawberries and Cream Dream Layer
- Ensure your cream cheese is at room temperature for easy blending; this helps achieve a smooth filling.
- When whipping the heavy cream, avoid overmixing to prevent it from becoming grainy.
- Level the cake layers carefully to ensure they stack evenly, providing a stable structure for the dessert.
- Macering the strawberries properly allows for maximum flavor extraction, enhancing their sweetness.
- Let the assembled dessert rest in the refrigerator overnight for the best melding of flavors and textures.
- Use a sharp knife dipped in warm water to slice through the layers smoothly.
- Consider adding a splash of almond extract to the cream cheese mixture for an extra layer of flavor.
Serving Ideas and Pairings
- Serve with a dollop of freshly whipped cream on top for added richness.
- Pair with a light dessert wine or sparkling water infused with lemon for a refreshing contrast.
- Complement with a side of fresh berries to enhance the fruity aspect of the dessert.
- Drizzle extra strawberry compote over each slice when serving for added flavor.
- Garnish with fresh mint leaves for an elegant touch.
- Offer a scoop of vanilla ice cream on the side for a classic pairing.
Variations and Swaps for Strawberries and Cream Dream Layer
Restaurant-Style Version
To elevate this dessert to restaurant quality, consider using a homemade red velvet cake recipe instead of box mix. Additionally, infuse the cream cheese filling with a touch of orange zest for a sophisticated flavor twist.
Rustic Home-Cook Version
For a more rustic take, use a simple sponge cake instead of red velvet. Layer with a mixed berry compote for a varied fruit experience.
Make-Ahead Version
To make this dessert in advance, prepare all layers and fillings a day ahead. Assemble the cake and let it rest overnight, allowing flavors to meld beautifully.
Seasonal Ingredient Version
Incorporate seasonal fruits like peaches or raspberries in place of strawberries for a delightful twist that celebrates the best of each season.
Leftovers and Storage Tips
- Store leftovers in the refrigerator, covered, for up to 3 days for optimal freshness.
- To reheat individual slices, use the microwave for 10-15 seconds at a time until just warmed through.
- Freezing is not recommended, as the cream cheese filling may alter in texture upon thawing.
- Consider repurposing leftover cake for trifles by layering with additional fruits and whipped cream.
Nutrition Notes
This Strawberries and Cream Dream Layer is a decadent treat, with each serving containing a generous amount of calories primarily from sugars and fats. Adjusting the sugar content in the cream cheese filling or opting for lighter cream options can help tailor it to your preferences without compromising the artisan quality.
Frequently Asked Questions About Strawberries and Cream Dream Layer
What is the best way to store the Strawberries and Cream Dream Layer?
Store the assembled cake in the refrigerator covered with plastic wrap or a cake dome for up to 3 days.
Can I use frozen strawberries for the filling?
Fresh strawberries are recommended for the best flavor and texture, but you can use frozen strawberries if thawed and drained well.
How can I make the Strawberries and Cream Dream Layer gluten-free?
Use a gluten-free red velvet cake mix as a substitute for the traditional mix, ensuring all other ingredients are gluten-free.
Is it possible to make the Strawberries and Cream Dream Layer dairy-free?
Yes, you can use dairy-free cream cheese and whipped cream alternatives to create a similar texture and flavor profile.
What can I serve with the Strawberries and Cream Dream Layer?
This dessert pairs wonderfully with whipped cream, fresh berries, or even a scoop of vanilla ice cream for added indulgence.
Now that you’ve learned the art behind the Strawberries and Cream Dream Layer, I encourage you to embrace this delightful creation. With its beautiful presentation and harmonious flavors, this dessert is bound to become a favorite at your gatherings. Dive into the joy of artisan cooking, and let this Strawberries and Cream Dream Layer be a testament to your culinary skills.

Strawberries and Cream Dream Layer Delight
Ingredients
Method
- Preheat the oven as indicated on the cake mix package. Grease and line two cake pans with parchment paper. Prepare the cake batter using the ingredients listed on the cake mix box, incorporating the vanilla extract if desired. Divide the batter equally between the prepared pans and bake according to the package directions. Once baked, allow the cakes to cool in the pans for 10 minutes before turning them onto a wire rack to cool completely. After cooling, level the tops with a serrated knife to ensure even stacking.
- In a bowl, place the sliced strawberries and sprinkle with 2 tablespoons of sugar. Toss lightly and let them sit at room temperature for 10 to 15 minutes to allow the juices to release.
- In a small saucepan, combine the diced strawberries, 1/3 cup of sugar, and 1 tablespoon of lemon juice. Cook the mixture over medium heat until the berries soften and release their juices, which should take about 5 minutes. Stir in the cornstarch slurry and continue to simmer until the mixture thickens and turns glossy, approximately 2 to 3 minutes more. Remove from heat and allow to cool completely.
- Using a stand mixer or hand mixer, beat the softened cream cheese until smooth. Add 1 cup of sugar, lemon juice, and vanilla extract, mixing until combined and creamy. In a separate bowl, beat the cold heavy cream until stiff peaks form. Gently fold the whipped cream into the cream cheese mixture, preserving volume for a mousse-like texture. Keep the mixture chilled until ready to use.
- Arrange the cooled cake layers, cheesecake filling, macerated strawberries, and strawberry compote at your station. Use a springform pan or place the first cake layer on a flat serving board.
- Set one cake layer on the serving board or inside the springform pan. Brush away any loose crumbs.
- Spread a thick, even layer of cheesecake filling, about 1/3 to 1/2 inch thick, over the top of the cake layer using an offset spatula.
- Evenly distribute the macerated strawberry slices on top of the cheesecake layer to create a balanced texture across the cake.
- Spoon and spread a thin, glossy layer of strawberry compote over the strawberries to enhance moisture and flavor.
- Add another thick layer of cheesecake filling on top of the compote and smooth the surface gently.
- Place the remaining cake layer on top and press very gently to set the layers.
- Cover the top cake layer with a final layer of cheesecake filling. Garnish with fresh sliced strawberries and additional strawberry compote if desired. Optionally, pipe whipped cream around the border or add decorative cream cheese frosting.