
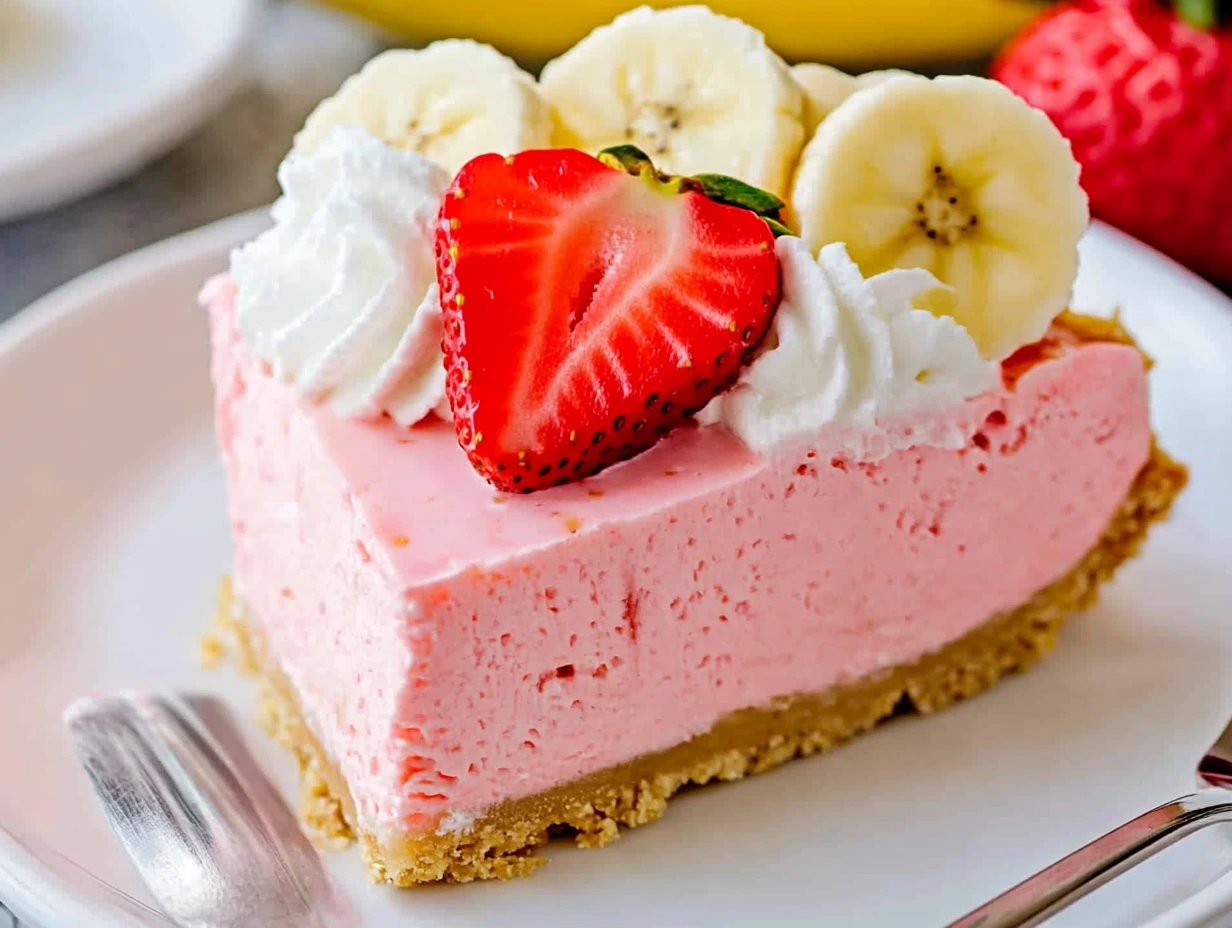
Hey friends! If you’re anything like me, the moment warm weather hits, you’re on the hunt for vibrant, no-fuss desserts that scream “summer.” Enter this Strawberry Banana Jell-O Pie—a retro-inspired, no-bake wonder that layers fresh banana slices with jewel-toned strawberry gelatin, all nestled in a buttery graham-cracker crust and finished with pillowy whipped topping. It’s the kind of dessert that transports you straight back to backyard barbecues and poolside lounging, but with just enough modern flair to keep things interesting.
I first stumbled upon this recipe during a weekend cabin getaway. We’d spent the day kayaking on the lake, and by late afternoon everyone wanted something cool, sweet, and totally effortless. I remembered a similar pie my grandma used to make, so I improvised with whatever I had on hand—instant Jell-O, ripe bananas, and a store-bought crust. Within minutes, the kitchen looked like a science lab: bright red gelatin bubbling in a bowl, banana slices fanned out in the crust like little golden coins, and a whisper of anticipation hanging in the air. Four hours later, we had a pie that was equal parts nostalgic and surprisingly elegant.
What I love most about this Strawberry Banana Jell-O Pie is how adaptable it is. No crust? You can whip one up in minutes using graham-cracker crumbs and melted butter. Want to jazz it up? Try orange or strawberry-banana flavored gelatin, or even swirl in a handful of fresh berry pieces before chilling. And because it’s make-ahead friendly, you can assemble everything up through the chilling step the day before—just add the whipped topping right before serving for that fresh-from-the-fridge appeal.
Ready to dive in? Let’s start layering up this beauty.

Ingredients You’ll Need
-
1 (9-inch) graham-cracker pie crust (store-bought or homemade)
-
1 (3-ounce) package strawberry Jell-O gelatin
-
1 cup boiling water
-
½ cup cold water
-
2 ripe bananas, peeled and sliced
-
8 ounces whipped topping (Cool Whip or homemade), divided
-
Fresh strawberries and banana slices for garnish (optional)
Tip: To keep your bananas looking bright, give each slice a quick brush of lemon juice before arranging them in the crust.
Step 1: Dissolve the Gelatin
-
Boil your water. Grab a medium-sized mixing bowl and pour in 1 cup of boiling water.
-
Add the Jell-O mix. Sprinkle in the 3-ounce package of strawberry gelatin. Stir vigorously until every crystal has dissolved and the liquid is completely clear—no granules hiding at the bottom. This usually takes about 1–2 minutes of steady stirring.
Pro Tip from My Kitchen: If you ever find your gelatin stubbornly clumping, switch to a whisk instead of a spoon. It’ll break up those lumps faster and give you a super-smooth base.
Step 2: Cool the Gelatin
-
Stir in cold water. Once the mixture is clear and steaming, pour in ½ cup of cold water. This helps bring the temperature down so you don’t shock the bananas or crack your crust.
-
Let it rest. Set the bowl aside for about 10 minutes. You’re aiming for a lukewarm temperature—warm enough to stay liquid, but cool enough not to cook your fruit or schmoosh the crust.
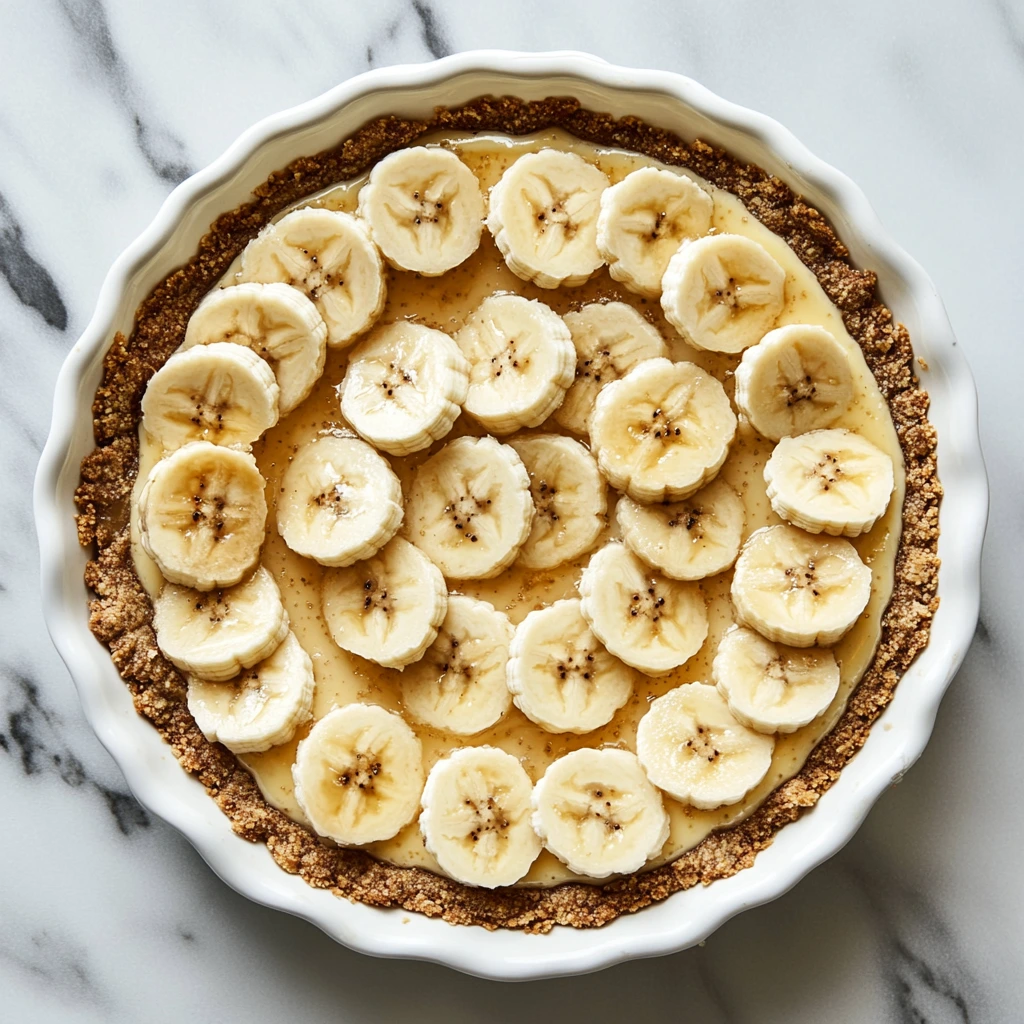
Step 3: Layer the Bananas
-
Prep your bananas. Peel and slice two ripe bananas into ¼-inch rounds. If you want to stretch them a bit, you can slice them on a slight diagonal.
-
Arrange in the crust. Gently press the slices into the bottom of your graham-cracker shell, overlapping them slightly so there are no big gaps. This banana “blanket” will peek through the strawberry layer, adding a lovely visual contrast.
Step 4: Pour the Gelatin
-
Carefully pour. Slowly drizzle the lukewarm gelatin over the banana layer, starting in the center and letting it flow toward the edges. Take your time—pour too fast and you risk shifting the fruit around.
-
Check coverage. Give the pie a gentle shake (just a little!) to ensure the gelatin settles evenly and completely covers all the bananas.
Step 5: Chill Until Firm
-
Cover and refrigerate. Wrap your pie loosely with plastic wrap (or pop it into a pie keeper) and slide it into the fridge.
-
Be patient. The gelatin needs about 3–4 hours to firm up completely. If you’re in a hurry, you can speed things along by placing it on the coldest shelf—just don’t tuck it next to anything smelly (no cheese or pickles, please).
Why Timing Matters: Under-chilled Jell-O will weep liquid when you slice it, while over-chilling can make it super dense. Aim for that sweet spot where slices hold their shape but still wobble delightfully on the plate.
Step 6: Whipped Topping Magic
Once the gelatin layer is rock-solid, it’s time for the cloud of whipped topping. If you’re using store-bought Cool Whip, let it sit at room temperature for 10 minutes so it’s spreadable. If you’d rather DIY, here’s my go-to homemade whipped cream:
-
Ingredients: 1 cup heavy cream, 2 tbsp powdered sugar, ½ tsp vanilla extract
-
Method: Chill your mixing bowl and beaters in the freezer for 5 minutes. Pour in the cream, sugar, and vanilla, then whip on medium-high until soft peaks form—about 2–3 minutes.
Now for the layering:
-
First layer: Scoop half of your whipped topping onto the center of the set gelatin.
-
Smooth it out: Use an offset spatula or the back of a spoon to gently spread it in a thin, even layer, reaching right to the crust’s edge.
-
Second layer (optional): You can either dollop the remaining whipped cream in the center and skillfully swirl it into a textured “mountain,” or transfer it to a piping bag (fitted with a star tip) and pipe rosettes around the rim for an elegant finish.
Insider Tip: For perfect piping, chill your whipped cream in the piping bag for 5 minutes before you start. It helps maintain those crisp ridges!
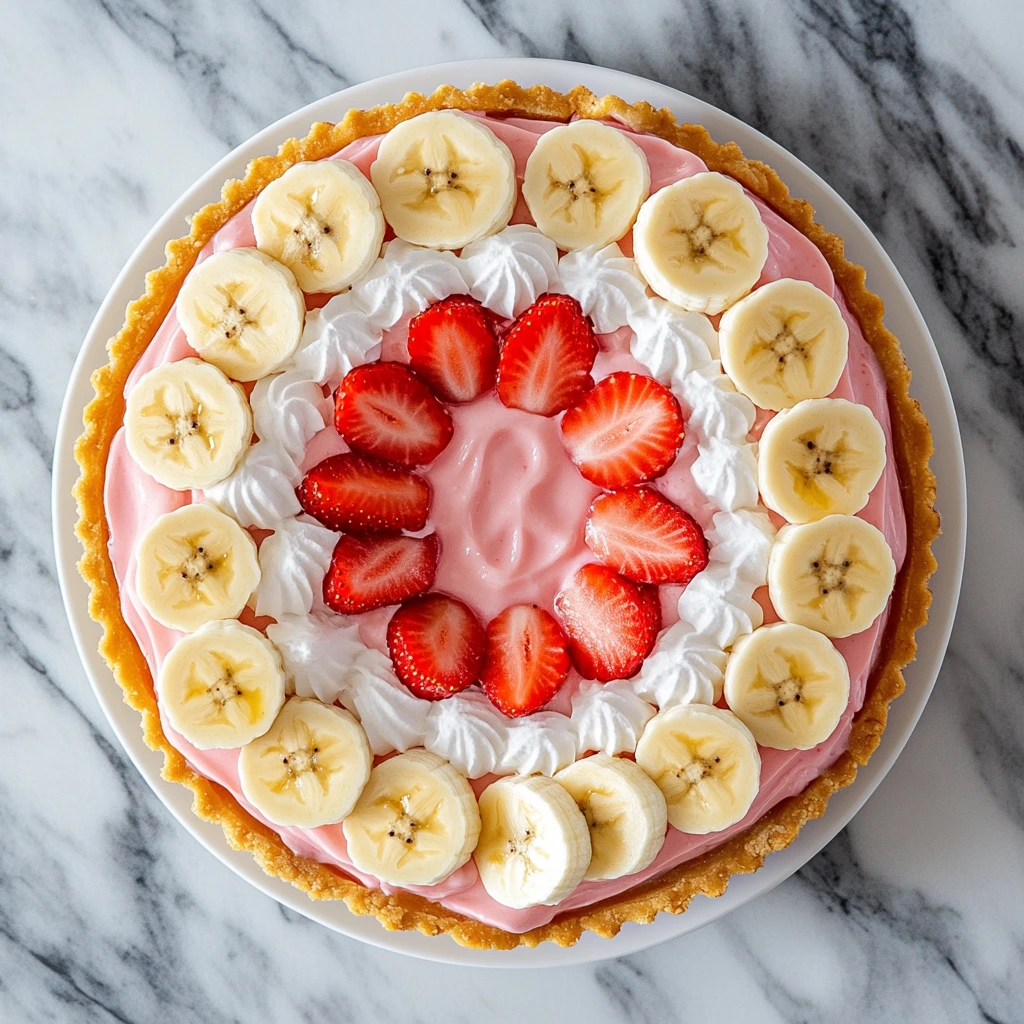
Step 7: Garnishes & Variations
Here’s where you can truly make this pie your own:
-
Fresh fruit: Arrange strawberry halves and banana slices over the whipped cream. I like to alternate red and yellow for a cheery color pop.
-
Berry boost: Scatter a handful of fresh raspberries or blueberries for extra tartness.
-
Citrus twist: Grate a little lemon or lime zest over the top for a zingy aroma that cuts through the sweetness.
-
Chocolate drizzle: Melt a few ounces of white or dark chocolate and use a spoon to drizzle thin ribbons across the top—instant gourmet upgrade!
Pro Tips & Troubleshooting
-
Preventing Soggy Crust: If your crust starts to soften (especially with homemade versions), try lining it with a thin layer of melted chocolate or cream cheese before adding the bananas. It creates a moisture barrier.
-
Browning Bananas: Beyond lemon juice, tossing your slices in a quick bath of orange juice or even pineapple juice works wonders—and adds a subtle flavor twist.
-
Gelatin Flavors: Feeling adventurous? Swap the strawberry gelatin for strawberry-banana, orange, or even pineapple Jell-O. Just adjust your garnish to match!
-
Make-Ahead Friendly: Assemble through Step 5 up to 12 hours in advance. Add whipped topping and garnishes just before serving to keep everything fresh and vibrant.
-
Storage: Leftovers (if you have any) keep beautifully in the fridge for up to 2 days, but note the bananas may darken slightly over time.
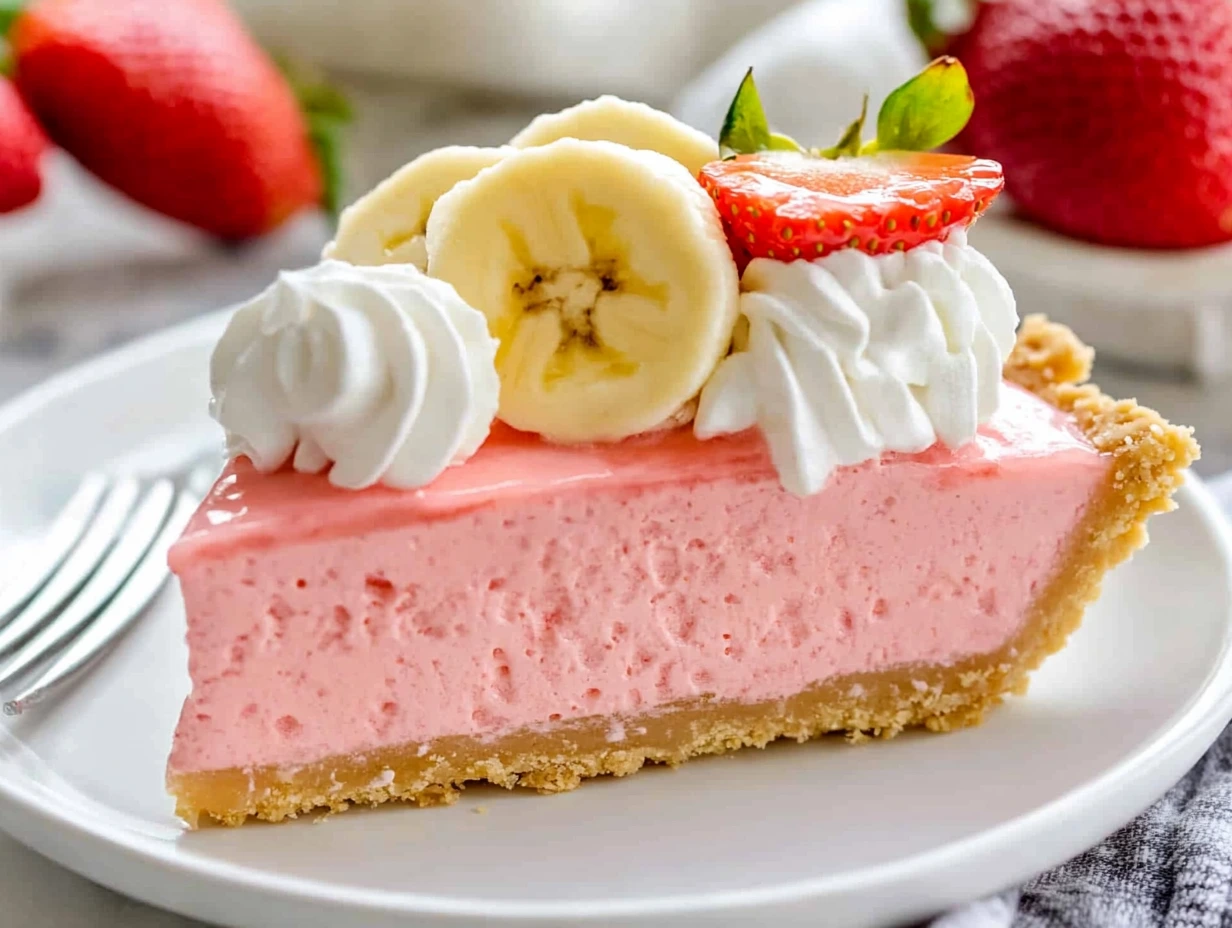
You’ve built the perfect Strawberry Banana Jell-O Pie, topped it with clouds of whipped cream, and garnished it to Instagram-worthy perfection. But before you dive in, here are the answers to the top questions I hear from home bakers—consider this your quick-reference guide to pie success!
Frequently Asked Questions
1. Can I freeze this pie for later?
Short answer: I wouldn’t recommend it. Gelatin and whipped topping don’t play nicely in the freezer—ice crystals form, the texture gets grainy, and bananas brown more aggressively. If you need to prep ahead, assemble through the gelatin-setting step (up to 12 hours in advance), then add the whipped cream and garnishes just before serving. That way, you still get that fresh, fluffy finish without freezer woes.
2. What if I don’t have a store-bought crust?
No problem! Homemade graham-cracker crust takes just minutes. Crush 1½ cups graham crackers (about 10-12 squares) into fine crumbs, mix with ¼ cup melted butter and a pinch of salt, then press firmly into your pie plate. Chill for 15 minutes before filling, and you’ll have a sturdy, buttery base that rivals any store-bought version.
3. How do I keep my banana slices from turning brown?
Bananas oxidize quickly once cut, but a light brush or dip in acidulated water (water plus a splash of lemon, orange, or even pineapple juice) will slow the browning. Do this immediately after slicing and pat dry before arranging in the crust. They’ll stay bright throughout the chilling process and beyond.
4. Can I swap out the strawberry Jell-O for another flavor?
Absolutely! Feel free to experiment with strawberry-banana, orange, or pineapple gelatin. Just remember to match your garnishes: pineapple chunks for pineapple Jell-O, orange zest for orange, and so on. Each flavor brings its own twist—plus, it’s a fun way to tailor the pie to different seasons or flavor cravings.
5. What’s the best way to serve individual portions?
Mini pies and parfait cups are super cute for parties. For mini pies, use a muffin tin and smaller crust circles; reduce chilling time to about 2–3 hours. For parfaits, layer banana slices, gelatin, and whipped topping in clear glasses. The visual layers look stunning, and guests can grab a spoon whenever they’re ready.
6. How long will leftovers stay fresh?
Cover any leftover pie slices loosely with plastic wrap or store in an airtight container. They’ll keep in the fridge for up to 2 days—though the bananas might develop a bit of color change. If that bothers you, wait to slice until you’re ready to serve and keep the remaining portion whole.
Conclusion
And there you have it—a simple, no-bake Strawberry Banana Jell-O Pie that’s equal parts nostalgic and show-stopping. From that first glossy layer of ruby-red gelatin to the last tender banana slice beneath the whipped topping, each bite captures the carefree spirit of summer. Whether you’re feeding a crowd at your next backyard barbecue or just craving a slice of childhood magic, this pie is your go-to dessert.
Print
Strawberry Banana Jell-O Pie
- Author: Sophia
Description
This Strawberry Banana Jell-O Pie layers fresh banana slices and vibrant strawberry gelatin in a buttery graham-cracker crust, then finishes with a cloud-like whipped topping. It’s a no-bake, make-ahead dessert that’s equal parts refreshing and nostalgic—perfect for summer gatherings or easy weeknight treats.
Ingredients
1 (9-inch) graham-cracker pie crust
1 (3-ounce) package strawberry Jell-O gelatin
1 cup boiling water
½ cup cold water
2 ripe bananas, peeled and sliced
8 ounces whipped topping (Cool Whip or homemade), divided
Fresh strawberries and banana slices for garnish (optional)
Instructions
1️⃣ In a medium bowl, dissolve the strawberry Jell-O mix in 1 cup boiling water, stirring until completely clear.
2️⃣ Stir in the ½ cup cold water and set aside to cool for about 10 minutes—just until it’s lukewarm.
3️⃣ Arrange the banana slices evenly over the bottom of the graham-cracker crust.
4️⃣ Carefully pour the lukewarm Jell-O mixture over the bananas, covering them completely.
5️⃣ Refrigerate the pie until the gelatin is firm, about 3–4 hours.
6️⃣ Once set, spread half of the whipped topping over the Jell-O layer in a smooth, even layer.
7️⃣ If desired, swirl the remaining whipped topping on top or pipe decorative rosettes around the edge.
8️⃣ Garnish with fresh strawberry halves and banana slices before slicing and serving.
Notes
For extra flavor, brush the banana slices with a little lemon juice before adding them to prevent browning.
Substitute flavored gelatin—like strawberry-banana or orange—to vary the taste profile.
To make your own crust, mix 1½ cups graham-cracker crumbs with ¼ cup melted butter and press into a pie plate; chill before filling.
Pie can be assembled a day ahead (through step 5); add whipped topping just before serving for best texture.
Leftover slices keep well, covered, in the refrigerator for up to 2 days.


