Garlic and Herb Bread is a culinary delight that transforms any meal into a celebration of flavors. Imagine pulling apart a loaf that boasts a crispy, golden crust while revealing a soft, fluffy interior infused with buttery garlic and aromatic herbs. Whether it’s a Sunday family dinner, a festive gathering, or simply mastering your baking skills, this artisan bread offers a satisfying experience that’s hard to beat. The intoxicating smell of baking garlic bread wafting through your kitchen creates a warm, inviting atmosphere, making it the perfect companion for soups, salads, or even as a stand-alone snack. Let’s dive into the craft of making this delicious Garlic and Herb Bread that’s crispy outside and soft inside.
- Why This Garlic and Herb Bread Is Worth Your Time
- Main Ingredients for Garlic and Herb Bread
- Tools Needed for Garlic and Herb Bread
- Step-by-Step Instructions for Garlic and Herb Bread
- Pro Tips for Perfect Garlic and Herb Bread
- Serving Ideas and Pairings
- Variations and Swaps for Garlic and Herb Bread
- Leftovers and Storage Tips
- Nutrition Notes
- Frequently Asked Questions About Garlic and Herb Bread
Why This Garlic and Herb Bread Is Worth Your Time
Crafting Garlic and Herb Bread is about more than just following a recipe; it’s a journey into the heart of baking where flavor and texture harmoniously collide. The balance of flavors is essential; the robust garlic complements the fresh herbs, while the melted cheese adds a creamy richness that ties everything together. The artisan quality lies not only in the ingredients but also in the techniques employed. From proofing the yeast to the final bake, each step requires patience and attention to detail. This bread stands out because it embodies a perfect synergy between the crispy exterior and the soft, aromatic interior, making it a centerpiece at any table. Whether you are a seasoned baker or a novice, this recipe provides an opportunity to hone your skills while delighting your senses.
Main Ingredients for Garlic and Herb Bread
-
To create the perfect Garlic and Herb Bread, high-quality ingredients are paramount. Here’s what you will need:
- 4 cups plain all-purpose flour: The backbone of the bread, it provides structure and texture.
- 1.5 cups warm water: Activates the yeast and helps to create a soft dough.
- 1 packet active dry yeast: The leavening agent that gives the bread its rise and airy texture.
- 1 small spoon salt: Enhances flavor and strengthens the dough’s structure.
- 2 tablespoons olive oil: Adds moisture and richness to the bread.
- 4 cloves garlic, minced: The star ingredient, providing a robust and aromatic flavor.
- 0.5 cups mixed fresh herbs, chopped: Adds freshness and a burst of flavor; consider basil, parsley, and thyme.
- 1 cup shredded cheese: Provides a creamy, savory layer that integrates beautifully with the herbs and garlic.
Tools Needed for Garlic and Herb Bread
| Tool | Purpose / what it helps with |
| Mixing bowl | For combining and kneading the dough. |
| Measuring cups and spoons | Ensures accurate ingredient measurements for consistency. |
| Wooden spoon or dough scraper | Helpful for mixing ingredients and scraping the bowl. |
| Floured surface | Needed for kneading and rolling out the dough. |
| Oven | For baking the bread to achieve that crispy crust. |
| Baking sheet | To place the bread for baking. |
| Kitchen towel or plastic wrap | Used to cover the dough while it rises. |
Step-by-Step Instructions for Garlic and Herb Bread
Now that you have your ingredients and tools ready, let’s walk through the process of making Garlic and Herb Bread. Follow these steps closely to achieve that artisan quality.
- Proof the yeast: Begin by mixing the packet of active dry yeast with 1.5 cups of warm water in a small bowl. Let it sit for 5-10 minutes until you notice tiny bubbles rising to the surface, indicating that the yeast is active.
- Mix flour and salt: In a large mixing bowl, combine 4 cups of all-purpose flour with 1 small spoon of salt. This will help distribute the salt evenly throughout the flour.
- Add yeast and olive oil: Pour the bloomed yeast mixture and 2 tablespoons of olive oil into the bowl with the flour. Stir with a wooden spoon or dough scraper until all the ingredients come together.
- Knead the dough: Transfer the dough to a floured surface and knead it for 8-10 minutes. You’re looking for a smooth and springy texture. If the dough is too sticky, sprinkle a bit more flour as needed.
- First rise: Place the kneaded dough in a lightly oiled bowl, turning it to coat. Cover with a kitchen towel or plastic wrap and allow it to rise in a warm place for about 1 hour, or until it has doubled in size.
- Shape the dough: After the dough has risen, punch it down gently to release any air. Then, flatten it into a rectangle on a floured board, approximately 1 inch thick.
- Add filling: Spread the minced garlic evenly across the surface of the dough. Next, scatter the chopped herbs and shredded cheese over the garlic, ensuring even coverage.
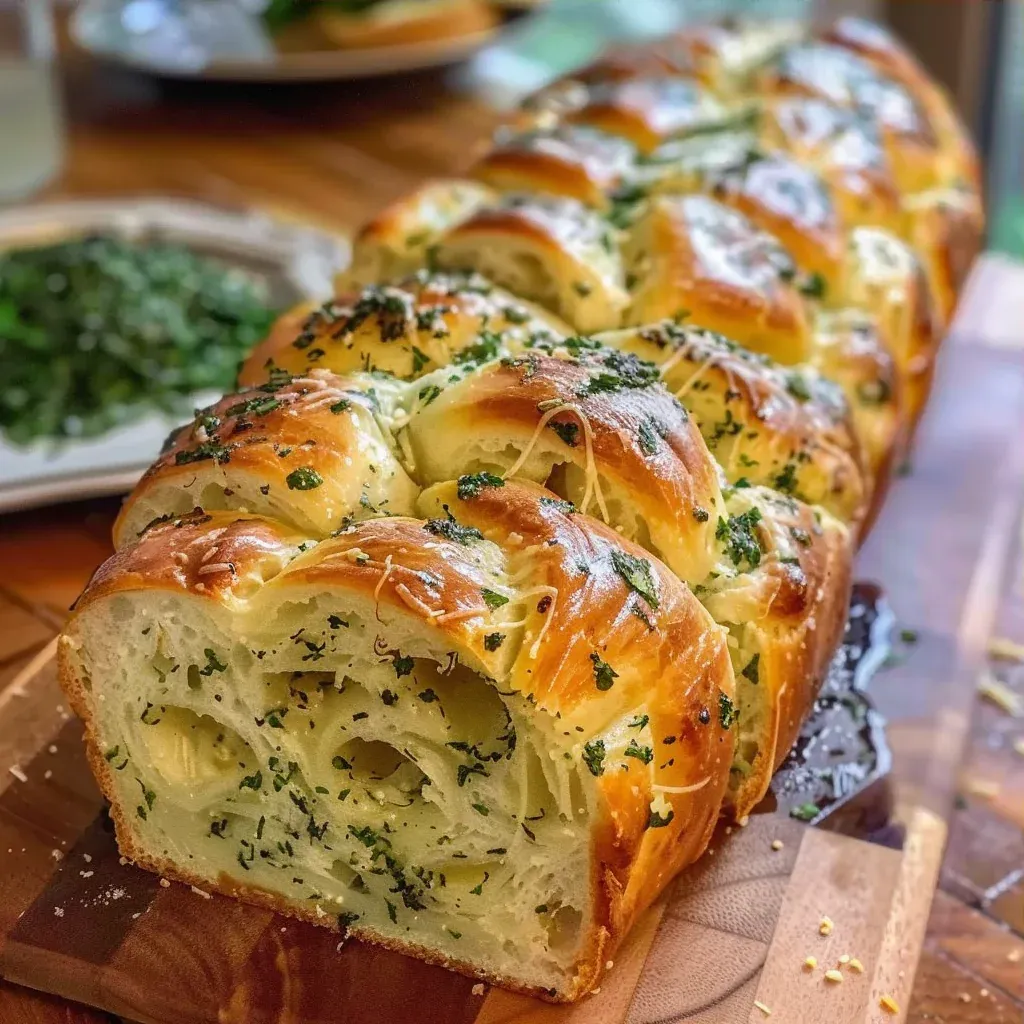
- Roll the dough: Gently press the filling into the dough to adhere. Starting from one long edge, roll the dough tightly into a log. Use a sharp knife to slice the roll lengthwise down the center, exposing the beautiful filling.
- Braid the dough: Twist the two halves together loosely to form a braid. This not only enhances the appearance but also allows for even baking.
- Preheat the oven: While you’re braiding, preheat your oven to 425°F. This ensures that the bread will start baking at the right temperature.
- Brush with olive oil: Before placing the braided dough on a baking sheet, brush the surface generously with olive oil. This will create a beautiful, crispy crust.
- Bake the bread: Place the baking sheet in the preheated oven and bake for 20-30 minutes. Keep an eye on it; the crust should be blistered and golden brown.
- Check for doneness: To ensure your Garlic and Herb Bread is fully baked, tap the bottom of the loaf. It should sound hollow, indicating it’s cooked through.
Pro Tips for Perfect Garlic and Herb Bread
- Use fresh herbs for the best flavor impact; they make a world of difference compared to dried herbs.
- Ensure your water is warm, not hot, when proofing the yeast; too hot can kill the yeast.
- Knead the dough until it is smooth and elastic; this helps develop gluten, which is crucial for a good rise.
- If you want a more intense garlic flavor, consider sautéing the minced garlic in olive oil before spreading it on the dough.
- Experiment with different types of cheese for varied flavors; mozzarella, cheddar, or even feta can work beautifully.
- Letting the dough rise in a slightly warm oven (turned off) can speed up the rising process.
- For added texture, you can sprinkle seeds like sesame or poppy on top before baking.
Serving Ideas and Pairings
- Serve warm with a side of marinara sauce or a rich balsamic reduction for dipping.
- Pair with a fresh garden salad drizzled with lemon vinaigrette for a light meal.
- Complement with a hearty soup, such as tomato basil or minestrone.
- Slice and serve with a charcuterie board featuring cured meats, olives, and cheeses.
- Toast slices lightly before serving to enhance the crispy crust.
- For a breakfast treat, top slices with avocado and poached eggs.
Variations and Swaps for Garlic and Herb Bread
Restaurant-Style Version
To elevate your Garlic and Herb Bread to a restaurant-quality dish, consider adding ingredients like roasted red peppers or artichokes to the filling. A sprinkle of crushed red pepper flakes can add a delightful kick.
Rustic Home-Cook Version
For a more rustic approach, use whole wheat flour instead of all-purpose flour. This adds a nutty flavor and a denser texture. You can also mix in some chopped nuts or seeds for added crunch.
Make-Ahead Version
Prepare the dough and shape it into a braid, then wrap it tightly in plastic wrap and refrigerate for up to 24 hours. When ready to bake, let it come to room temperature for about 30 minutes before brushing with olive oil and baking.
Seasonal Ingredient Version
Incorporate seasonal herbs like sage or dill for a different flavor profile. You can also add grated zucchini or spinach to the filling for a delicious twist.
Leftovers and Storage Tips
- Store leftover Garlic and Herb Bread in an airtight container at room temperature for up to 2 days.
- To maintain freshness, wrap it in foil or plastic wrap if you plan to keep it longer.
- This bread can be frozen for up to 3 months; slice before freezing for easier thawing.
- To reheat, simply place slices in a toaster oven or wrap in foil and warm in a preheated oven at 350°F until heated through.
- Avoid microwaving the bread as it can make it chewy instead of maintaining its crispiness.
Nutrition Notes
The nutritional content of Garlic and Herb Bread varies based on portion sizes and ingredient choices. A standard serving contains approximately 250 calories, with a good balance of carbohydrates and fats from the olive oil and cheese. To reduce calories, consider using less cheese or opting for a lower-fat variety. Pairing this bread with a protein-rich meal can help balance your macronutrients while keeping the artisan quality intact.
Frequently Asked Questions About Garlic and Herb Bread
What makes Garlic and Herb Bread different from regular bread?
The addition of garlic and fresh herbs infuses the bread with aromatic flavors that elevate it beyond standard bread, creating a delightful taste experience.
Can I use dried herbs instead of fresh herbs in Garlic and Herb Bread?
While fresh herbs provide the best flavor, you can substitute dried herbs in a pinch. Use about one-third of the amount, as dried herbs are more concentrated in flavor.
How do I know when my Garlic and Herb Bread is done baking?
To test for doneness, tap the bottom of the bread; it should sound hollow. Additionally, look for a golden-brown crust.
Can I make Garlic and Herb Bread ahead of time?
Yes, you can prepare the dough and shape it ahead of time, then refrigerate it and bake when ready for fresh bread.
What should I serve with Garlic and Herb Bread?
This bread pairs wonderfully with soups, salads, or as a side for pasta dishes. It’s also great on its own with dips or spreads.
Now that you’ve mastered the art of making Garlic and Herb Bread, it’s time to roll up your sleeves and try this recipe at home. With its crispy outside and soft, flavorful inside, this bread is sure to impress. Embrace the joy of artisan cooking and indulge in the delightful experience of crafting your very own Garlic and Herb Bread.
Garlic and Herb Delight Bread
Ingredients
Method
- Proof the yeast in warm water for 5-10 minutes until tiny bubbles rise.
- In a bowl, mix flour with salt, then pour in the bloomed yeast and olive oil.
- Knead the dough for 8-10 minutes until it becomes smooth and springy.
- Allow the dough to rise in a lightly oiled bowl until it has doubled in size, approximately 1 hour.
- Flatten the risen dough into a rectangle on a floured board.
- Spread the minced garlic evenly, followed by scattering the herbs and cheese across the dough.
- Gently press the filling into the dough, then roll it tightly from one long edge and slice the roll lengthwise.
- Twist the two halves together to form a loose braid.
- Preheat the oven to 425°F.
- Brush the surface of the twisted dough with olive oil before placing it in the oven.
- Bake for 20-30 minutes, or until the crust is blistered and golden brown.
- Check for doneness by tapping the bottom of the bread; it should sound hollow.