There’s just something magical about biting into a crispy, flavorful chicken wing — especially when you didn’t have to deal with the hassle (and the mess) of deep frying. These Oven-Baked Chicken Wings are a total game-changer. Not only are they super easy to whip up, but they also come out golden and crispy every single time. Perfect for game day gatherings, family dinners, or even just a casual Friday night treat, these wings are going to become a staple in your kitchen.
Honestly, I still remember the first time I tried making baked wings instead of fried. I was skeptical. I mean, could you really get that satisfying crunch without submerging them in hot oil? But once I pulled that tray out of the oven, saw the golden edges, and heard that first crunchy bite — I was completely hooked. And the best part? No oil splatter all over the stove and no lingering fried food smell in the house. Win-win!
What really sets these wings apart is the sweet and smoky spice rub. It brings the perfect balance of flavor — a little bit of heat, a little bit of sweetness, and a whole lot of savory goodness. Plus, you can totally customize the spice level depending on your crowd (more on that in a bit).
Alright, let’s dive into how to make these beauties!
Ingredients You’ll Need:
-
1 pound chicken wing portions
-
1 tablespoon olive oil
-
1 tablespoon brown sugar
-
1 teaspoon garlic powder
-
½ teaspoon onion powder
-
½ teaspoon ground mustard
-
½ teaspoon paprika
-
½ teaspoon salt
-
¼ teaspoon chili powder
-
¼ teaspoon red pepper flakes (optional)
STEP 1: Preheat Your Oven and Prep Your Pan
Start by preheating your oven to 400°F. This high temperature is key to getting those wings nice and crispy without drying them out.
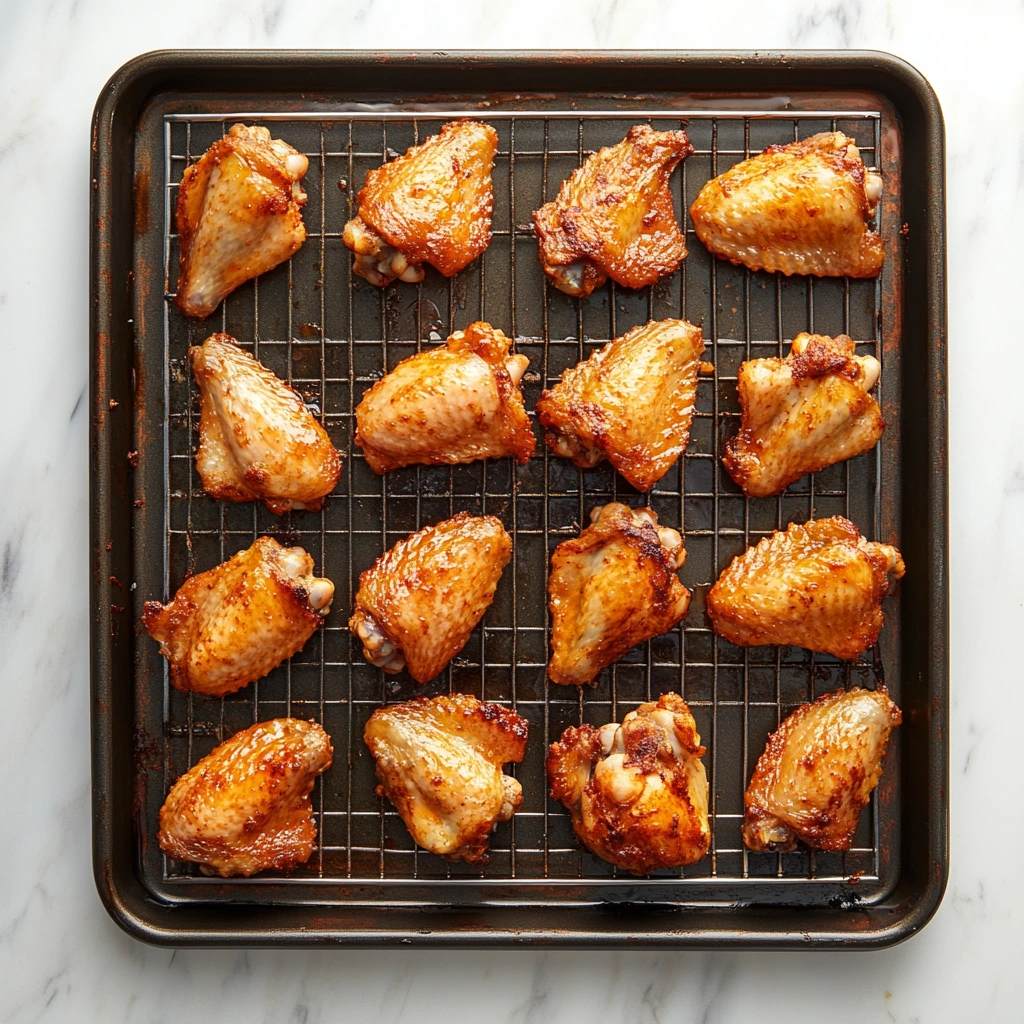
Next, set a wire baking rack over a rimmed sheet pan. I like to line the pan with aluminum foil or parchment paper first — it makes cleanup so much easier. The rack helps air circulate around the wings, ensuring they crisp up evenly on all sides. Trust me, it’s worth the extra step!

STEP 2: Dry Those Wings
Now, don’t skip this part — it’s crucial! Take your chicken wings and pat them dry with plenty of paper towels. Removing as much moisture as possible is what gives you that irresistible, crispy skin once they bake.
If you have a few extra minutes, you can even let the wings sit out at room temperature for 10-15 minutes after drying. It helps them dry out even more, and you’ll notice a difference when they hit the oven.
STEP 3: Coat in Olive Oil
Place the wings in a large bowl and drizzle them with the olive oil. Toss them around so that every wing gets a nice, even coating. The oil helps the seasoning stick and adds to the crispy finish later on.
STEP 4: Mix Up the Spice Rub
In a small bowl, stir together the brown sugar, garlic powder, onion powder, ground mustard, paprika, salt, chili powder, and the optional red pepper flakes. This blend smells amazing — a little sweet, a little smoky, and just a hint of heat. It’s honestly hard not to taste-test it right then and there!
STEP 5: Season the Wings
Sprinkle the spice mixture over the wings and toss everything together until the wings are thoroughly coated. Make sure to get in there and mix well — every nook and cranny of the wings should be covered in that delicious seasoning.
At this point, your kitchen is already going to start smelling pretty incredible… and you haven’t even baked them yet!
How to Bake Crispy Chicken Wings in the Oven
Alright, now that our wings are beautifully seasoned and ready to go, it’s time for the fun part — baking them to crispy perfection! This method is so easy, and the results are truly impressive. You’ll get wings that are golden brown, full of flavor, and have that satisfying crunch you usually only get from deep frying.
Let’s get those wings in the oven and talk about a few little tricks that make a big difference.
STEP 6: Arrange the Wings on the Rack
Take your seasoned chicken wings and lay them out in a single layer on your prepared wire rack. Be sure to place them skin side up — that’s the side you want to get the crispiest.
Make sure the wings aren’t touching each other. Leaving a little bit of space between them helps the hot air circulate all around, giving you that even, crispy finish we’re after.
STEP 7: Bake and Flip
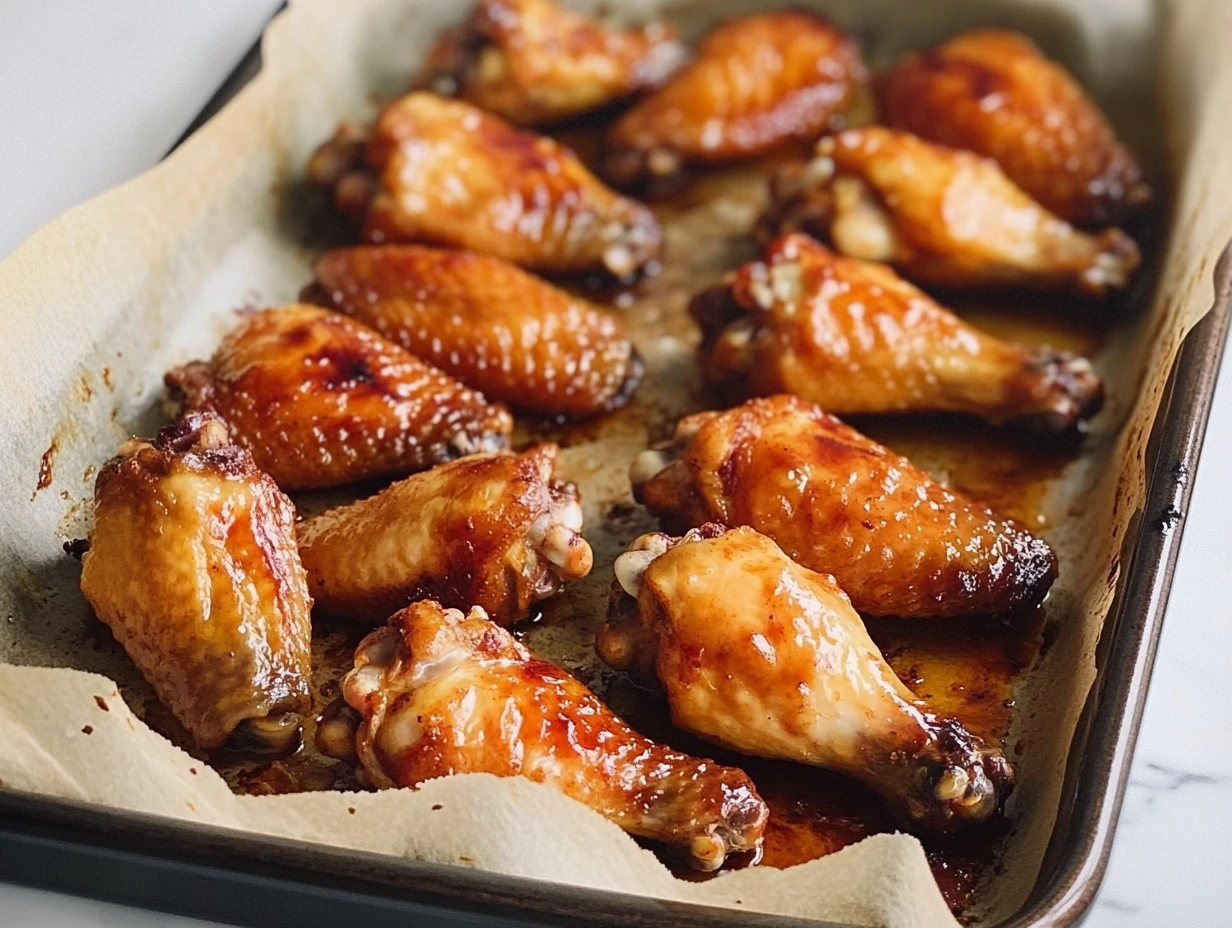
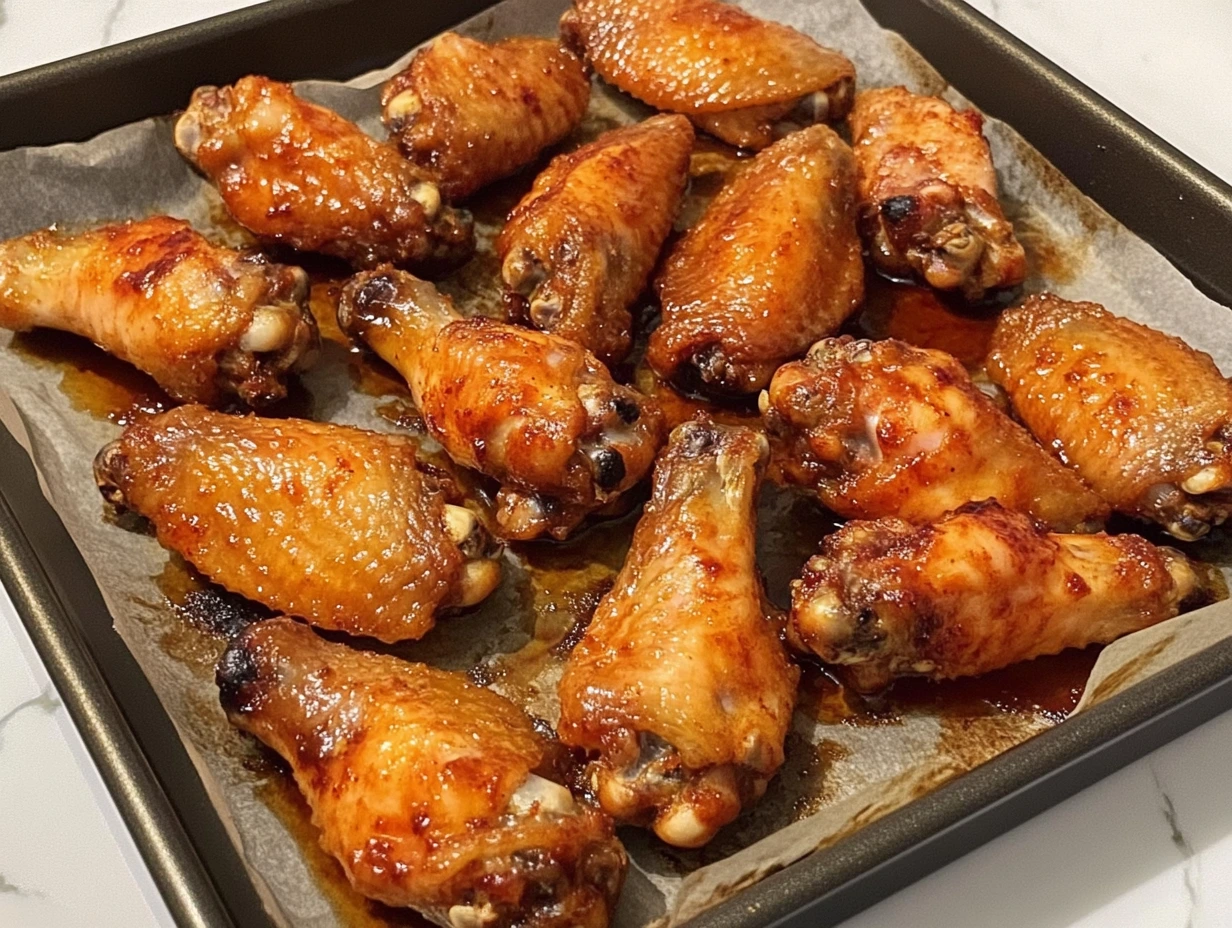
Pop the tray into your preheated 400°F oven and bake the wings for 20 minutes. Your kitchen is going to start smelling absolutely mouthwatering around this point — sweet, smoky, and savory all at once.
After 20 minutes, carefully flip each wing over using tongs. This ensures that both sides get nice and crispy. Return them to the oven and continue baking for another 15 minutes.
By the end of the 35-minute total bake time, your wings should be golden brown, crispy, and fully cooked through. If you have a meat thermometer handy, the internal temperature should reach at least 165°F.
STEP 8: (Optional) Broil for Extra Crispiness
If you like your wings extra crispy (who doesn’t?), you can broil them for the last 2 to 3 minutes. Just switch your oven to broil, move the pan up closer to the top heating element, and watch them closely.
Broiling can take your wings from crispy to burnt in a heartbeat, so don’t walk away! Keep a close eye and pull them out as soon as they reach your desired level of golden-brown deliciousness.
STEP 9: Serve and Enjoy
Serve your hot, crispy wings with your favorite dipping sauce. Ranch dressing and blue cheese are classics for a reason — they cool down the heat and pair perfectly with the smoky flavors of the wings.
Add some carrot and celery sticks on the side if you want to make it feel like you’re at your favorite sports bar. Trust me, these wings will disappear fast!
Tips for Perfect Oven-Baked Chicken Wings
Here are a few extra little tips that make a big difference:
-
Dry, dry, dry: I can’t stress enough how important it is to thoroughly dry the wings before seasoning. Moisture is the enemy of crispiness!
-
Use a wire rack: Baking the wings on a wire rack lets the heat circulate around them, so the bottoms get just as crispy as the tops.
-
Don’t overcrowd the pan: If you’re making a big batch, use two pans. Overcrowding steams the wings instead of baking them.
-
Customize the spice: If you like it spicier, add more chili powder or red pepper flakes. Want it sweeter? Increase the brown sugar a little.
-
Prep ahead: You can dry and season the wings a few hours ahead of time and keep them in the fridge until you’re ready to bake. They’ll be even crispier after chilling!
Oven-Baked Chicken Wings: FAQ and Final Thoughts
You’ve got your wings baking away, your kitchen smells amazing — but maybe you still have a few questions. Don’t worry, I’ve got you covered! Here’s a quick FAQ to help you nail this recipe every single time.
Frequently Asked Questions
Can I use frozen wings for this recipe?
Yes, but make sure they are completely thawed and patted very dry before seasoning and baking. Frozen wings straight from the freezer will release too much moisture and won’t get crispy.
How do I make the wings even crispier?
For extra crispy wings, make sure they are very dry before seasoning, bake them on a wire rack, and broil for the last 2-3 minutes. You can also toss the wings with a teaspoon of baking powder (not baking soda) along with the seasoning to help the skin crisp up even more.
Can I make these wings ahead of time?
You can definitely prep them ahead. Dry and season the wings, then cover and refrigerate for up to 8 hours before baking. When ready to cook, just place them straight from the fridge onto your prepared pan and bake as directed.
What dipping sauces go best with these wings?
Classic ranch dressing and blue cheese dressing are favorites. You can also try buffalo sauce, honey mustard, or even a spicy sriracha mayo if you want to change things up.
How do I store and reheat leftover wings?
Store leftover wings in an airtight container in the fridge for up to 3 days. Reheat them in the oven at 375°F for about 10 minutes to bring back some of the crispiness.
Can I double the recipe?
Absolutely! Just make sure you don’t overcrowd the pan. If needed, bake the wings on two separate pans or in two batches to ensure they stay crispy.
Are these wings spicy?
They have a mild kick thanks to the chili powder and red pepper flakes, but they’re definitely not overly spicy. You can easily adjust the heat by adding more or less chili powder to your taste.
Final Thoughts
There you have it — the ultimate guide to making crispy, flavorful oven-baked chicken wings without the mess of frying. Whether you’re planning a big game day spread, hosting friends for a casual get-together, or just treating yourself to a plate full of deliciousness, these wings are guaranteed to impress.
What I love most about this recipe is how easy it is to customize. Want them a little sweeter? Add a touch more brown sugar. Craving some extra heat? Bump up the chili powder or even drizzle on some hot sauce before serving. You can really make them your own, and they’ll still turn out fantastic.
If you give these Oven-Baked Chicken Wings a try, I’d love to hear how they turned out for you! Leave a comment, share any fun twists you tried, and of course — let me know your favorite dipping sauces. Happy baking!
Print
Oven-Baked Chicken Wings
- Author: Sophia
Description
These Oven-Baked Chicken Wings are crispy, flavorful, and incredibly easy to make without the mess of deep frying. Coated in a sweet and smoky spice rub, they bake up beautifully golden and are perfect for game day, parties, or a simple family dinner. Serve them with your favorite dipping sauce for a crowd-pleasing appetizer or main course.
Ingredients
1 pound chicken wing portions
1 tablespoon olive oil
1 tablespoon brown sugar
1 teaspoon garlic powder
½ teaspoon onion powder
½ teaspoon ground mustard
½ teaspoon paprika
½ teaspoon salt
¼ teaspoon chili powder
¼ teaspoon red pepper flakes (optional)
Instructions
1️⃣ Preheat the oven to 400°F. Place a wire baking rack over a rimmed sheet pan lined with aluminum foil or parchment paper for easy cleanup.
2️⃣ Pat the chicken wings thoroughly dry with paper towels. Removing the excess moisture ensures they get crispy while baking.
3️⃣ In a large bowl, add the chicken wings and drizzle with olive oil. Toss the wings until they are evenly coated.
4️⃣ In a small bowl, combine the brown sugar, garlic powder, onion powder, ground mustard, paprika, salt, chili powder, and red pepper flakes if using. Stir to blend the spices evenly.
5️⃣ Sprinkle the spice mixture over the chicken wings and toss again until the wings are well coated with the seasoning.
6️⃣ Arrange the chicken wings in a single layer on the wire rack, skin side up, making sure they are not touching for maximum crispiness.
7️⃣ Bake the wings for 20 minutes, then flip them over and continue baking for an additional 15 minutes, or until the wings are golden brown, crispy, and cooked through.
8️⃣ Serve the wings hot with ranch dressing or blue cheese dressing for dipping.
Notes
Drying the wings thoroughly before seasoning is key to getting that crispy texture without frying. Adjust the level of spice by adding more or less chili powder and red pepper flakes. For extra crispy wings, broil them for the last 2 to 3 minutes of cooking time, keeping a close eye to prevent burning. These wings are great served with celery sticks, carrot sticks, and your favorite dipping sauces.