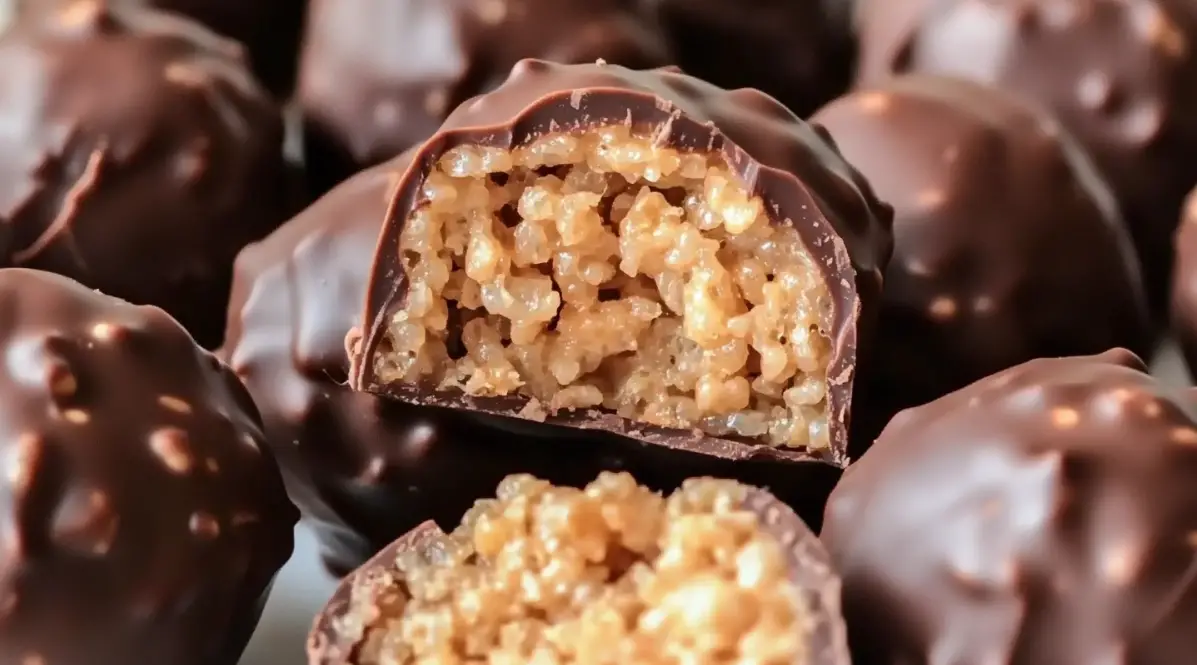
Peanut Butter Balls with Rice Krispies are a delightful, no-bake treat that perfectly balances creamy and crunchy textures. These little bites combine the smoothness of peanut butter with the light, crispy crunch of Rice Krispies cereal, making them an instant favorite for both kids and adults alike. The recipe has gained popularity due to its simplicity, requiring just a few common ingredients that are likely already in your pantry. With minimal prep and no baking involved, these treats can be whipped up in minutes, providing a quick, satisfying snack or dessert.
What makes these peanut butter balls stand out is the harmonious blend of flavors and textures: sweet and salty, creamy and crunchy. Whether you’re craving something quick or looking for a fun, hands-on recipe to make with kids, this recipe is sure to hit the spot. Perfect for any occasion, they’re guaranteed to impress with minimal effort.
Why This Recipe is Perfect for Any Occasion
Peanut Butter Balls with Rice Krispies are ideal for nearly any occasion, whether you’re hosting a holiday gathering, attending a party, or simply in need of a sweet snack fix. Their quick preparation time and easy-to-follow steps make them an excellent choice for beginner bakers or even kids who want to join in the fun. Because these treats are no-bake, they’re perfect for those hot days when turning on the oven isn’t appealing or when you need a dessert in a hurry.
Beyond convenience, their versatility makes them great for gift-giving, potlucks, or special occasions like birthdays and holidays. You can easily customize the recipe with fun coatings and toppings, making them look festive and unique. Whether you’re planning ahead or need a last-minute treat, these peanut butter balls are a crowd-pleasing solution, combining ease and deliciousness in every bite.
Ingredients and Preparation
Ingredients Breakdown
To make Peanut Butter Balls with Rice Krispies, you’ll need a few key ingredients that create the perfect combination of creamy, crunchy, and sweet:
- Peanut Butter (smooth or crunchy): The main ingredient that binds the mixture together. Smooth peanut butter creates a creamy texture, while crunchy peanut butter adds an extra bite.
- Rice Krispies Cereal: The crispy element that adds texture and a satisfying crunch to each bite.
- Powdered Sugar: Used to sweeten the peanut butter mixture and thicken it for easy rolling.
- Butter: Adds richness to the mixture, helping to balance the sweetness and improve the texture.
- Chocolate Chips (or Candy Melts): Melted and used to coat the peanut butter balls, giving them a smooth, sweet outer layer.
Variations:
- Vanilla Extract: Add a teaspoon for extra flavor depth.
- Nut Butter Substitutes: Almond butter or sunflower seed butter are great alternatives for those with peanut allergies.
- Chocolate Coating Variations: Use milk chocolate for sweetness, dark chocolate for a richer taste, or white chocolate for a sweeter, creamier coating. You can even mix and match coatings for a more colorful presentation.
Step-by-Step Instructions
Step 1:
In a large mixing bowl, combine 1 cup of peanut butter, 1/4 cup of melted butter, and 1 1/2 cups of powdered sugar. Stir together until the mixture is smooth and well blended. The result should be thick but not too sticky.
Step 2:
Add 2 cups of Rice Krispies cereal to the mixture. Gently stir until the Rice Krispies are evenly coated in the peanut butter mixture. Make sure every piece of cereal is well-incorporated for maximum crunch.
Step 3:
Using your hands or a small cookie scoop, take portions of the mixture and roll them into bite-sized balls, about 1 inch in diameter. Place the rolled balls onto a baking sheet lined with wax or parchment paper.
Step 4:
Melt 1 1/2 cups of chocolate chips in a microwave-safe bowl or using a double boiler. If using a microwave, heat in 30-second intervals, stirring in between until the chocolate is completely smooth.
Step 5:
Dip each peanut butter ball into the melted chocolate, ensuring it’s fully coated. Use a fork or dipping tool to remove the ball from the chocolate, letting any excess drip off. Place the coated balls back on the wax paper.
Step 6:
Allow the peanut butter balls to cool and harden completely at room temperature, or speed up the process by placing them in the refrigerator. Once the chocolate is set, the treats are ready to enjoy.
Optional:
For added decoration, drizzle with extra melted chocolate or top with sprinkles, sea salt, or chopped nuts before the chocolate hardens.
Tips and Variations
Tips for Perfect Peanut Butter Balls
- Achieving the Right Consistency: If your peanut butter mixture is too sticky, add a little more powdered sugar to thicken it up. If it’s too dry, add a tablespoon of melted butter or peanut butter until it reaches a workable texture.
- Chilling for Easier Rolling: If the mixture is too soft to roll, refrigerate it for 10-15 minutes. This makes the mixture firmer and easier to shape into balls without sticking to your hands.
- Melting Chocolate: To avoid burning your chocolate, melt it in 30-second intervals in the microwave, stirring in between. Alternatively, use a double boiler to melt chocolate slowly over indirect heat.
- Even Chocolate Coating: For a smooth and even chocolate coating, use a fork to dip the peanut butter balls into the melted chocolate, tapping the fork gently on the edge of the bowl to remove excess chocolate. This will help create a smooth, even finish.
Recipe Variations and Add-Ins
- Healthy Version: Replace the powdered sugar with honey or maple syrup, and use natural peanut butter for a less processed treat. You may need to adjust the cereal amount to maintain the right consistency.
- Flavored Variations: Add 2 tablespoons of cocoa powder to the peanut butter mixture for a chocolatey twist, or mix in mini chocolate chips for extra bursts of chocolate in every bite.
- Holiday-Themed Options: For a festive look, use colored candy melts (red, green, or pastels) and decorate with seasonal sprinkles or edible glitter. You can also flavor them with peppermint extract for a holiday touch.
- Texture Twist: Incorporate shredded coconut, chopped nuts, or crushed pretzels into the mixture for added crunch and texture. These variations add exciting new layers of flavor and crunch to the traditional recipe.
Storage and Serving Suggestions
How to Store Peanut Butter Balls
To maintain freshness, store the peanut butter balls in an airtight container. You can keep them in the refrigerator for up to one week. If you’d like to make a large batch, they also freeze well. Place the balls in a single layer on a baking sheet, freeze them until solid, and then transfer them to a freezer-safe container or bag. They will last in the freezer for up to three months.
Tips for Storing:
- If your peanut butter balls are coated in chocolate, it’s best to refrigerate them to avoid melting.
- When storing, layer them between sheets of wax paper to prevent sticking.
Serving Ideas for Different Occasions
Peanut Butter Balls with Rice Krispies are versatile and can be presented in creative ways:
- Dessert Platter: Serve them alongside other no-bake treats like truffles or energy bites for a varied snack board.
- Party Presentation: Arrange them in mini cupcake liners for a neat, bite-sized presentation. You can also serve them on skewers for a fun party twist.
- Gift Ideas: These make excellent gifts during holidays or special occasions. Place them in a decorative tin or glass jar with a ribbon for an elegant, homemade gift.
- Themed Occasions: Decorate them with themed sprinkles or drizzle different colored chocolate to match a specific event, whether it’s a birthday, holiday, or special celebration.
Nutritional Information and Dietary Considerations
Nutritional Information
Each peanut butter ball (depending on size and ingredients) contains approximately:
- Calories: 150-200
- Fat: 10-12g
- Protein: 3-4g
- Sugar: 10-15g
To enjoy these treats mindfully, consider portion control—one or two balls make for a satisfying sweet treat. For those watching sugar or fat intake, reduce the powdered sugar or opt for dark chocolate to decrease the overall sugar content.
Dietary Adaptations
- Gluten-Free Version: Use gluten-free Rice Krispies or another certified gluten-free puffed cereal.
- Vegan Version: Substitute the butter with a plant-based alternative and use dairy-free chocolate chips. Natural nut butters can also be used for a vegan-friendly version.
- Nut-Free Version: Swap out peanut butter with sunflower seed butter or soy nut butter for a nut-free option, ensuring the recipe is safe for those with allergies.
FAQs Section
Can I use natural peanut butter?
Yes, natural peanut butter can be used, but since it tends to be runnier due to oil separation, you may need to refrigerate the mixture before rolling the balls or slightly increase the powdered sugar to firm up the texture.
How can I make these peanut butter balls less sweet?
To reduce sweetness, cut back on the powdered sugar or replace it with a natural sweetener like honey or maple syrup. Keep in mind this may slightly alter the consistency, so adjust accordingly.
Can I make these peanut butter balls ahead of time?
Yes, peanut butter balls can be made ahead of time and stored in the fridge for up to a week. They can also be frozen for up to three months, making them a great make-ahead treat.
How do I keep the chocolate coating smooth and shiny?
To achieve a glossy chocolate finish, temper the chocolate or add a teaspoon of coconut oil when melting. This will give your chocolate a smooth, professional-looking sheen.
Can I add other ingredients to the mixture?
Absolutely! Feel free to incorporate mini chocolate chips, crushed graham crackers, or dried fruit into the peanut butter mixture for additional flavor and texture.

Peanut Butter Balls with Rice Krispies
Description
Peanut Butter Balls with Rice Krispies are an easy, no-bake treat that combines creamy peanut butter, crunchy Rice Krispies, and a smooth chocolate coating. These bite-sized delights are perfect for quick snacks, parties, or gifting, and they require minimal ingredients and time. The blend of textures and flavors—sweet, salty, crunchy, and creamy—makes them an irresistible treat that both kids and adults will love.
Ingredients
- 1 cup creamy peanut butter no-stir
- 3 tbsp salted butter melted
- 1 cup powdered sugar
- 2 1/2 cups Rice Krispies cereal
- 12 oz semi-sweet chocolate chips or chocolate melting wafers
Instructions
-
In a large mixing bowl, blend peanut butter with melted butter until smooth.
-
Gradually fold in Rice Krispies cereal until evenly distributed.
-
Mix in powdered sugar until the mixture becomes thick and cohesive.
-
Line a baking sheet with parchment paper. Portion and roll the mixture into balls, then refrigerate for at least 30 minutes.
-
Melt the chocolate in a microwave-safe bowl in 30-second intervals, stirring in between.
-
Dip each peanut butter ball in the melted chocolate, coat fully, and place back on the parchment-lined sheet. Chill until the chocolate is set.
Notes
- Peanut Butter:
- You can use smooth or crunchy peanut butter depending on your texture preference. If using natural peanut butter (the kind that separates), refrigerate the mixture before rolling to firm it up, as natural peanut butter tends to be runnier.
- Feel free to substitute with other nut butters like almond or cashew, or use sunflower seed butter for a nut-free option.
- Rice Krispies Cereal:
- Rice Krispies add a light crunch to the balls. For a gluten-free version, make sure to use gluten-free puffed rice cereal.
- You can swap in other types of cereal like puffed quinoa or cornflakes if you want to experiment with different textures.
- Powdered Sugar:
- Powdered sugar thickens and sweetens the mixture. If you prefer a less sweet version, reduce the amount of powdered sugar or substitute it with honey or maple syrup. Just be aware that liquid sweeteners may affect the consistency slightly.
- Butter:
- The butter helps make the peanut butter mixture smoother and richer. For a vegan version, you can use plant-based butter. Make sure to melt the butter before mixing it with the other ingredients.
- Chocolate Coating:
- Choose from milk, dark, or white chocolate depending on your flavor preference. You can also use colored candy melts for a festive or themed presentation.
- Add a teaspoon of coconut oil to the chocolate when melting for a smoother, shinier coating. This also helps the chocolate set more evenly.
- Storage:
- Store the peanut butter balls in an airtight container. They will last up to one week in the refrigerator or up to three months in the freezer. When freezing, place them in a single layer on a baking sheet until solid before transferring them to a freezer-safe bag or container.
- If refrigerating or freezing, allow them to come to room temperature for a few minutes before serving for the best texture.
- Customizations:
- Add vanilla extract, shredded coconut, crushed pretzels, or chopped nuts for a fun twist on the classic recipe.
- For holidays, use festive sprinkles, edible glitter, or colorful candy melts to match the occasion.
- Try adding a small amount of sea salt on top of the chocolate before it hardens for a salty-sweet contrast.
- Serving Suggestions:
- Serve these peanut butter balls as part of a dessert platter alongside other no-bake treats or truffles.
- They also make a great homemade gift—package them in a decorative tin or box for friends, family, or coworkers during the holidays or special events.
- At parties, display them in mini cupcake liners for easy, mess-free serving.


